.avif)

You've chosen the cabinet door style, approved the island proportions, and started imagining the finished room. Then the refrigerator specification arrives, and the opening you drew isn't deep enough. The dishwasher panel needs a different hinge arrangement. The wall oven requires a rough-in your electrical plan never allowed for.
That sequence is common, but it puts the most consequential decisions in the wrong order. Kitchen appliance integration should organize the remodel from the beginning, shaping cabinetry, circulation, utilities, ventilation, and service access before the first cabinet line is drawn. For homeowners in Washington, DC, Maryland, and Virginia, that early coordination is what separates a kitchen that merely looks composed from one that feels effortless every day.
Table of Contents
Why Appliances Should Lead the Design
A homeowner once selected cabinetry around a 33-inch refrigerator opening, then spent months trying to find a refrigerator that fit it. The opening had been framed before anyone confirmed the appliance's actual dimensions, hinge requirements, or ventilation path. The eventual solution involved compromises in storage and trim, plus work that could have been avoided with an appliance schedule prepared at the start.
That's why the appliance list comes before the cabinet elevations. Integrated refrigerators, wall ovens, induction surfaces, dishwashers, beverage centers, and ventilation systems each impose requirements that furniture alone can't solve. The category itself has moved well beyond a niche design preference. An industry forecast projects the global integrated kitchen appliances market will grow from USD 15.2 billion in 2025 to USD 30.6 billion by 2034, at an 8.1% compound annual growth rate, according to the integrated kitchen appliances market forecast.
Lock the technical decisions first
Start by identifying each appliance and obtaining its current manufacturer cut sheet. Then confirm:
- Dimensions: Record the actual width, depth, height, and required opening, not just the nominal label such as “30-inch.”
- Ventilation: Note rear gaps, top slots, toe-kick airflow, and duct requirements.
- Utilities: Mark electrical circuits, gas lines, water supplies, drains, and shutoffs.
- Access: Preserve a practical route for delivery, installation, adjustment, and repair.
- Movement: Check door swings, handle projection, drawer removal, and adjacent clearances.
A wall oven needs an exact rough-in opening and a correctly placed junction box. A downdraft system needs a duct route that may compete with drawers, joists, or structural members. A panel-ready dishwasher requires coordinated door thickness, toe-kick treatment, and hinge clearance. These details belong in the architectural and cabinet drawings, not in the installer's notebook after the room is finished.
Practical rule: If an appliance affects a wall, cabinet module, duct, circuit, or water line, select and document it before finalizing cabinetry.
The history of built-in appliances reinforces this shift. Built-in units emerged in the 1950s, became more common as modular kitchens spread in the 1960s and 1970s, and reached a notable milestone when Siemens introduced its first built-in kitchen appliances in 1986, describing the move as one that gave design a larger role alongside function. Industry history also observes that the kitchen's move into living spaces over the last 15 years encouraged appliances to become “as hidden and invisible as possible,” as described in the evolution of built-in appliances.
For layout fundamentals, homeowners can also use this guide to planning a kitchen layout. And if a double oven is part of the wish list, kitchen renovation double oven tips offer a useful supplement to the broader planning conversation.
Defining How You Actually Cook and Live
Before visiting a showroom, conduct an honest household audit. Don't begin with a brand list or a photograph saved from a magazine. Begin with the way the kitchen behaves on an ordinary Tuesday, then compare that with how it behaves when guests arrive.

Ask about the meals, not the fantasy
How many meals do you really cook at home each week? Which pans do you reach for without thinking? A household that uses a gas wok, cast iron, or several sauté pans daily may value a broad rangetop and generous landing space. A household that reheats prepared meals may get more practical value from a combi-steam oven, microwave drawer, or carefully organized refrigerator than from a large professional range.
Baking deserves its own question. If bread, pastry, or holiday roasting is central to your routine, oven configuration and rack positions matter. If baking happens occasionally, dedicating a tall cabinet stack to multiple ovens may consume space better used for pantry storage or a beverage station.
Let entertaining patterns guide the schedule
Think about the people who use the room and how they move through it.
- Household cooks: Decide whether one person cooks at a time or whether two people need separate prep and cooking zones.
- Grocery habits: Frequent fresh-food shopping creates different refrigeration priorities than bulk shopping or long gaps between trips.
- Hosting style: Large dinners may justify extra oven capacity, while casual gatherings may favor an accessible beverage refrigerator or secondary ice and water point.
- Morning traffic: If several people make breakfast at once, place the refrigerator, coffee system, toaster, and microwave so they don't collide with the primary cooking zone.
An appliance schedule should reflect those answers. The goal isn't to assemble the most impressive package. It's to assign every appliance a job that supports the household's actual rhythm.
For a deeper lifestyle-focused framework, this kitchen design guide for creating a space that works for you is a helpful companion. A good designer will listen for the small details, such as whether someone unloads groceries through the garage, whether children help themselves to snacks, and whether the cook prefers visual control of the room or a dedicated work area away from conversation.
Measuring, Scheduling, and Sizing Appliances
The appliance schedule is the master document that keeps design intent and construction reality aligned. It should list every appliance, its model, dimensions, finish, electrical requirements, ventilation clearances, plumbing notes, rough-in location, delivery status, and service requirements.
Build the schedule before the cabinet drawings
Use the exact manufacturer cut sheets, not a dealer's abbreviated product page. Confirm that the selected model is still current, then check the opening dimensions against the proposed cabinet modules. Common built-in widths include 600 mm, 450 mm, and 900 mm, while typical reference dimensions include a dishwasher carcass around 600 mm × 820 to 870 mm × 570 mm and refrigerator carcasses around 600 mm × 1770, 1880, or 1968 mm × 570 mm, as outlined in integrated appliance installation guidance.
Those figures are planning benchmarks, not permission to skip the cut sheet. A particular refrigerator may require a 50 mm rear gap or a top ventilation slot of approximately 200 mm², and the manufacturer's instructions control the installation.
| Field | Example Entry |
|---|---|
| Appliance | Integrated refrigerator |
| Manufacturer and model | Exact selected model |
| Cabinet opening | Manufacturer-required width, height, and depth |
| Front treatment | Cabinet panel, stainless front, or custom finish |
| Electrical | Supply type, circuit, outlet or connection position |
| Plumbing | Water supply, drain, filter, or no plumbing |
| Ventilation | Rear gap, top slot, toe-kick or side airflow |
| Door swing | Hinge side, opening angle, handle projection |
| Service access | Removable toe kick, panel removal, front access |
| Delivery condition | Ordered, received, inspected, or pending |
Check the dimensions people overlook
Nominal size can hide conflicts. Confirm the weight allowance for an integrated dishwasher panel, the ventilation gap around a column refrigerator, the stacking height of wall ovens, and the clearance between a microwave drawer pull and an adjacent cabinet. A refrigerator can fit its opening and still fail if the door can't open far enough to remove drawers or if the handle strikes a wall.
Several built-in refrigerator guides specify side tolerances as tight as 1/8 inch to 1/4 inch, with 1 inch above and approximately 1 to 2 inches behind for ventilation and service access, according to built-in refrigerator installation requirements. Another installation guide notes that a 130-degree door swing is designed to allow drawer removal, while limiting the swing to 90 degrees can require as much as 4 inches of minimum clearance, as explained in this refrigerator door-swing guidance.
Cross-reference the finished schedule against architectural drawings before walls close. That's when a plumber can shift a drain, an electrician can move a junction box, and the contractor can reserve a duct path without dismantling completed work. EN 1116:2018 specifically addresses coordinating dimensions for kitchen units, worktops, decorative panels, and appliances, including the free space required for integration, as summarized in this overview of built-in refrigerator dimensions.
Panel-Ready Cabinetry and Aesthetic Choices
Panel-ready appliances give a kitchen a quiet, furniture-like appearance, but the front is only one part of the decision. Behind that panel are hinges, ventilation paths, service points, and a usable interior volume that may differ from a visible-front appliance.
The market reflects that tension. Visible-front standard built-ins represented 45.92% of the residential built-in appliance market in 2025, while fully integrated and panel-ready formats are projected to grow at a 7.25% CAGR, according to the market discussion of integrated appliance formats. The same source identifies retrofit and remodel projects as 59.71% of demand in 2025, which matters because many homeowners are fitting integration into existing footprints rather than starting with an empty room.
Compare the practical trade-offs
| Consider Factor | Panel-Ready | Built-In Stainless |
|---|---|---|
| Visual effect | Cabinetry continues across the appliance front | Appliance remains a deliberate visual element |
| Door and hinge design | Requires coordinated panel weight, thickness, and swing | Factory front and hardware are already matched |
| Ventilation | Airflow must remain open behind or below the panel treatment | Manufacturer's finished housing usually makes airflow easier to read |
| Handles | Must coordinate with cabinet hardware and projection | Factory handle is supplied and tested with the appliance |
| Service access | May require panel, toe-kick, or adjacent trim removal | Access is often more apparent, though still model-specific |
| Interior capacity | Cabinet structure and insulation can reduce usable space | Visible-front construction may offer a more straightforward interior |
| Replacement | A different footprint can require a new panel or cabinet adjustment | Finish changes are visible, but custom panel rebuilding is avoided |
Refrigeration exposes the issue most clearly. A tight flush fit may require only the small side tolerances described above, but the cabinetmaker still has to coordinate door swing, handle depth, wall conditions, and drawer removal. A dishwasher needs a toe kick that looks continuous while allowing the airflow and hinge movement the appliance requires.
Treat the cabinet panel as a crafted component
Custom panels are not generic rectangles. The designer and cabinetmaker must coordinate species, finish, grain direction, reveal gaps, edge treatment, and panel weight. A wide or heavy panel may warp, interfere with the hinge, or change the way the door feels in use. Solid wood placed where the appliance expects a stable panel can also create performance and alignment concerns if the material is not properly engineered.
Replacement planning deserves an honest conversation. If the appliance is discontinued or a different model becomes necessary later, the original panel may not transfer. That can trigger a rebuild cycle involving new drilling, altered reveals, or a replacement front.
Panel-ready is often the right choice when the kitchen opens directly to living areas and cabinetry continuity matters. Stainless can be the wiser choice when service simplicity, visible controls, quick replacement, or maximum interior practicality matters more than concealment.
Ventilation, Electrical, Plumbing, and Smart Systems
The finished cabinet front hides the mechanical work, but it doesn't make that work less important. Heat, load, water, drainage, and airflow must be coordinated by the general contractor, electrician, plumber, ventilation specialist, and appliance vendor before the backs of cabinets are closed.
Design the utility backbone
Ventilation begins with the cooking appliance and the duct route. A downdraft system may require a short, carefully planned path that competes with drawers or structural framing. An island hood needs a route through the ceiling or soffit, and its airflow must match the cooktop and the room's makeup-air requirements. If a ventilation design exceeds 400 CFM, makeup air becomes a code and comfort issue that should be addressed with the mechanical contractor rather than left to the final inspection.
Electrical planning also starts with connected load. Common reference values include integrated single ovens at 2.5 to 3.5 kW on a 13A spur, double ovens at approximately 6 kW on a 32A cooker circuit, microwaves around 1.5 kW, and dishwashers around 2.1 kW on a separate 13A spur. Integrated refrigerators may draw only 100 to 150 W, but they still need appropriate supply, ventilation, and access, as detailed in published appliance installation guidance.
These figures must be checked against local code and the selected model. The electrician should total connected loads, verify available capacity, assign circuits where the load warrants it, and position junction boxes so the appliance can be serviced without demolition. Receptacles hidden behind fastened-in-place appliances or appliance garages may not count as required accessible countertop outlets, according to this code-focused outlet planning discussion.
Coordinate water and connected technology
Plumbing rough-ins may serve a pot filler, filtered water dispenser, steam oven, plumbed coffee system, dishwasher, or refrigerator. Each needs a defined supply, drain, shutoff, and service route. Keep connections accessible after installation, and don't assume a cabinet void automatically provides enough room for hoses and bends.
Connected appliances require decisions before cabinet backs close. Confirm whether the chosen system uses Matter or Thread, whether switch boxes need a neutral wire, and whether metal appliance fronts or dense cabinetry create Wi-Fi dead zones. Smart functions can be useful, but interoperability should be verified at specification rather than assumed from a showroom display.
A ventilation contractor can help determine whether a hidden hood, downdraft, or ceiling system is appropriate. For homeowners weighing that decision, when to call a pro for fan installation provides practical context.
Coordination checklist
- GC: Confirm framing, delivery paths, cabinet sequencing, and access panels.
- Electrician: Verify circuits, junction boxes, outlet accessibility, and load capacity.
- Plumber: Set water, drain, filter, and steam connections to the final schedule.
- Ventilation specialist: Confirm duct size, route, discharge, and makeup air.
- Appliance vendor: Recheck current cut sheets, installation guides, and service clearances.
Timeline, Budgeting, and the Showroom Experience
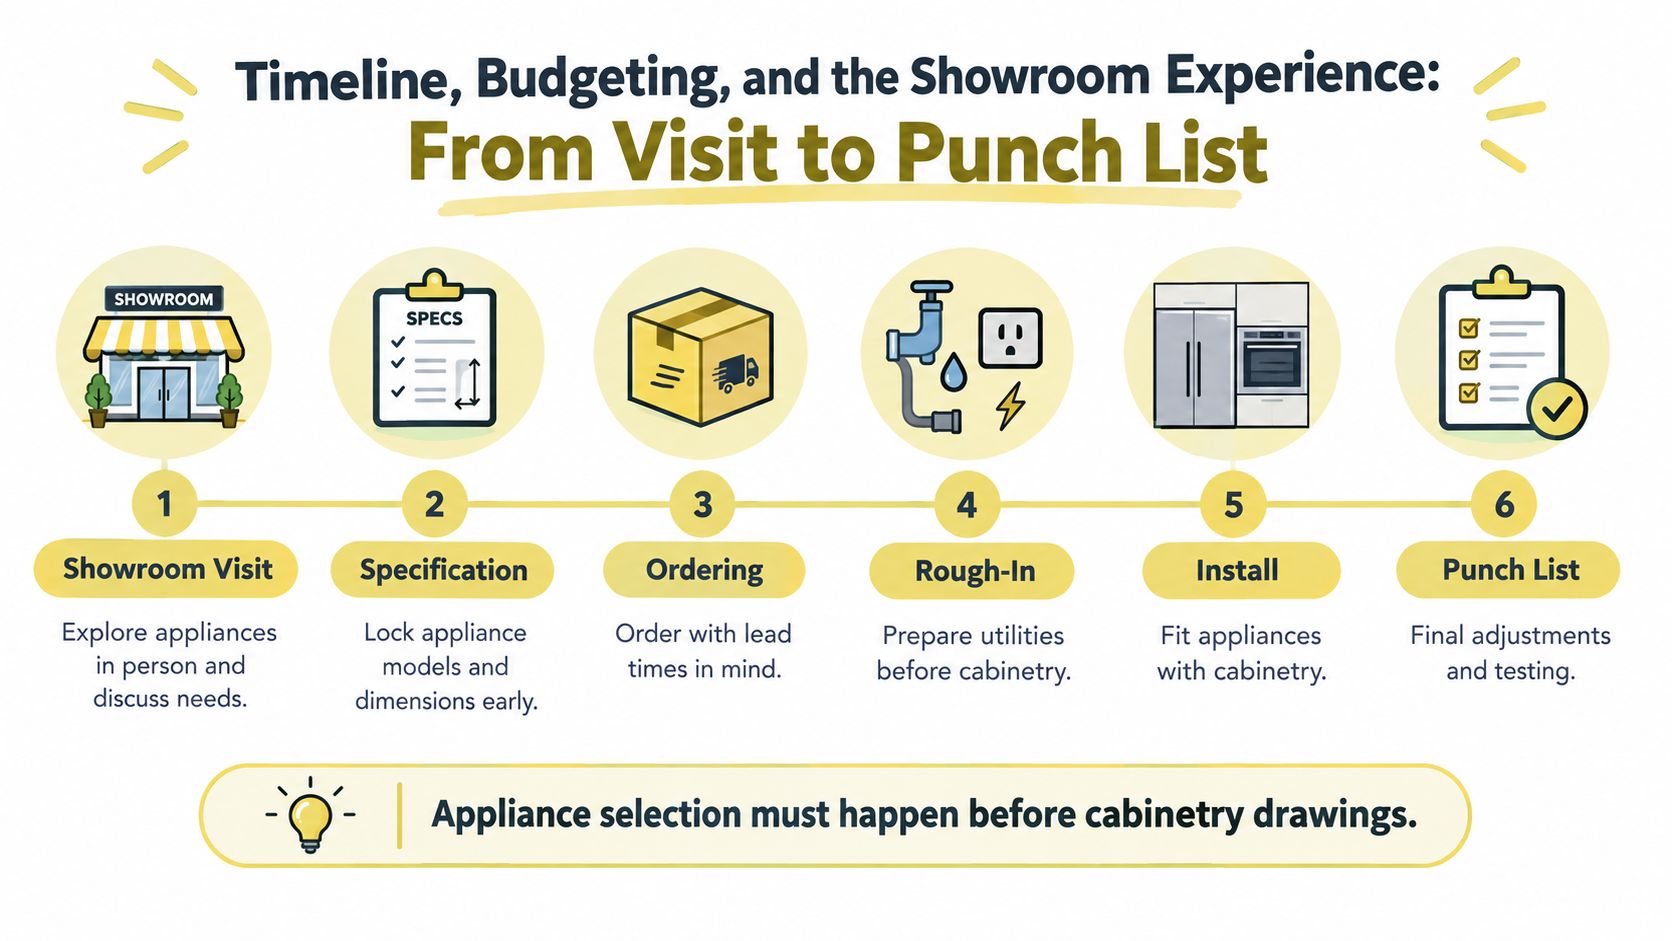
A well-coordinated remodel has a recognizable rhythm. The first showroom visit is for discovery, not commitment. Homeowners test controls, handle heights, door weight, rack positions, refrigerator access, and the physical relationship between an appliance and the person using it.
The next phase locks the models and dimensions. Only then should the designer complete cabinet elevations and utility drawings. Premium appliance lines can carry lead times of 12 to 20 weeks, so the order window needs to be coordinated with construction rather than treated as a purchasing detail.
Follow the decisions through the project
A typical sequence looks like this:
- Showroom visit: Define cooking habits and handle working displays.
- Specification: Confirm models, dimensions, finishes, cut sheets, and utilities.
- Ordering: Reserve appliances with delivery and storage conditions in mind.
- Rough-in: Complete electrical, plumbing, gas, ducting, and framing before cabinetry.
- Installation: Fit the appliances with panels, fillers, toe kicks, and hardware.
- Punch list: Test doors, drawers, controls, water, ventilation, and service access.
The budget compounds at each stage. A panel-ready refrigerator may require custom panels and more exact cabinetry. A concealed hood may require more involved ductwork. Induction, double ovens, and steam equipment can require electrical upgrades. None of these costs should be evaluated in isolation because each one can affect another trade.
Bring cabinet elevation sketches and rough room dimensions to the showroom. Test the handle ergonomics on actual displays, confirm control locations in person, and ask the manufacturer's representative to verify service-clearance numbers rather than relying only on a dealer's summary.
For broader project budgeting context, homeowners can review this NorCal Construction remodel insight, then ask their local design-build team to translate the principles into Washington, DC, Maryland, or Virginia conditions.
A short video can also help clarify the visual relationship between appliances and cabinetry. Watch it after reviewing the sequence above, so the design choices remain connected to the construction process.
Common Pitfalls and Final Design Consultation Tips
Most integration failures begin before installation. A homeowner signs off on cabinet drawings, then selects appliances that need a different opening, a larger circuit, a new duct route, or a different panel attachment. The installer is then asked to solve a design problem with trim, fillers, or field modifications.
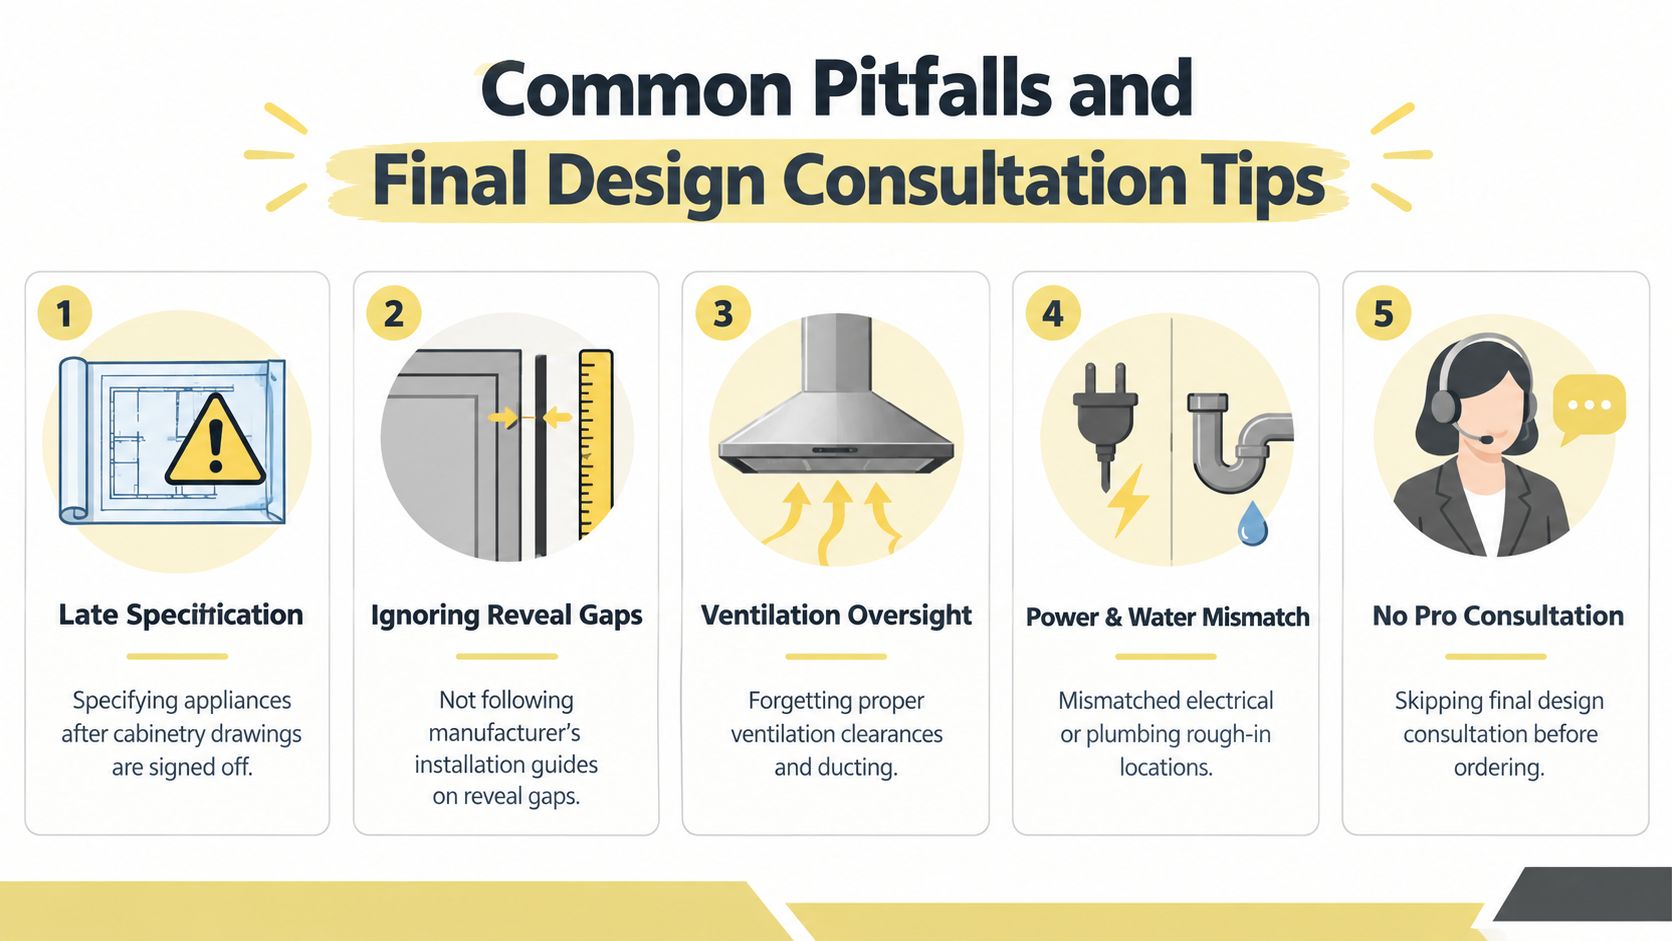
Watch for the recurring errors
- Late specification: Appliances are selected after cabinetry drawings are signed, forcing changes to openings and adjacent storage.
- Ignored reveal gaps: Manufacturer installation guides are treated as optional, even when a tight reveal affects cooling, hinges, or door alignment.
- Missed ventilation: Downdraft or island hood ducting is left until framing is complete, when the available route is limited.
- Power and water mismatch: Electrical circuits, junction boxes, drains, or shutoffs don't align with the final appliance schedule.
- Assumed smart compatibility: Connected appliances are expected to work together without checking ecosystems, network coverage, or wiring requirements.
Bring useful documents to the first meeting
A productive consultation starts with information. Bring dimensional drawings, electrical plans, inspiration images, and a list of the meals and events the kitchen needs to support. Ask for complete cut sheets and specification packets, not just product brochures.
The designer should coordinate appliance delivery with cabinet installation, confirm panel-ready handle compatibility early, and verify that ventilation capacity matches the selected cooking surface. Before drywall closes, schedule a walkthrough that checks every clearance, junction box, water shutoff, duct route, and access panel.
Before ordering, ask: Which appliances are fixed in the schedule? Where will each utility terminate? How will every unit be serviced? Which panels, handles, and reveals must the cabinetmaker coordinate? What happens if a selected model is delayed or replaced?
That framework keeps kitchen appliance integration grounded in the whole room. The best result isn't the kitchen with the fewest visible appliances. It's the kitchen where the refrigerator opens fully, the oven vents correctly, the dishwasher panel aligns, the cook has room to work, and every concealed system remains reachable when it needs attention.
Jennifer Gilmer Kitchen & Bath develops kitchen remodels from concept through installation, coordinating cabinetry, appliances, utilities, and detailed space planning for homeowners throughout Washington, DC, Maryland, and Virginia. Visit Jennifer Gilmer Kitchen & Bath to discuss your appliance schedule and begin a design consultation shaped around how your household cooks and lives.