
You're standing in a showroom with three samples that all look right in your hand. One is polished and quiet, one has the handmade variation you loved in a photograph, and one is a small mosaic you hadn't considered until someone mentioned the shower drain. At home, the existing bathroom tells a clearer story. Water pools near the tub, steam reaches the vanity mirror, and the powder room floor barely gets wet at all. Learning how to choose bathroom tile starts with those differences, not with color. When you judge each surface by how it gets wet, how it's walked on, and how it'll be cleaned, the pretty sample and the practical one are often the same tile, just specified correctly.
Table of Contents
Map Each Zone of the Bathroom Before You Shop
The shower floor and the powder room floor may sit ten feet apart, but they live in different conditions. One sees standing water, soap, and bare feet every morning, while the other sees a guest's dry shoes twice a month. Each zone deserves its own specification, so start with this quick reference, then walk your own room zone by zone.
| Zone | Water exposure | What to look for | Format note |
|---|---|---|---|
| Shower floor | Standing water, soap, bare feet | Porcelain at 0.5% absorption or less; wet DCOF of 0.42 or higher | Small mosaic that follows the drain slope |
| Shower walls | Direct spray every day | Porcelain or other low-absorption tile | Large format works if the wall is flat |
| Tub surround | Splashing and frequent cleaning | Low absorption; gloss is acceptable on walls | Rectangular or large format with tight joints |
| Bathroom floor outside the shower | Splashes at toilet and vanity, wet feet | Wet DCOF of 0.42 or higher; matte or textured finish | Medium format with a finish that is easy to keep clean |
| Vanity wall and backsplash | Splashes and steam | Any wall-rated tile with a documented finish | Size chosen for the view from the doorway |
| Powder room floor | Light, occasional moisture | Floor-rated tile; wet DCOF still matters | Pattern can carry more personality |
Where the Rules Tighten and Where They Loosen
The shower floor is the strictest zone because standing water, soap residue, and bare feet arrive together. Traction, drainage, and low absorption all have to work at once, and there's no bath mat to intervene. Shower walls face daily spray but no foot traffic, so finish and gloss have more freedom there.
At the other end, the vanity backsplash and the powder room floor are the most forgiving surfaces in the house. A bolder pattern, a handmade texture, or a more personal color can go on those surfaces without asking the tile to do heavy safety work.
Wall format is a maintenance decision as much as a style one. Rectangular and large-format tiles put fewer grout lines on the wall, and grout is where a shower shows its age first. Every joint you eliminate is one less seam to scrub and one less edge where sealant can fail. A small mosaic across a full shower wall can look striking, but it multiplies the grout you'll maintain for the life of the room, so weigh the look against the upkeep before you commit.
Before you shop, list your own zones on paper and mark each one dry, splashed, or daily spray. That simple map keeps every later decision, from slip ratings to grout, tied to a specific place in the room.
How to Check Floor Tile for Slip Resistance
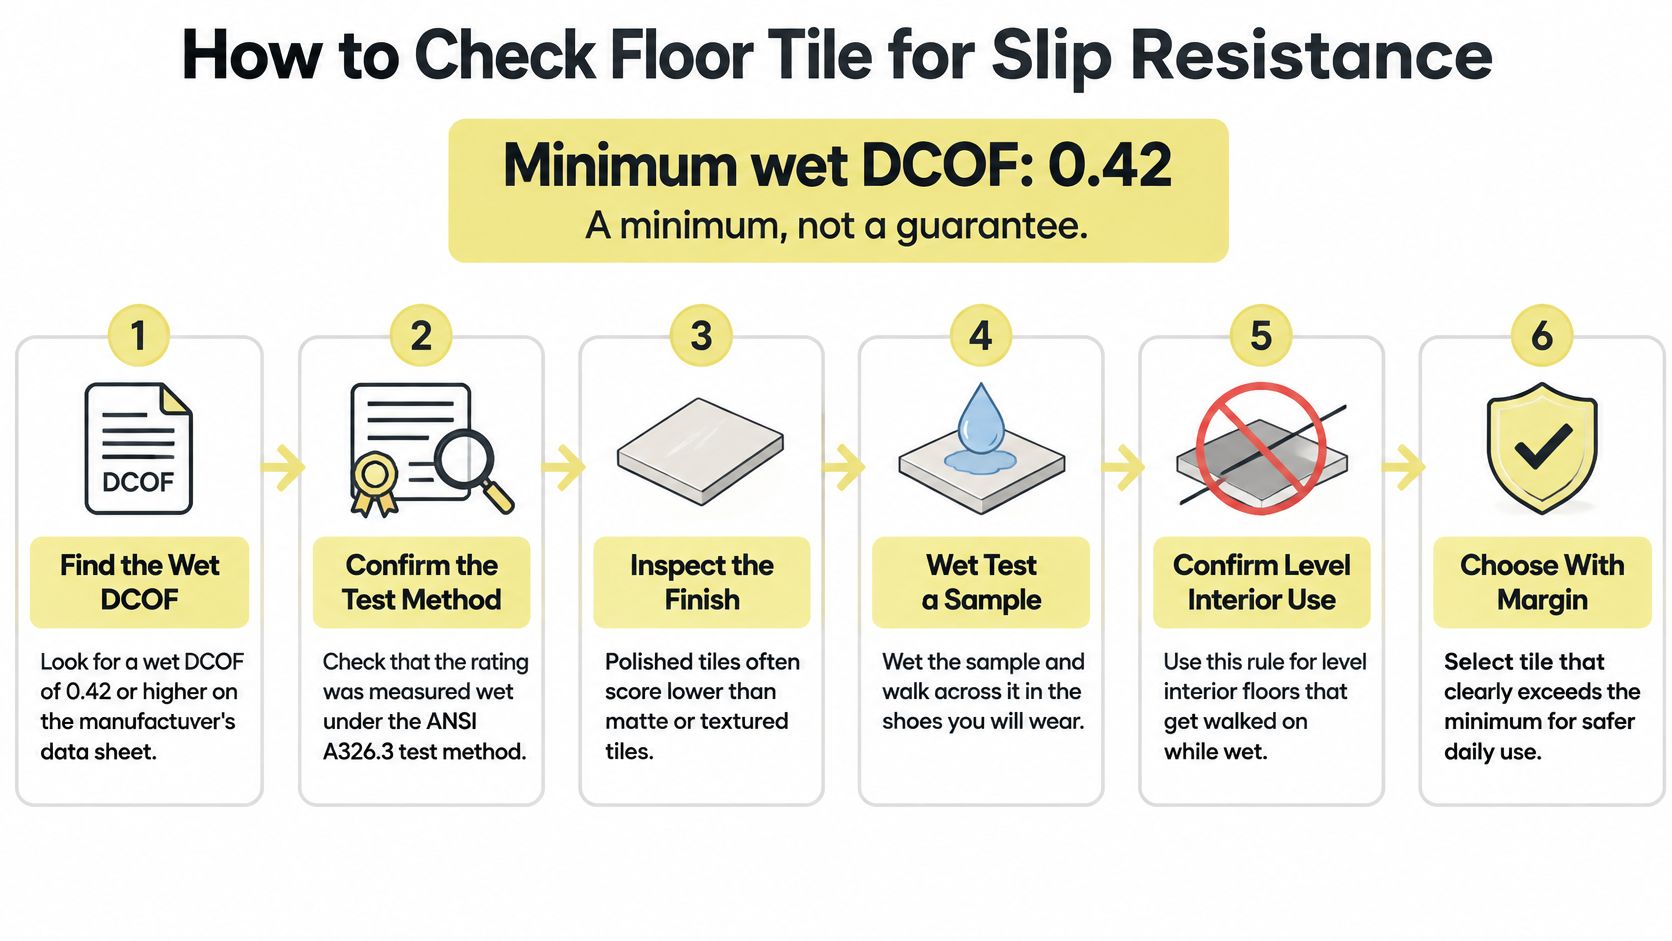
A level interior floor that'll be walked on while wet needs a wet Dynamic Coefficient of Friction, or wet DCOF, of at least 0.42, and that number is a minimum, not a guarantee. The TCNA guidance on the ANSI A137.1 DCOF threshold sets that benchmark using the DCOF AcuTest method, and later ANSI A326.3 guidance classifies flooring by intended conditions, including interior wet use. The infographic below lays out the checking sequence at a glance.
Reading the Product Sheet in Order
- Separate floor and wall specifications. A wall tile chosen for a floor by accident is one of the most common and most avoidable errors.
- Find the wet DCOF value. Look for a number on the manufacturer's technical sheet, not the words slip-resistant, which on their own tell you nothing measurable.
- Confirm the intended-use classification. It should say floor, and ideally interior wet floor, not wall only.
- Favor matte, honed, or textured finishes. A polished tile with a lower value is intended for areas that stay dry when walked on, which makes it a poor default for an unprotected bathroom floor.
- Match the value to your exact selection. The rating should apply to the specific color and finish you're buying, not just the product family.
- Plan the cleaning routine. Standing water, soil, and soap film lower real grip even on a tile that meets the test threshold, so maintenance is part of the specification.
The short video below walks through how these ratings translate to an actual floor underfoot.
A bath mat keeps portions of a residential bathroom dry, but it should supplement appropriate tile selection near tubs, showers, and sinks, never replace it.
Choose the tile as if the mat weren't there. That's the honest test.
Water Absorption and Porcelain Versus Ceramic
Water absorption is a measured number, not a label, and the name on the box matters less than the test result behind it. Standards such as ASTM C373 and ANSI A137.1 use defined methods, including vacuum and boil testing, to sort tile into classes. The ANSI overview of the porcelain definition confirms that porcelain under ANSI A137.1:2022 is ceramic tile with water absorption of 0.5% or less, reflecting a dense, impervious body.
| Classification | Water absorption | Bathroom use |
|---|---|---|
| Porcelain (impervious) | 0.5% or less | Shower walls, shower floors and wet floors |
| Vitreous | Above 0.5% up to 3% | Dry interior walls and lightly used floors; less moisture margin |
| Semi-vitreous | Above 3% up to 7% | Dry interior walls only |
| Nonvitreous (standard ceramic) | Above 7% | Dry decorative walls only |
What the Classes Mean in a Real Room
Porcelain is the sensible default for shower walls, bathroom floors, and other surfaces exposed to frequent moisture. It can also carry the visual character of stone or handmade tile while offering a more consistent response to water. Vitreous tile can work in drier interior spots, but it gives you less margin where splashing is constant. The two more absorbent classes belong on dry walls, where their decorative range is an asset rather than a risk.
The Waterproofing Myth
Don't assume a dense, glossy, or heavy tile is waterproof. Water can still reach the substrate through grout joints, movement cracks, perimeter gaps, or failed shower waterproofing, so the tile is only one part of a moisture-control system that includes the substrate, membrane, drainage, and movement joints. Even porcelain still needs its surface selected for wet-floor performance, as covered in the slip section above.
Request the absorption result from the data sheet and ask the supplier to confirm the product's approved installation conditions, floor, wall, or shower, in writing. That one habit prevents most mismatches.
Sizes and Formats That Suit Showers and Floors
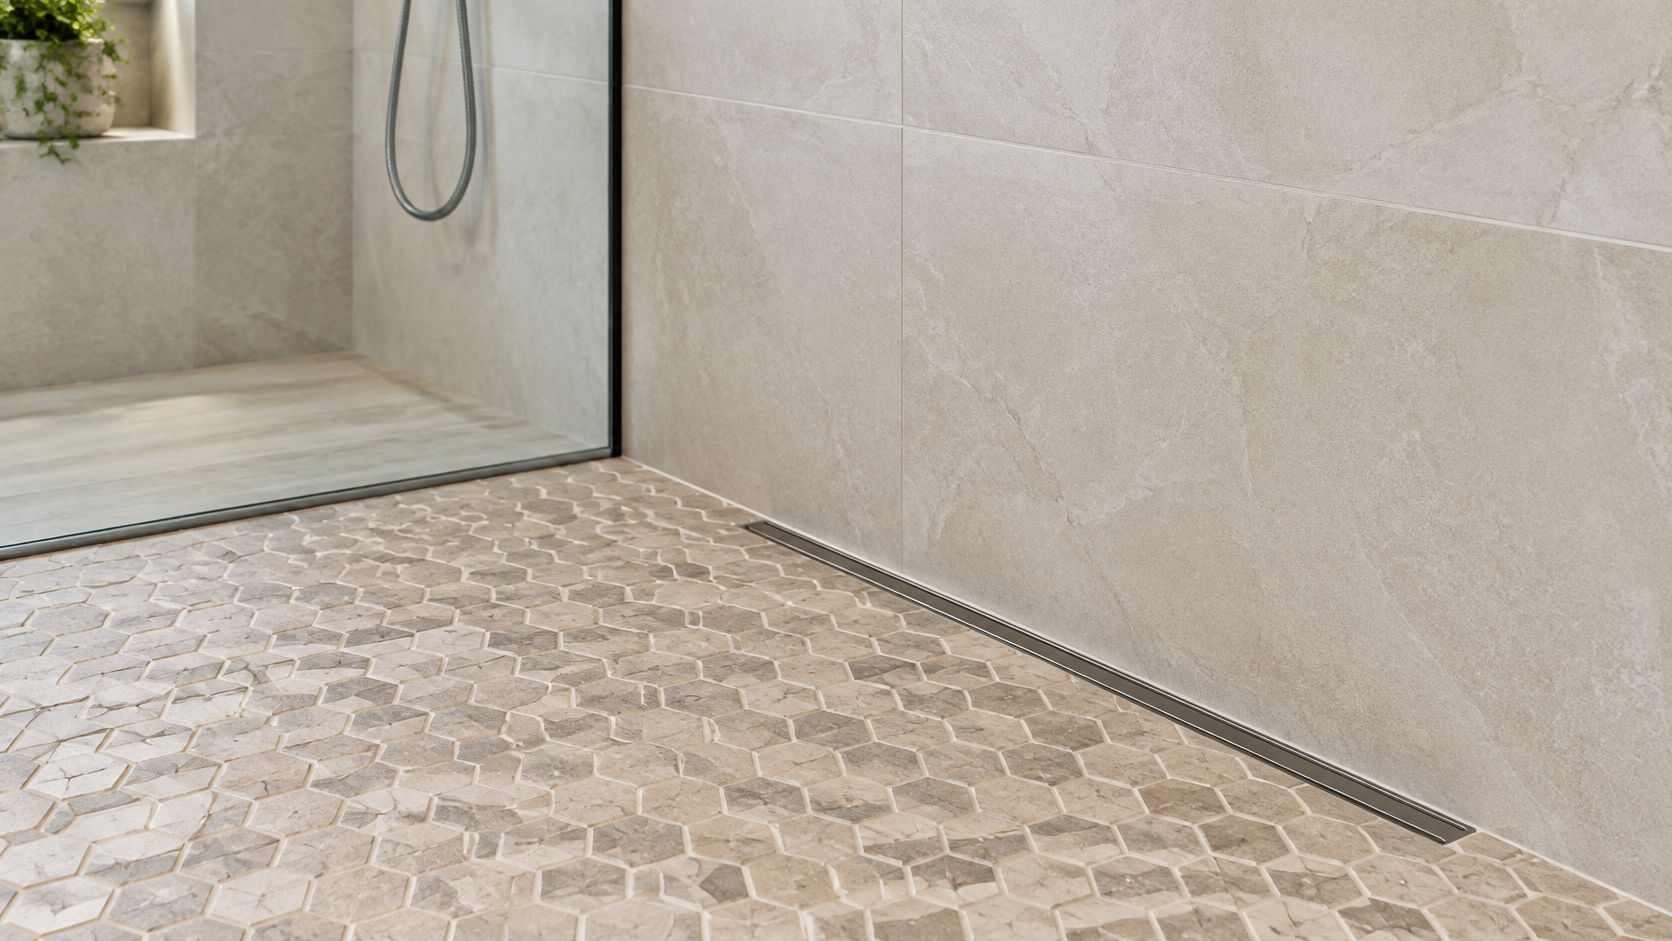
The rule of thumb is simple. Larger modules on relatively flat walls and floors reduce grout-joint length and visual noise, while small pieces suit shower floors that must follow a slope to the drain. The photograph below shows that pairing, a small mosaic underfoot against calmer large-format walls.
Why the Shower Floor Goes Small
Small-format mosaics, often around 2 inches or smaller, can follow the multiple planes created by the slope toward a drain, and their numerous grout joints add texture underfoot in a wet setting. Common formats include squares, hexagons, and penny rounds mounted on mesh sheets, as described in guidance on mosaic formats for shower floors. Small size alone doesn't establish slip resistance, though. You still check the published wet DCOF, and you plan the shower's overall geometry early, something our guide to primary bathroom shower dimensions covers in practical detail.
For large-format walls, confirm these points before buying:
- Actual dimensions and thickness. Nominal sizes and real sizes aren't always the same.
- Warpage tolerance and shade variation. Both affect how flat and even the finished wall reads.
- Trim availability. Finished edges at niches and returns need matching pieces.
- Approved locations. Not every large tile is cleared for shower interiors.
Order enough material from one production lot to cover the project plus a documented waste allowance. Irregular rooms, diagonal layouts, niches, and pattern matching all increase cuts. Then ask for a dry layout that centers the field and avoids narrow slivers at corners, doors, and plumbing penetrations. For example, on a 60-inch shower wall with a 12-inch tile, a layout ending in a 3-inch sliver can usually be shifted by half a tile so both edges land in balanced, deliberate cuts.
Grout and Sealant Choices That Protect the Tile
Grout belongs in the tile decision from the start, alongside slip resistance and porosity. It affects how the room cleans, how it ages, and whether water finds its way where it shouldn't. One point deserves emphasis first: grout is not a waterproofing membrane.
| Option | Standard or type | Water behavior | Best use |
|---|---|---|---|
| Sanded cement grout | ANSI A118.6 | Absorbs water; the amount varies with formulation and curing | Joints 1/8 inch and wider on floors and walls |
| Unsanded cement grout | ANSI A118.6 | Similar absorption to sanded cement | Joints narrower than 1/8 inch, where sand would not fill the joint |
| Epoxy grout | ANSI A118.3 | Near zero absorption | Showers, tub surrounds and heavy-use wet areas |
| Flexible sealant (silicone or urethane) | Joint sealant, not grout | Not applicable | Floor-to-wall changes of plane, tub and shower perimeters, movement joints |
Joint Width and the Sealant Rule
That absorption split explains why epoxy earns its place in showers despite a more demanding installation. Cement grout takes in moisture and needs periodic sealing to stay ahead of it, while epoxy shrugs off daily spray, a distinction that wet-installation grout and movement guidance treats as central to shower planning.
Wherever planes change, at the floor-to-wall transition or around a tub, use flexible sealant rather than rigid grout, because those corners move. The TCNA EJ171 handbook calls for movement joints at changes of plane, over structural joints, and at intervals of roughly 8 to 12 feet across larger fields. Skip them and the tile field cracks along predictable lines.
Joint width is its own trade-off. Narrow joints reduce cleaning area but demand dimensionally consistent tile. Wider joints absorb visual variation and collect more soil. Color belongs in this conversation too, since grout can either quiet a pattern or outline every tile, a choice explored in our guide to choosing grout color for tile.
In practice: inspect grout and tile periodically for chips and cracks, repair promptly, and watch for early signs of mold near the shower, because damaged tile can let water behind the assembly.
Balancing Style, Durability and Budget
Style decisions hold up better when they're disciplined. Choose one dominant tile and one supporting texture, then match grout color and metal finishes to the tile's undertone rather than to a photograph. A sample reads differently under warm vanity lights than under cooler daylight, so make final color calls in the bathroom itself, at the times of day you regularly use it.
Spending Where Water Spends Its Time
Budget follows the zone map. Direct your spending toward high-exposure surfaces, the shower floor and shower walls, where performance failures are expensive to undo. Dry or lightly splashed areas, a powder room floor or a vanity backsplash, can carry more economical tile or more expressive pattern without compromise. When you compare material prices, remember they're material-only figures. Installation, waterproofing, trim, and waste are separate lines, and they're where careful planning protects you. Our overview of bathroom flooring options is a useful companion when tile is competing with other floor materials for the same budget.
| Material direction | Upkeep character | Sensible budget role |
|---|---|---|
| Porcelain | Low routine upkeep, consistent moisture response | Primary investment in showers and wet floors |
| Standard ceramic | Low upkeep on walls, wide decorative range | Economical choice for dry walls and backsplashes |
| Natural stone | Regular sealing and gentle cleaners | Considered splurge where its variation is the point |
Durability, stated plainly, is about the life you'll really give the room. Porcelain and ceramic ask little of you. Natural stone asks for periodic sealing and gentler cleaning, and repays that attention with variation no print fully reproduces. Neither answer is wrong. The wrong answer is choosing stone's maintenance routine for a household that won't keep it.
Sustainability as a Whole System
Treat environmental impact as a system decision covering tile, installation materials, cleaning chemicals, ventilation, longevity, and end-of-life, not as a single eco-friendly badge. As industry coverage of tile's sustainability story notes, tile's durability can reduce long-term impact, and benefits should rest on verifiable product attributes. Ask for documentation: recycled content, manufacturing location, product-specific environmental declarations, and low-emitting installation materials, plus whether sealers or grout need recurring reapplication.
Here's the contrarian point worth sitting with. The greenest choice is often not the tile with the highest recycled content. A durable tile that remains serviceable for decades can outperform a fashionable product replaced quickly, because replacement itself consumes materials, labor, and disposal. Aggressive cleaners and difficult textures add chemical use over the room's life, too. Longevity is an environmental specification.
Confirm Your Choice in the Showroom Before You Order
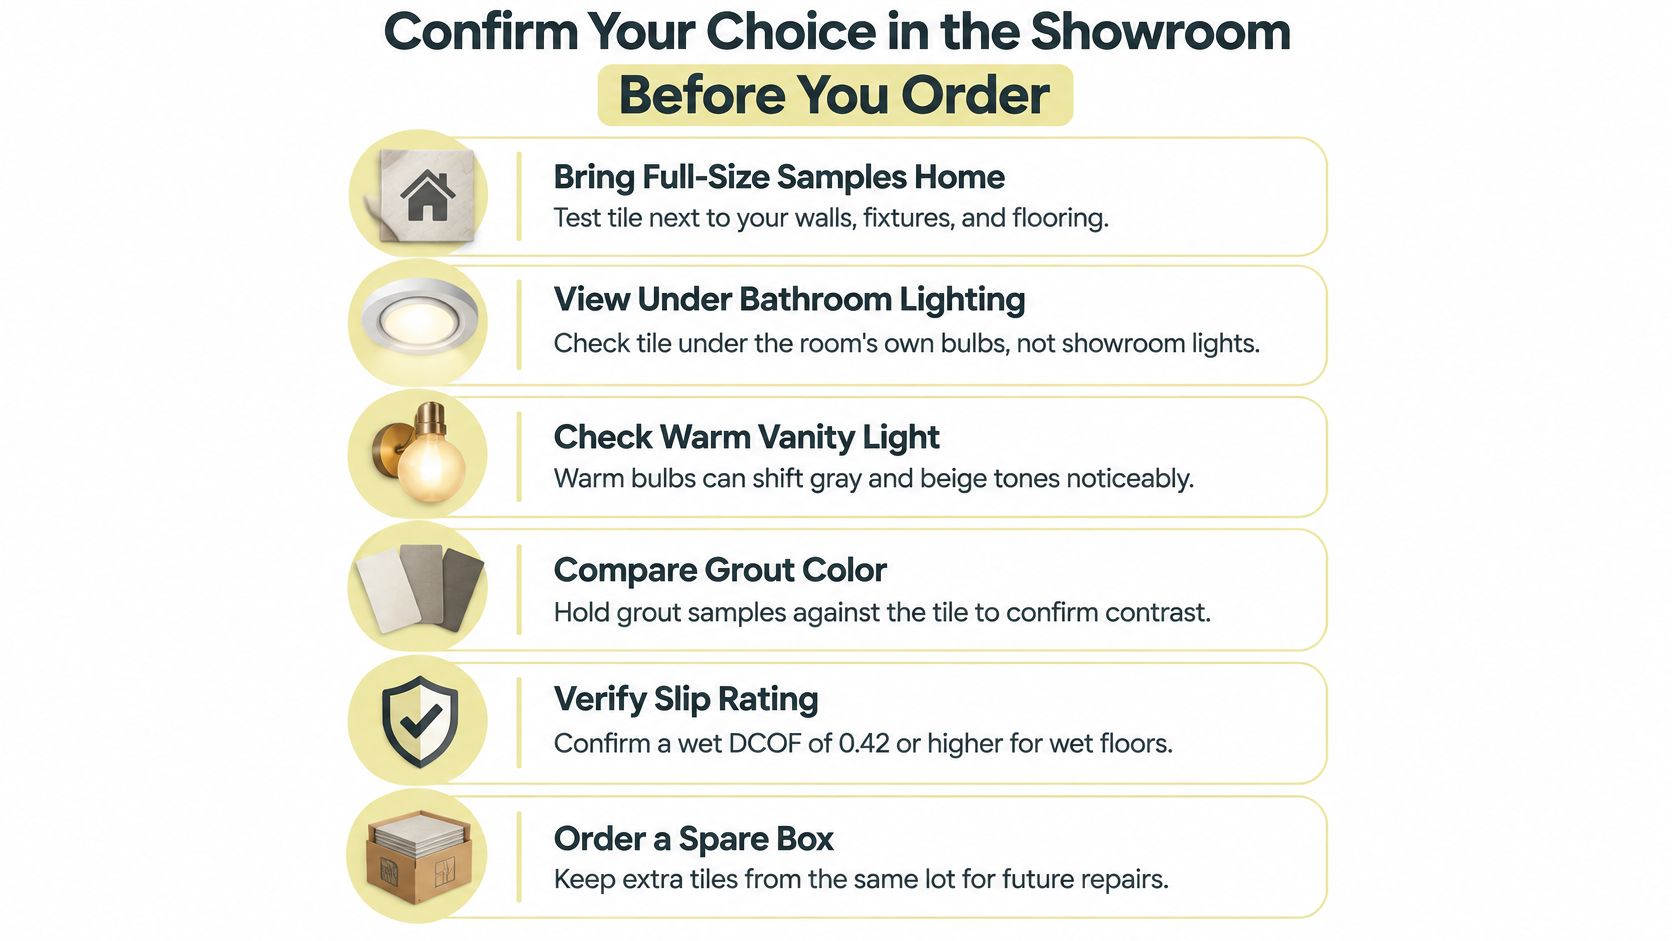
Treat the showroom visit as a test of decisions already made, not an admiring walk-through. Bring full-size samples home or view them in the bathroom under its own lighting, since warm vanity light and cool daylight shift the same tile noticeably. The checklist below summarizes the confirmation steps before any order is placed.
The Wet Test and the Paperwork
Set the sample on the floor, wet a patch of it, and press down with a rubber-soled shoe. Pivot gently. A finish that looked calm and matte on the display board will tell you quickly whether it grips or skates under a wet sole. If the sample is too small to stand on safely, hold it steady at counter height and drag a wet fingertip across the glaze. A flat, polished surface lets your finger glide, while a grippier finish drags. The physical check supplements the DCOF value rather than replacing it, and soap belongs in your mental picture of the room, not underfoot in a showroom aisle.
Then match the paperwork to the earlier decisions. Confirm the floor's wet DCOF value, the shower tile's absorption class, and the exact color, finish, and lot number the supplier will ship. Ask the installer for a dry layout drawing that avoids slivers at corners and doors and marks movement joints and flexible sealant locations. Put grout type, joint width, and waste allowance on the order itself so the drawing and the purchase agree.
Bring your zone list and this checklist to a consultation with Jennifer Gilmer Kitchen & Bath, which handles projects from concept through installation, so the tile specification and the finished room stay one continuous conversation.
When you're ready to turn a zone map and a handful of samples into a bathroom that holds up to daily water and daily life, Jennifer Gilmer Kitchen & Bath can guide the selections, layout, and installation as one considered process. Visit Jennifer Gilmer Kitchen & Bath to schedule a consultation and start planning your project with the specification settled before the first tile is ordered.