.avif)

You're unloading the dishwasher while someone reaches for a mixing bowl, a child swivels on a stool, and another cook opens the oven. Nobody has done anything unreasonable, yet the kitchen feels crowded. The problem often isn't the island itself. It's the space around it, planned as if every side had the same job.
Kitchen island clearances work best as a use-case matrix. A walkway, a one-cook work aisle, a seating zone, and an appliance swing zone each demand a different kind of room. Jennifer Gilmer Kitchen & Bath approaches island planning in the Washington DC, Maryland, and Virginia area by measuring from the finished island edge to the face of the opposing cabinet, wall, or appliance, then testing how the room behaves in daily use.
Table of Contents
Introduction Why Island Clearances Shape Everyday Comfort
A kitchen island can be the place where vegetables are chopped, homework is spread out, coffee is served, and guests gather. That range of activity makes clearance a comfort decision, not just a fit calculation. A path that works for someone walking through may feel tight when a cook turns from the sink, pulls out a drawer, or carries a hot pan.
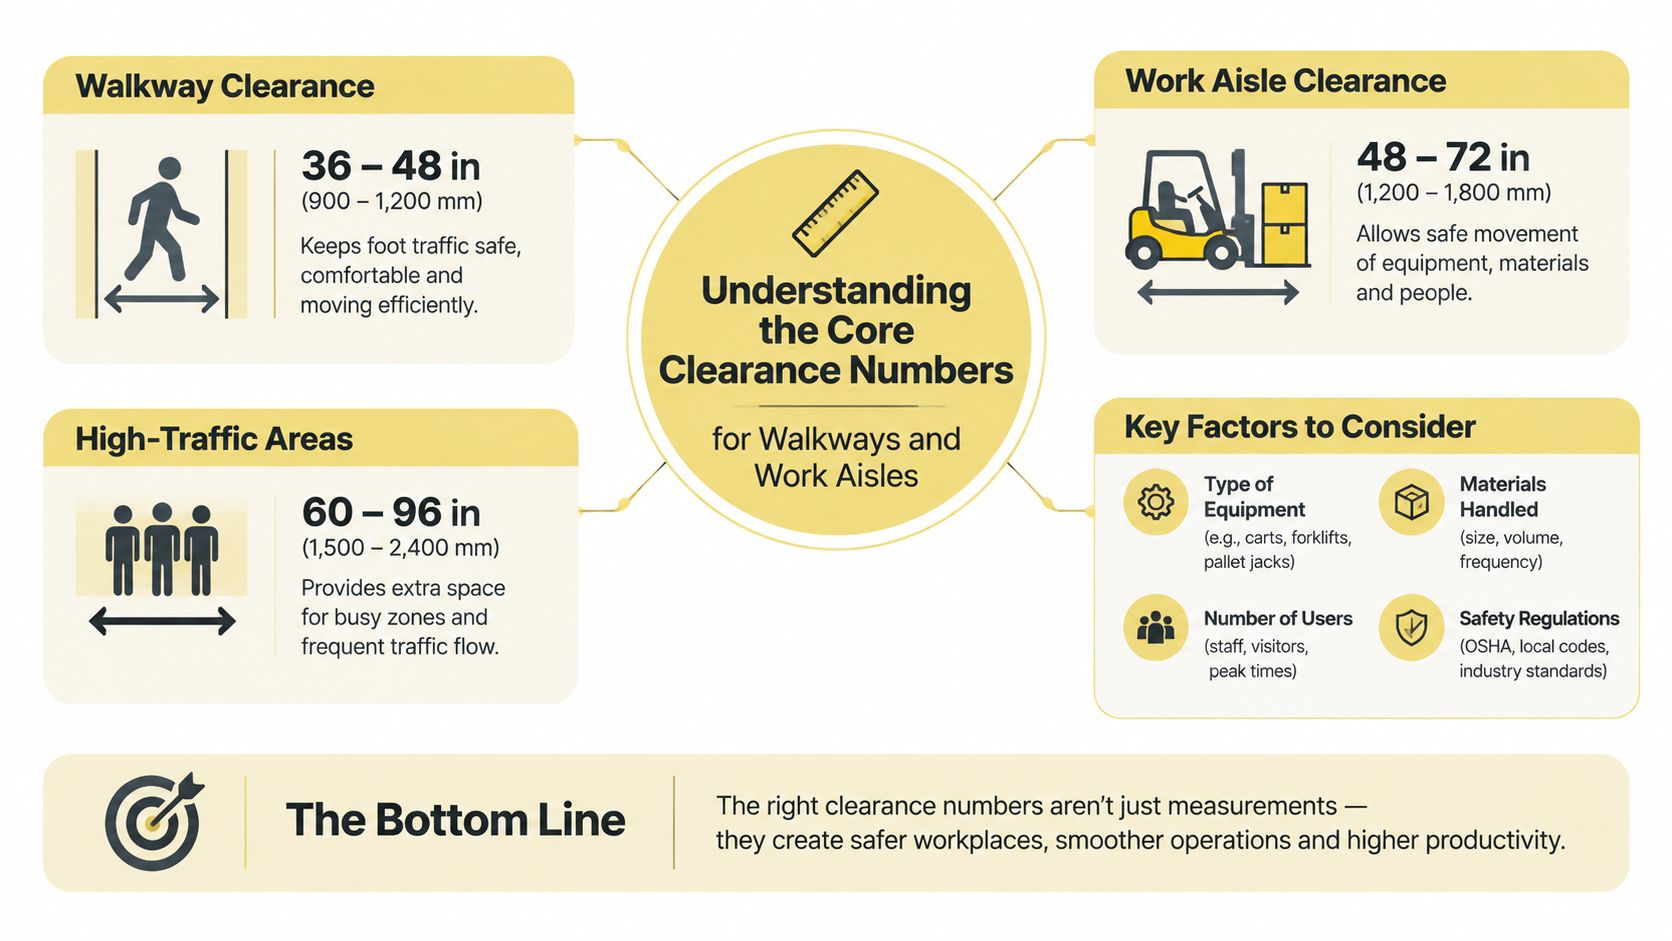
The National Kitchen & Bath Association separates these situations clearly. Its kitchen planning guidelines identify 36 inches for a pure walkway, 42 inches for a work aisle used by one cook, and 48 inches for a work aisle used by multiple cooks. The same guidance describes a traffic aisle used only for walking as at least 36 inches wide. Those are not interchangeable recommendations. They describe different movements.
The useful question isn't “How wide should my kitchen be?” It's “What must happen on each side of the island?”
Consider a DC-area open-plan kitchen with stools facing the family room. The aisle behind the stools may serve casual traffic, while the opposite side may contain the dishwasher and sink. A single clearance number can't account for both. The dishwasher side needs room for an open door and a standing person, while the seating side must accommodate stool pull-out, seated shoulders, and people passing behind.
A room that fits versus a room that works
Designers also consider the relationship between the island and the surrounding run. More distance doesn't automatically improve a kitchen. If the island drifts too far from the perimeter cabinets, the cook may take unnecessary steps between storage, preparation, and cleanup.
That's why the finished measurement matters. Framing dimensions can look generous on a plan, but cabinet faces, appliance fronts, handles, countertop overhangs, and open doors define the space you use. A thoughtful plan protects circulation while keeping the island connected to the room's working zones.
Understanding the Core Clearance Numbers for Walkways and Work Aisles
The same kitchen can need different clearances on opposite sides of the island. A cook turning from the sink with a full sheet pan needs room to pivot, while someone passing behind should not have to wait for the task to finish. Assigning a use to each side makes the plan more accurate than applying one rule to the entire room.
Measure the finished working zone
Jennifer Gilmer Kitchen & Bath measures from the island edge to the opposing face, whether that face is cabinetry, a wall, or an appliance. This finished-to-finished dimension shows the space people will use. Stud-to-stud measurements can make a room appear wider than it feels once cabinets, trim, counters, appliance bodies, and handles are installed.
Room width also determines the island size that remains practical. In a narrow kitchen, preserving a clear traffic path may require a shorter or shallower island. In a wider DC, Maryland, or Virginia remodel, the extra room can support separate work and circulation zones, but only if the island stays connected to the refrigerator, sink, and cooking area. An oversized island may satisfy a drawing while adding unnecessary steps during meal preparation.
The professional island functionality guidance supports treating the island as part of a working sequence, rather than as a freestanding piece of furniture. Check how doors, drawers, and people share each zone before finalizing its position.
Use a simple use-case matrix:
- Walkway: Reserve the clear path for movement only. Keep it free from appliance doors and daily prep activity.
- Work aisle: Allow the cook to stand, turn, reach storage, and set down ingredients without blocking circulation.
- Appliance zone: Measure with the dishwasher, oven, or refrigerator door open, then account for the person using it.
- Shared zone: Allow two people to pass or work without forcing either person to twist around an open door.
This approach is especially helpful in open-plan homes, where an island may separate the kitchen from a family room. Plan each side for its actual movement pattern, including people using mobility aids, children crossing through, and more than one cook working at once.
Planning Clearance Behind Island Seating Without Crowding the Room
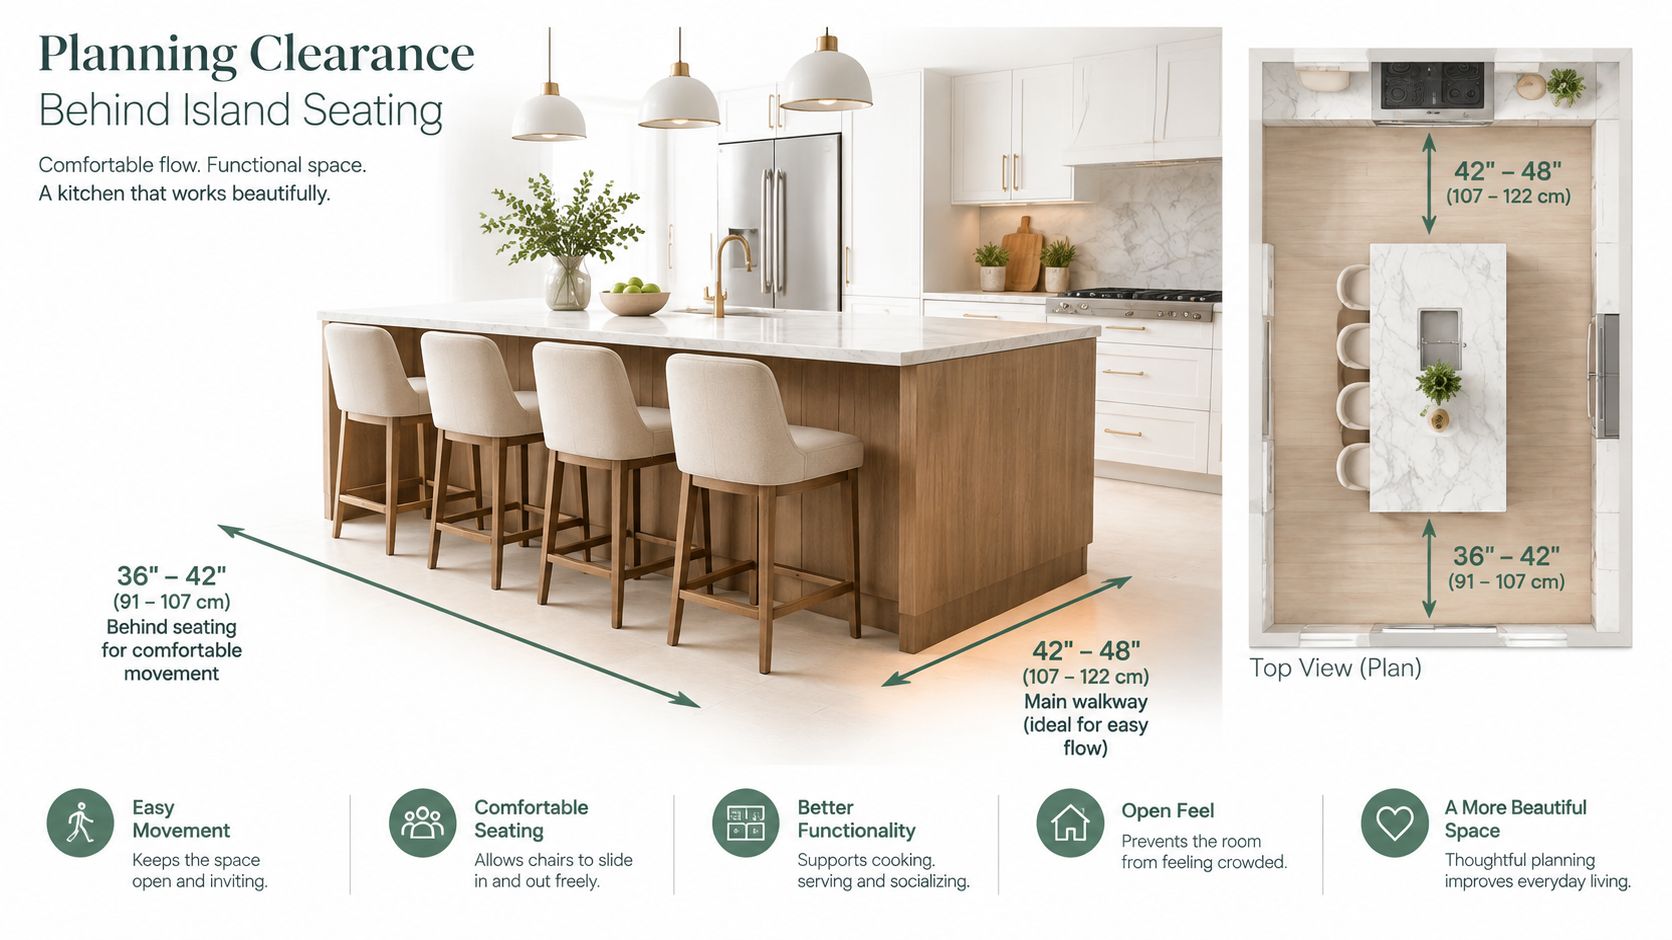
Seating creates a different spatial problem from cooking. A stool isn't a flat object at the edge of a counter. Someone must pull it out, sit with enough shoulder room, and sometimes allow people to pass behind.
For light circulation behind seating, guidance commonly uses about 36 inches. Where people need to pass regularly, 44 inches is the more suitable minimum. The distinction is explained in kitchen island clearance guidance for seating and knee space. A family room path, for example, deserves more consideration than a rarely used gap behind a single stool.
Seating and island depth compete for space
A deeper overhang can make seating feel more relaxed, but it expands the island footprint. That added depth comes directly out of the room and may reduce the work aisle on the opposite side. A shallower overhang preserves circulation, but it may leave seated users with less knee room.
Seat capacity must be calculated with the island's overall depth and aisle width. One cited planning benchmark allows 24 inches of width per seat, while knee clearance varies according to counter height, as outlined in this guide to standard kitchen island height. Adding another stool isn't a small adjustment if it requires a longer counter, additional overhang, or a wider passage behind.
A comfortable seat needs room in front, below, and behind it.
Compare two planning choices. A compact island with limited seating may preserve a generous work aisle and keep the room easy to cross. A larger island with several stools may support gathering, but only if the rear passage remains usable and the cooking side still accommodates the intended work.
The right decision depends on which activity matters most. If the stools are occasional perches, light circulation may be adequate. If children eat there daily while adults move between the kitchen and family room, the rear zone should be treated as a true traffic path.
Accounting for Appliance Doors Drawers and Traffic Flow
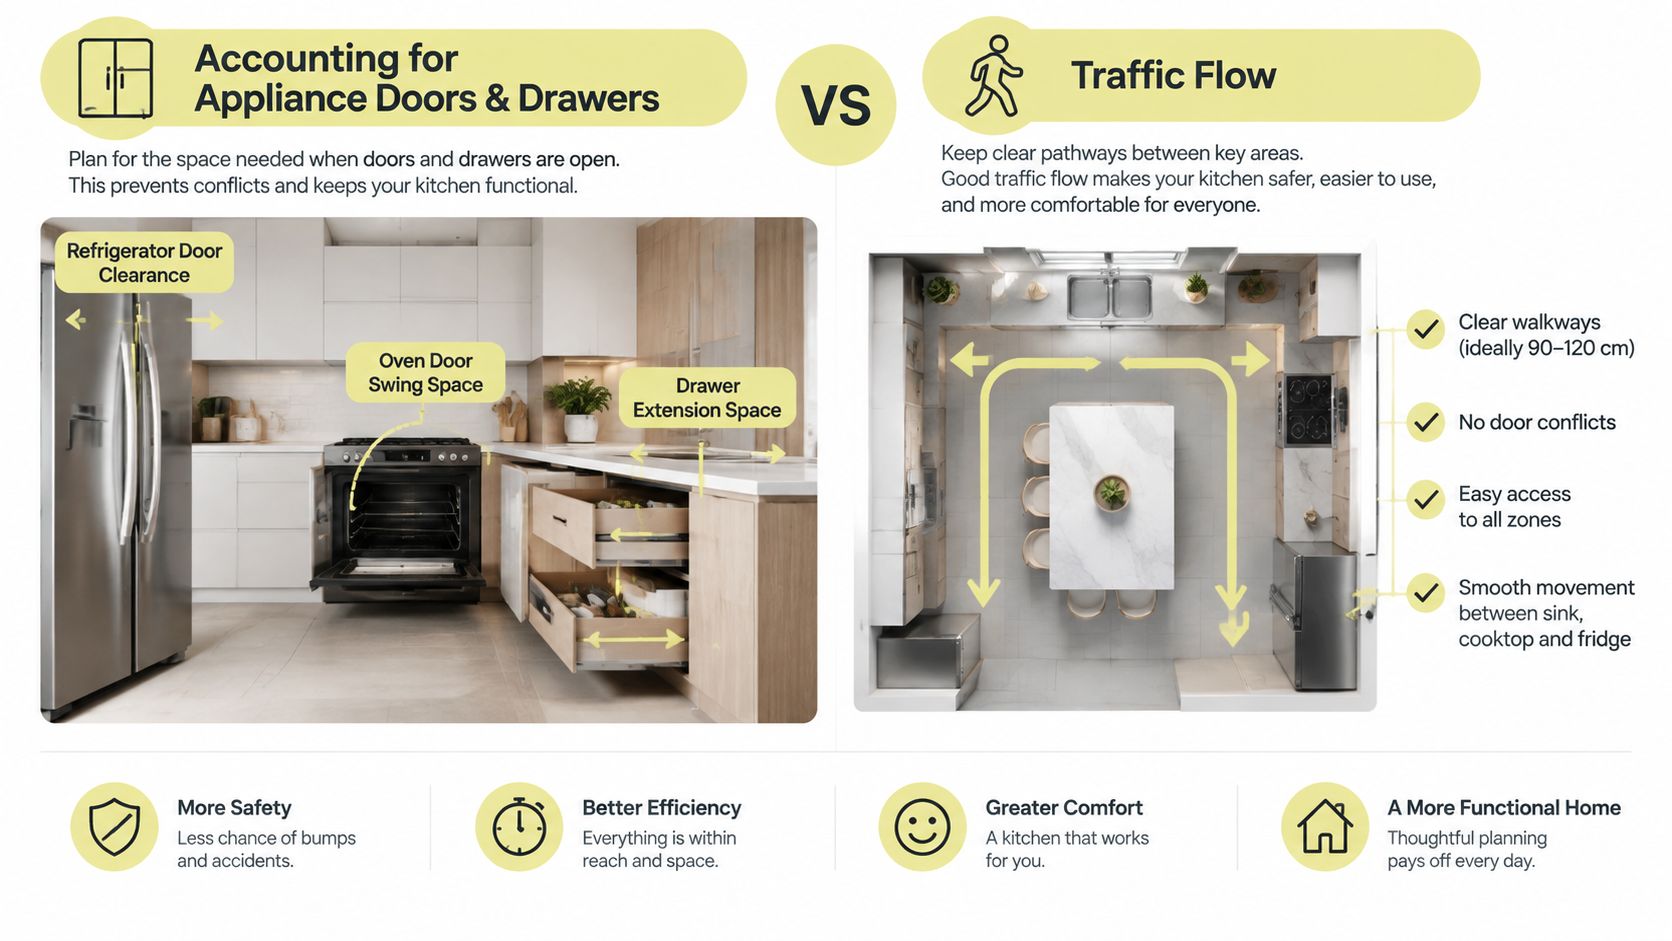
Appliance doors reveal why a static measurement can be misleading. A closed dishwasher occupies one position, but an open door projects into the aisle and creates a standing zone for loading. International guidance describes a dishwasher door projecting about 600 mm into the aisle, with 1,050 to 1,200 mm recommended on the side facing a dishwasher or oven. The same source identifies 900 mm as an absolute minimum around an island and 1,000 to 1,200 mm as a comfortable general working range in millimetres, as detailed in this international kitchen aisle-clearance guide.
That appliance-side logic aligns with the U.S. working ranges of 42 to 48 inches. A cook shouldn't have to stand in the path of an open dishwasher, and another person shouldn't need to squeeze past while dishes are being loaded.
Assign each island side a job
Mixed-use islands need side-by-side reasoning. One face may support prep, another may face a traffic route, and a third may sit near an appliance swing. Treating all three as identical can produce a plan that meets a minimum in one location but fails during actual use.
| Island Side Function | Recommended Clearance | When to Widen |
|---|---|---|
| Pure walkway | 36 inches | Widen for frequent traffic or difficult turns |
| One-cook work aisle | 42 inches | Widen when drawers, doors, or active prep occupy the zone |
| Multiple-cook work aisle | 48 inches | Use when cooks need to pass and work together |
| Appliance side | 1,050 to 1,200 mm | Widen where an open door and standing user share the aisle |
| Seating side | About 36 inches for light circulation, 44 inches where people pass | Widen for regular traffic behind stools |
A sink and dishwasher require early coordination because plumbing, loading movement, and cabinet placement share the same area. This guide to an island with a sink and dishwasher offers useful context for thinking through that combination.
More space can also become counterproductive. Recent planning guidance notes that once clearances exceed about 1,500 mm, the island may feel functionally too far from the surrounding run, as discussed in this kitchen island planning guide. The goal is a connected working room, not an island floating in the middle of it.
Designing for Real Movement Accessibility and Multiple Cooks
A clearance can look acceptable on paper and still feel difficult when someone carries groceries, turns with a tray, or uses a walker. Inclusive planning asks what the household does in the space, not only whether a person can technically pass.
The 36-inch dimension is an absolute minimum, not a comfort standard, according to the accessibility-focused kitchen island clearance guidance. The practical working range is commonly presented as 42 to 48 inches, especially when a household includes multiple cooks, aging-in-place needs, or people who use mobility aids.
Test movement instead of relying on a floor plan
A person using a walker may need room to approach an appliance, turn, and retreat without catching the island corner. Someone using a wheelchair needs a path that supports turning and positioning, not merely forward travel. A parent carrying groceries may need the same practical freedom, even without a mobility aid.
Widening the aisle is one response. Reducing island depth is another. In a narrower room, a peninsula can preserve a useful work surface while keeping circulation open on more of the room's perimeter.
The layout also needs to acknowledge multiple cooks. Two people working at the island may approach from different directions, open drawers simultaneously, or pause to communicate. A plan that serves one cook beautifully can become frustrating when the household's actual rhythm includes shared preparation and social movement.
Inclusive design often comes from removing an obstacle rather than adding a feature.
Jennifer Gilmer Kitchen & Bath uses personalized layout planning to align the island with the client's lifestyle, whether that means a clear route for long-term use, easier grocery unloading, or a work zone shared by several family members. The firm's kitchen layout planning guide provides further perspective on organizing the room around movement and function.
Your Measurement Checklist and Layout Examples Before You Build
Before selecting cabinetry or countertop material, test the island as a shape in the room. Painter's tape can reveal a cramped corner more clearly than a small plan drawing.
A practical floor-test sequence
- Mark the island footprint. Tape the proposed finished edges on the floor, including any seating overhang. Keep the island edge distinct from the cabinet box so you're testing the surface people will encounter.
- Measure edge to face. Check from the taped island edge to the finished face of every opposing cabinet, wall, and appliance. Record the narrowest point rather than relying on an average.
- Open every door. Test the dishwasher, oven, refrigerator, and nearby drawers in their open positions. Ask whether someone can stand there while another person passes.
- Pull out the stools. Sit down, stand up, and walk behind the seating. Try this with the stools placed where the household would really use them.
- Carry something through. Walk the main route with grocery bags, a laundry basket, or a serving tray. Movement that feels easy with empty hands may feel very different during a busy morning.
Read the layout by shape
In a galley kitchen, protect the working aisle before pursuing a large island. A shorter or shallower element may serve prep without interrupting the opposing cabinet run.
An L-shaped kitchen may allow the island to organize preparation and seating, but each side still needs its own use classification. One edge can face a social area while another supports active work.
In an open-plan kitchen, the island often separates cooking from living space. That makes the seating side a traffic condition as well as a dining condition. If the footprint forces compromises, changing the island length or depth may preserve more comfort than squeezing in another function.
Material changes can also affect the renovation conversation. For homeowners comparing finish updates with broader remodeling work, this guide to kitchen cabinet painting cost from Arsh Art Cabinet Refinishing may help frame the difference between refinishing existing cabinetry and reworking the entire layout.
Bringing Your Island Plan Together With Jennifer Gilmer Kitchen & Bath
Clearances become easier to judge when they're considered alongside cabinetry, appliances, lighting, materials, and installation details. An island's success depends on how those parts work together, from the first hand-drawn plan to the final adjustment of a drawer front.
Jennifer Gilmer, CKD; Nancy McCarren, AIA, LEED AP; and Marie-Josée Parisi bring different design perspectives to that process. Their work connects layout decisions to the way each client cooks, hosts, stores equipment, and moves through the home. The firm serves Washington DC, Maryland, and Virginia, with showrooms in Chevy Chase, MD, Easton, MD, and Ashburn, VA.
Plan from concept through installation
A showroom consultation can help turn a taped floor test into a resolved plan. Bring your room measurements, appliance information, photographs, and notes about who cooks, who sits, and which routes stay busy. Those details give the designer a clearer basis for choosing between a wider aisle, a shallower island, a peninsula, or a different appliance arrangement.
Jennifer Gilmer Kitchen & Bath handles projects from concept through installation, with support for cabinetry, space planning, appliance placement, material selections, lighting, hardware, and storage. Homeowners can also explore the firm's portfolio and its educational resource, The Kitchen Bible, for additional design guidance.
The most comfortable island won't come from copying a dimension seen in another kitchen. It will come from assigning every side a purpose, testing real movement, and refining the plan until the room supports both work and welcome.
Bring your island footprint, appliance list, and daily movement concerns to a consultation with Jennifer Gilmer Kitchen & Bath. The firm can develop your kitchen plan from concept through installation, helping you balance work aisles, seating, appliance access, cabinetry, and craftsmanship across your Washington DC, Maryland, or Virginia home.