

You're holding a pull against a new cabinet door, moving it slightly higher, then lower. The finish feels right, but the location is harder to settle. Once someone drills the holes, that small decision becomes part of the cabinetry.
A useful cabinet pull placement guide starts with where your hand lands, then considers proportion, drawer contents, and the people who use the kitchen. The right arrangement should look composed across the room and feel comfortable when you're opening a pantry or reaching for a heavy pot.
Table of Contents
- Where Pulls Go on Doors and Drawers
- Sizing Pulls and Spacing Holes for Each Front
- One Pull or Two on Wide and Heavy Drawers
- Reach Heights for Accessible Kitchens
- How to Mark and Drill Each Pull Hole
- Confirm the Placement Before You Order
Where Pulls Go on Doors and Drawers
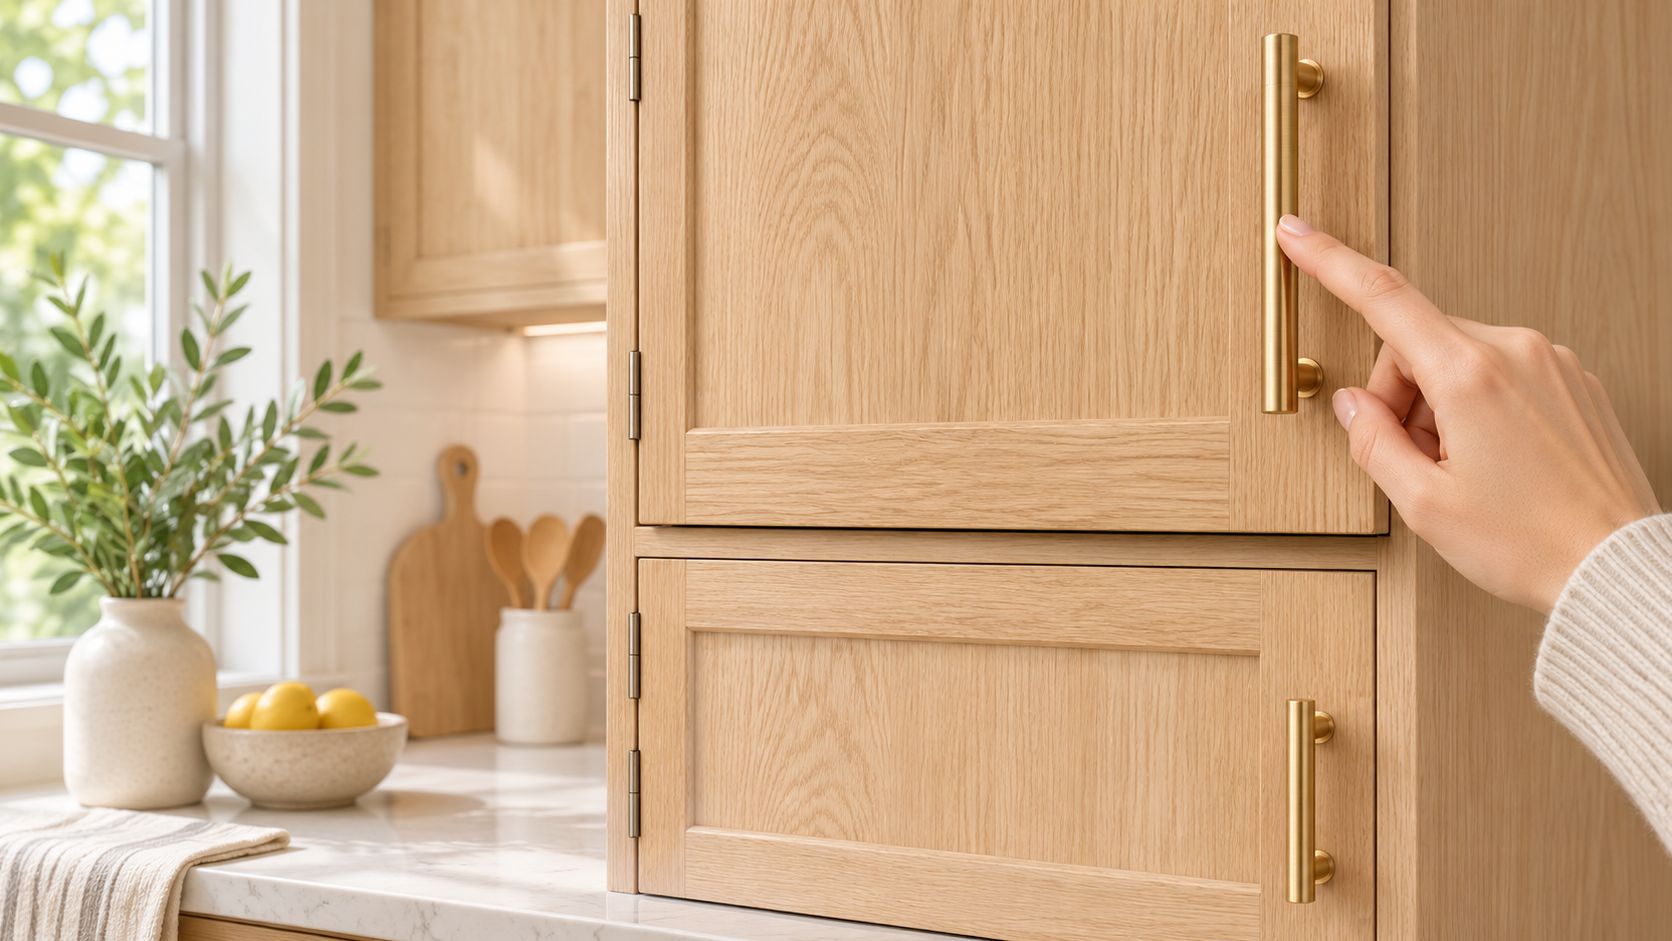
On base-cabinet doors, place the pull near the upper corner opposite the hinges. On wall-cabinet doors, reverse that arrangement and use the lower, non-hinged corner. Your hand reaches the opening edge rather than crossing the door toward the hinges.
The KraftMaid hardware placement guide gives a common offset of 2 to 3 inches from the adjacent edges, measured to the center of a knob or the relevant pull hole. For a vertical pull, identify the end mounting hole you're locating before measuring. Don't confuse that point with the center of the entire handle.
The relationship between the handle, door frame, and opening edge is easier to judge with an actual sample.
Pull placement by cabinet face
| Cabinet or drawer | Where the pull sits | Offset or centering |
|---|---|---|
| Base cabinet door | Upper, non-hinged corner | 2 to 3 inches from adjacent edges |
| Wall cabinet door | Lower, non-hinged corner | 2 to 3 inches from adjacent edges |
| Standard drawer | Centered left to right and top to bottom | Equal margins on both sides |
| Deep drawer | Slightly above the vertical midpoint | Equal side margins; test on a sample front |
| Tall pantry door | Corner on the non-hinged side, matching the run | Same offset as adjacent doors |
Let the Cabinet Face Guide the Position
On a framed door, check how the pull sits within the stile, the vertical frame member. The mounting feet should look deliberately placed rather than crowded against a panel profile. A slab door has no frame to help your eye, so consistent edge measurements matter even more.
Drawer pulls generally sit horizontally, centered across the face. A shallow drawer usually suits vertical centering, while a deep drawer can feel more comfortable with the pull raised slightly. Judge the whole stack rather than treating each front as an isolated rectangle.
Tall pantry doors need a separate reach check. Match the surrounding cabinetry where practical, but don't preserve a corner alignment that puts the grip out of comfortable reach. The Department of Justice's 1991 ADA Standards regulate accessible reach and usability, not a universal decorative pull location.
Sample-door check: Hold the front at its installed height, grasp the proposed handle, and confirm your hand naturally finds the opening side.
Consider nearby room hardware, too. Groen's Fine Furniture lets you compare nickel door lever designs when you're deciding whether interior-door hardware and cabinet pulls should share a similar finish or silhouette. Coordination is useful; exact matching isn't necessary.
Sizing Pulls and Spacing Holes for Each Front
Pull length by drawer and door size
These starting proportions apply the one-third rule described in Lowe's cabinet hardware buying guide, including the calculated drawer and door examples below.
| Drawer or door size | Pull length (one-third rule) | Placement note |
|---|---|---|
| 12-inch drawer | 4-inch pull | Compact drawer; a shorter pull keeps the proportion |
| 18-inch drawer | 6-inch pull | Centered horizontally and vertically |
| 24-inch drawer | 8-inch pull | Centered; one pull is usually enough |
| 30-inch drawer | 10-inch pull | Consider two pulls or a long bar if the drawer is heavily loaded |
| 36-inch tall door | 12-inch pull | Vertical pull on the non-hinged stile |
Use that proportion as a starting point, not an ordering specification. A delicate pull can suit a compact front, while a substantial bar may balance a broad expanse of wood. The surrounding rails, drawer heights, and appliance panels all affect how large the hardware appears.
Lay out the proposed sizes across the elevation before choosing them individually. Keeping one hardware family while changing its length can create a quieter composition than forcing the same size onto every front. However, adding too many lengths can make the selection feel unnecessarily busy.
Overall Length Is Not Hole Spacing
Overall length measures the pull from end to end. Center-to-center spread measures between mounting-hole centers. A bar that extends beyond its mounting feet can have a noticeably different overall length from its spread.
The Kitchen Cabinet Kings pull-size guide identifies common spreads of 3, 3.75, and 5 inches and gives a useful worked example: an 8-inch center-to-center pull on a 30-inch drawer puts the holes 11 and 19 inches from one side. That layout centers the mounting pattern, regardless of how far the handle extends beyond it.
Order by the manufacturer's dimension drawing, not by the product photograph or the largest number on the packaging.
Before buying, record these details together:
- Overall length: Check the handle's visual scale against the actual front.
- Mounting spread: Confirm the hole spacing on the specific size you're ordering.
- Projection and clearance: Make sure fingers fit comfortably behind the grip and the handle clears neighboring doors.
- Front construction: Note the thickness and any drawer-box layer the fastener must pass through.
A sample is especially helpful when the handle has broad feet, curved ends, or a shallow grip. Those details can change both its apparent size and its comfort without changing the mounting spread.
One Pull or Two on Wide and Heavy Drawers
A 30-inch drawer filled with heavy cookware puts more strain on the grip than a shallow utensil drawer. The right choice depends on the drawer's width, depth, contents, box construction, and slide performance, as well as who will open it and from where. A centered knob may look restrained, but can be awkward to grip when the drawer is loaded.
Use the standard kitchen drawer sizes as a reference when planning the storage arrangement, then choose hardware for the drawer's actual job. Matching every front can look consistent, but a deep cookware drawer and a shallow utensil drawer may call for different grips.
Weigh Grip Options Against Everyday Habits
One long pull gives a broad area to grasp and keeps the drawer front visually simple. The Kitchn's reporting on the 2025 Houzz kitchen renovation study reports that bar pulls were selected in 75% of kitchen renovations and describes long pulls on wide drawers as a way to distribute pulling force.
A long bar still needs to suit the way the drawer is used. Pulling from one end can twist a wide, heavily loaded drawer, and a longer handle does not raise the slides' load rating or fix a poorly adjusted drawer box.
Two shorter pulls can give balanced control when both are used together, and they often suit traditional cabinetry. The trade-off is a busier front and more placement decisions. If someone usually grabs the nearest handle with one hand, two pulls may not improve control.
Choose for the way the drawer will actually be opened, not the way someone might open it during a showroom demonstration.
Jennifer Gilmer is willing to break traditional rules of symmetry and placement, including placing a range hood in front of a window. Here, symmetry should serve the room's function rather than dictate the hardware choice.
Before committing, try the proposed grip on the actual drawer with its intended contents. Use a securely mounted sample or an installer-approved mock-up, then open and close the drawer from the positions where household members normally stand.
Reach Heights for Accessible Kitchens
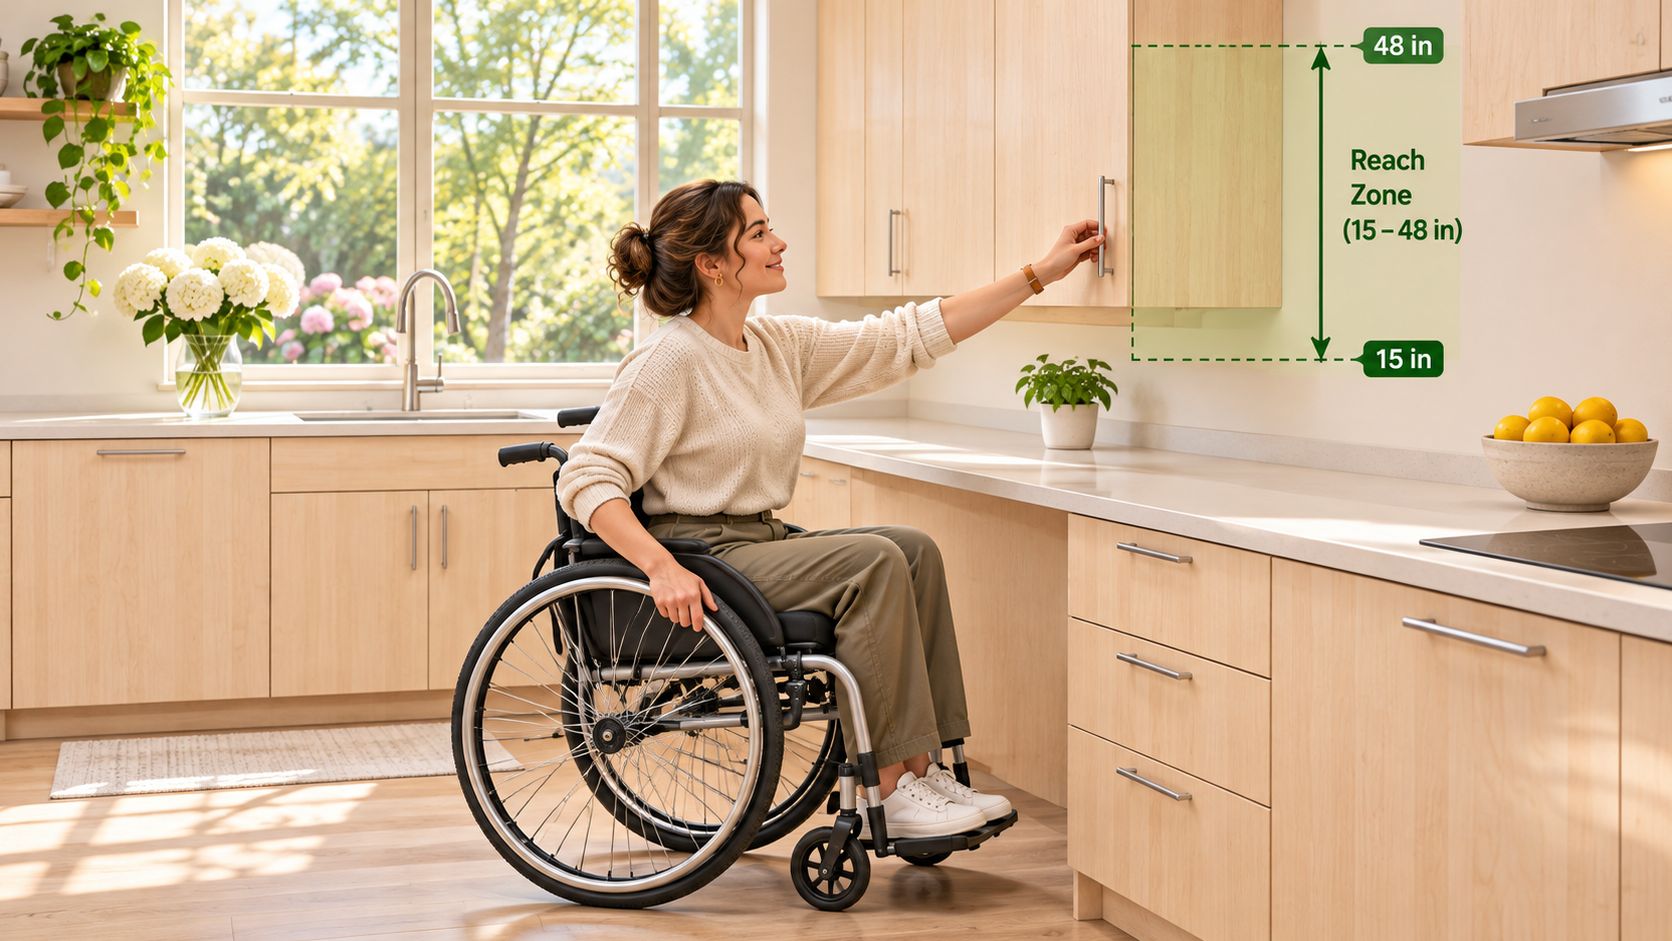
Reach limits for pull placement
The table combines the historical ADA reach and shelf-access baseline with the U.S. Access Board's operable-parts guidance, which specifies one-handed operation without tight grasping, pinching, or wrist twisting, using no more than 5 pounds of force.
| Requirement | Value | Note |
|---|---|---|
| Unobstructed forward reach | 15 to 48 inches above finished floor | Maximum drops to 44 inches over an obstruction more than 20 inches deep and no more than 25 inches deep |
| Unobstructed side reach | 15 to 48 inches above finished floor | 48-inch upper limit |
| Cabinet or refrigerator shelf space | At least 50% within reach ranges | Doors and appliances must stay usable |
| Operable part | Usable with one hand, no tight grasping, pinching or wrist twisting | No more than 5 pounds of force |
These are dimensional baselines, not a guarantee that a particular kitchen is comfortable or legally compliant. Applicable requirements depend on the project and current governing standards. The obstruction's depth and the direction of approach matter as much as the handle's height.
Test the approach at the cabinet, with the countertop and surrounding storage in place.
Measure Comfort, Not Just Height
Measure to the usable grasp point, not a mounting screw. Check the clear floor space, the door swing, and whether the person must lean across a counter to reach it. A raised panel or projecting appliance garage can change the approach even when the handle itself appears well positioned.
For someone with arthritis, reduced grip strength, or limited shoulder movement, choose a pull with generous finger clearance. A small knob or tightly recessed grip may demand more pinching than the person can comfortably manage. Test opening resistance as well, since a comfortable handle can still be attached to a difficult door.
Jennifer Gilmer Kitchen & Bath's universal-design kitchen guidance considers usability as part of the larger layout. For another perspective on organizing everyday tasks, Vinson Fine Furniture's kitchen layout ideas for Columbus homeowners offers a useful prompt to consider movement between storage and work areas.
The video provides another way to consider reach alongside the kitchen layout.
Include upper cabinets and tall pantry doors in the mock-up, not only the easiest drawer to reach. Have the primary user approach, grasp, and operate each sample from their normal standing or seated position. A passing measurement isn't a substitute for a comfortable movement.
How to Mark and Drill Each Pull Hole
Settle the door and drawer-front alignment before marking. If hinge adjustments or drawer positioning change after drilling, the holes may look uneven even when they were measured carefully. Hardware placement also needs to suit the way each front is used: a heavily loaded drawer may need a pull that is easy to grasp and positioned for a comfortable, direct pull.
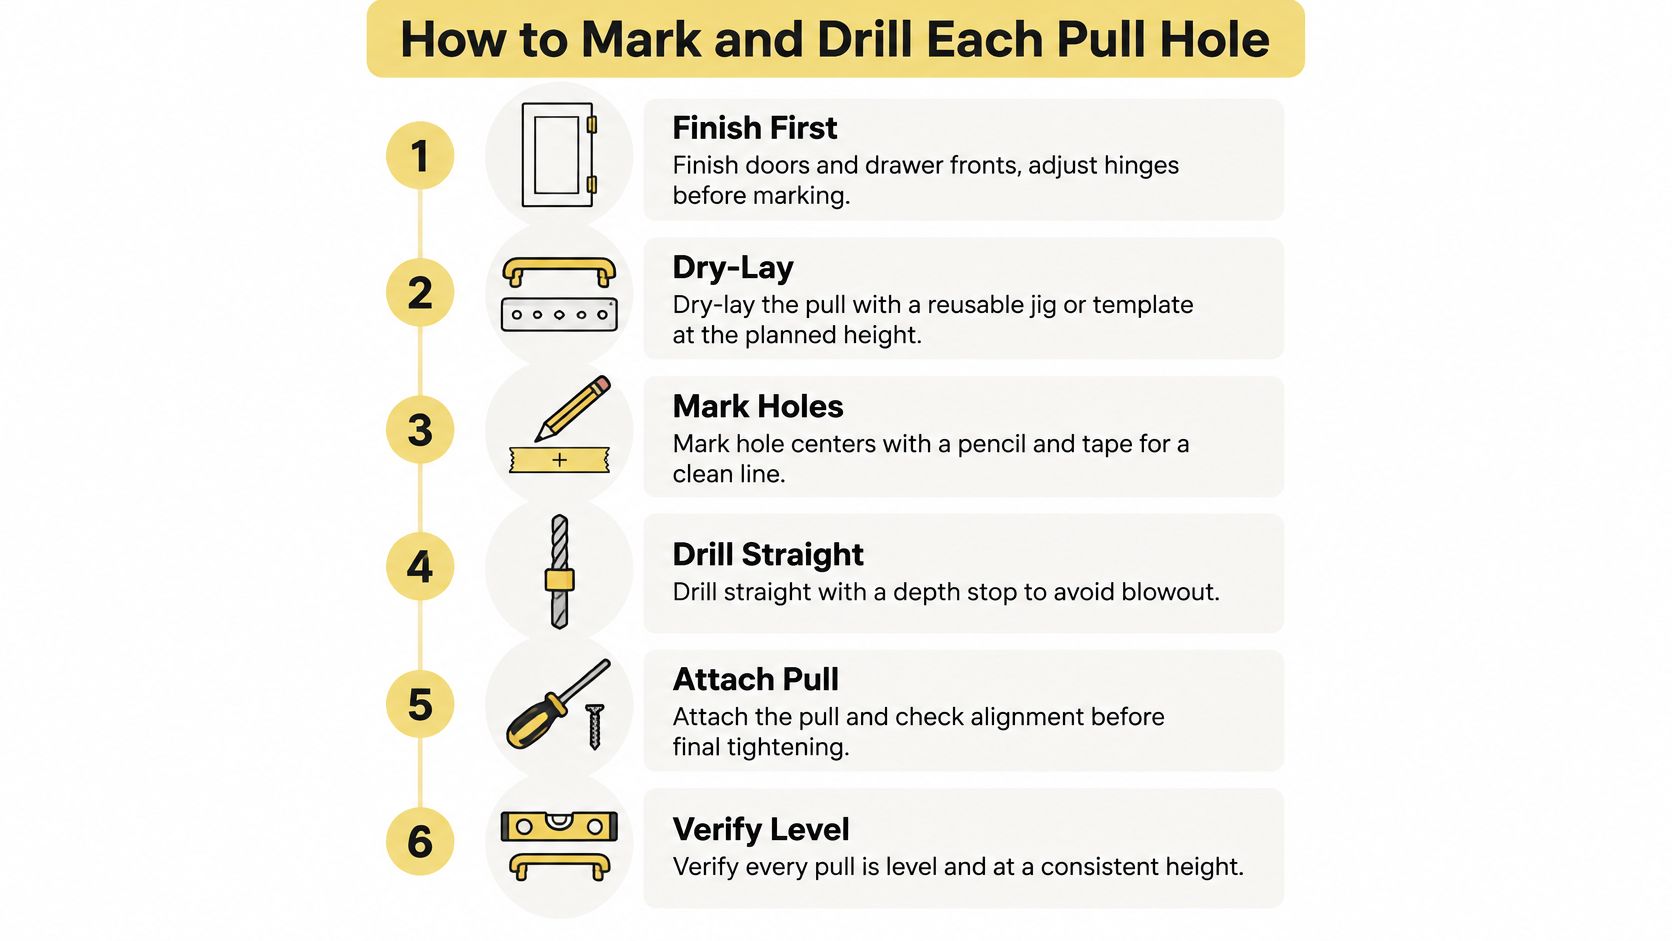
Use this sequence to lay out and drill each front.
Keep the Reference Edge Consistent
Finish and adjust first. Set the hinges and align the drawer fronts before laying out holes. Check the reveals across the run, since a later adjustment can make correctly drilled pulls appear out of line.
Dry-lay the hardware. Use a reusable jig or template, then check the proposed position with a level. Test it on a full-size sample door or drawer front before drilling. A position that looks balanced on one front may feel awkward on another, so judge the sample by both appearance and reach.
Mark from a fixed edge. Measure comparable doors from the same non-hinged edge, and use a consistent side reference for drawers. Mixing reference edges can cause visible drift across a run. Mark both holes for a pull, then recheck their spacing and alignment.
Support the exit and drill straight. Clamp a scrap block behind the panel to help prevent tear-out, and keep the drill perpendicular to the face. The Würth installation instructions specify a 3/16-inch hole for most hardware and a possible 1/4-inch hole for integral studs. Confirm the selected hardware's requirements before drilling.
Match the fastener to the front. Measure the full thickness the screw must pass through. Check that it has enough thread engagement without bottoming out. The Captivating Cabinets installation guide advises checking screw length rather than assuming supplied fasteners suit every cabinet construction.
Tighten gently and inspect. Start each screw by hand, align the pull, and tighten until snug. Stop before the mounting feet dent the finish or pressure damages the front.
Check the finished installation from both sides. Comparable pulls should align, handles should not rock, and fasteners should not leave sharp ends exposed inside a drawer. Open each door and drawer fully to check for collisions with nearby hardware or walls. For a wide or heavily loaded drawer, test the pull with the drawer open and loaded as it will be used. The finished position should allow a steady grasp and a direct pull without an awkward wrist or shoulder movement.
Confirm the Placement Before You Order
The order is ready when the hardware works as a coordinated selection, not just a collection of attractive samples. Keep the final review practical.
- Check the repeated offset. Comparable doors should share the same reference and measurement.
- Verify the spread. Measure the mounting pattern on the front rather than copying the overall length from the box.
- Test the actual reach. Have the person who uses the kitchen most grasp the sample at its installed height.
Make the final finish decision alongside the cabinet door, countertop, and nearby fixtures. Jennifer Gilmer Kitchen & Bath's overview of kitchen cabinet hardware styles can help narrow the visual direction before you commit to quantities. Keep a written schedule identifying the selected pull and placement for each cabinet type.
Review the Sample With the Whole Room
At Jennifer Gilmer Kitchen & Bath, we help clients select cabinet door styles and finishes in concert with the plan review. Countertop and cabinet hardware options can be viewed in our resource room, where the relationships between materials are easier to evaluate than they are on separate screens.
We serve Washington, DC, Maryland, and Virginia, coordinating projects from concept through installation. We can also help clients find a contractor to implement the design.
Bring a door or drawer-front sample to a showroom consultation before placing the hardware order. Reviewing the grip, finish, and placement together is a more useful final check than choosing from a photograph alone.
Jennifer Gilmer Kitchen & Bath offers thoughtful kitchen design and installation coordination, including help selecting hardware that suits your cabinetry and daily routines. Visit Jennifer Gilmer Kitchen & Bath to arrange a showroom consultation and review your cabinet samples, pull proportions, and placement decisions before ordering.