

You are standing at a sample board holding two pulls. Both are labeled brushed nickel, both look right against your cabinet door, and you have no reliable way to tell which one will still look even after a year of wet hands, cooking grease, and hurried cleaning. That uncertainty is the decision behind kitchen hardware finishes. The color matters, but so does the metal underneath, the coating on top, and whether you can buy a matching replacement later. Judge a finish by how it ages, cleans, and gets replaced, not only by installation day.
Table of Contents
- Kitchen Hardware Finishes at a Glance
- What Actually Sits Under the Finish
- How Finishes Hold Up to Kitchen Exposures
- Cleaning Habits That Keep Each Finish Intact
- Choosing One Dominant Finish and Adding One Accent
- Remodel Decisions That Change Your Finish Choice
- Test Samples Before You Order Hardware
Kitchen Hardware Finishes at a Glance
Two brushed nickel pulls can look almost identical on a showroom board yet read differently in a kitchen. One may appear cooler in daylight or feel visually slight at the edges, while the other has a softer, more substantial look. Finish names give you a useful starting point, but they do not guarantee the same appearance or long-term result.
Warm brass and black attract attention in current design coverage, while neutral silver finishes remain familiar choices for renovations. Trend appeal is one consideration; daily handling is another. A finish that looks right in a photograph still needs to suit the room's light, the way the kitchen is used, and the level of upkeep you are willing to take on.
Why coordination is now part of the choice
Hardware is a visible part of the overall kitchen palette, not just a final detail. In a professional design survey reported by Kitchen and Bath Business, slightly more than half of respondents said they specify one hardware material in residential projects, while just under half prefer combining multiple materials. The survey also found that nearly 50% of design professionals favor minimalist decorative hardware, compared with approximately 30% who prefer bolder choices.
That range of preferences gives you room to coordinate or mix. Consider how cabinet pulls relate to the faucet, pendants, appliance handles, and range hood. They do not all need to match, but their finishes should feel intentional together.
Designers specify a broad range of decorative hardware finishes, including nickel, brass, chrome, enamel or powder coat, iron, glass, wood, leather, stone, acrylic, ceramic, bronze, copper, stainless steel, and matte black. Brushed, satin, matte, and living finishes offer different levels of sheen and variation. Compare them in the room's daylight as well as under artificial light, because the same finish can feel warmer, cooler, or more reflective depending on its surroundings.
| Finish | Look under daylight | Wear and maintenance | Best fit |
|---|---|---|---|
| Brushed nickel | Soft, neutral silver | Fingerprints are less prominent; use label-approved cleaners | Mixed palettes and most cabinet colors |
| Polished chrome | Bright, reflective, cool | Water spots and smudges show; dry after cleaning | Light, bright or traditional kitchens |
| Matte black | Deep, graphic, contemporary | Scratches may show where the coating wears; avoid abrasives | Modern cabinetry and high contrast |
| Unlacquered brass | Warm, changes with handling | Develops patina; the change is part of the finish | Owners who want an aging finish |
| Lacquered brass | Warm and consistent | The protective layer helps preserve color while intact; address damage early | Low-touch areas and steady color |
| PVD-coated finish | Color set by the coating | Wear depends on adhesion and edge coverage; follow maker care | Sinks, dishwashers and coastal homes |
Use the table to narrow your options, then compare samples against your cabinets and nearby fixtures. The middle column helps you weigh upkeep against appearance; the last points to settings where each finish may suit the design. Treat the result as a shortlist to test in person, not a final decision based on a screen.
What Actually Sits Under the Finish
Start with the metal, because the finish name alone doesn't tell you what's underneath. Stainless steel, zinc alloys, and aluminum make up much of the hardware market, and each substrate behaves differently once a coating is scratched, chipped, or exposed at an edge. Two pulls can both be sold as brushed nickel or matte black and still differ in corrosion resistance, scratch behavior, repairability, and color stability.
A side by side view helps you see why weight, edge coverage, and construction deserve attention before color.
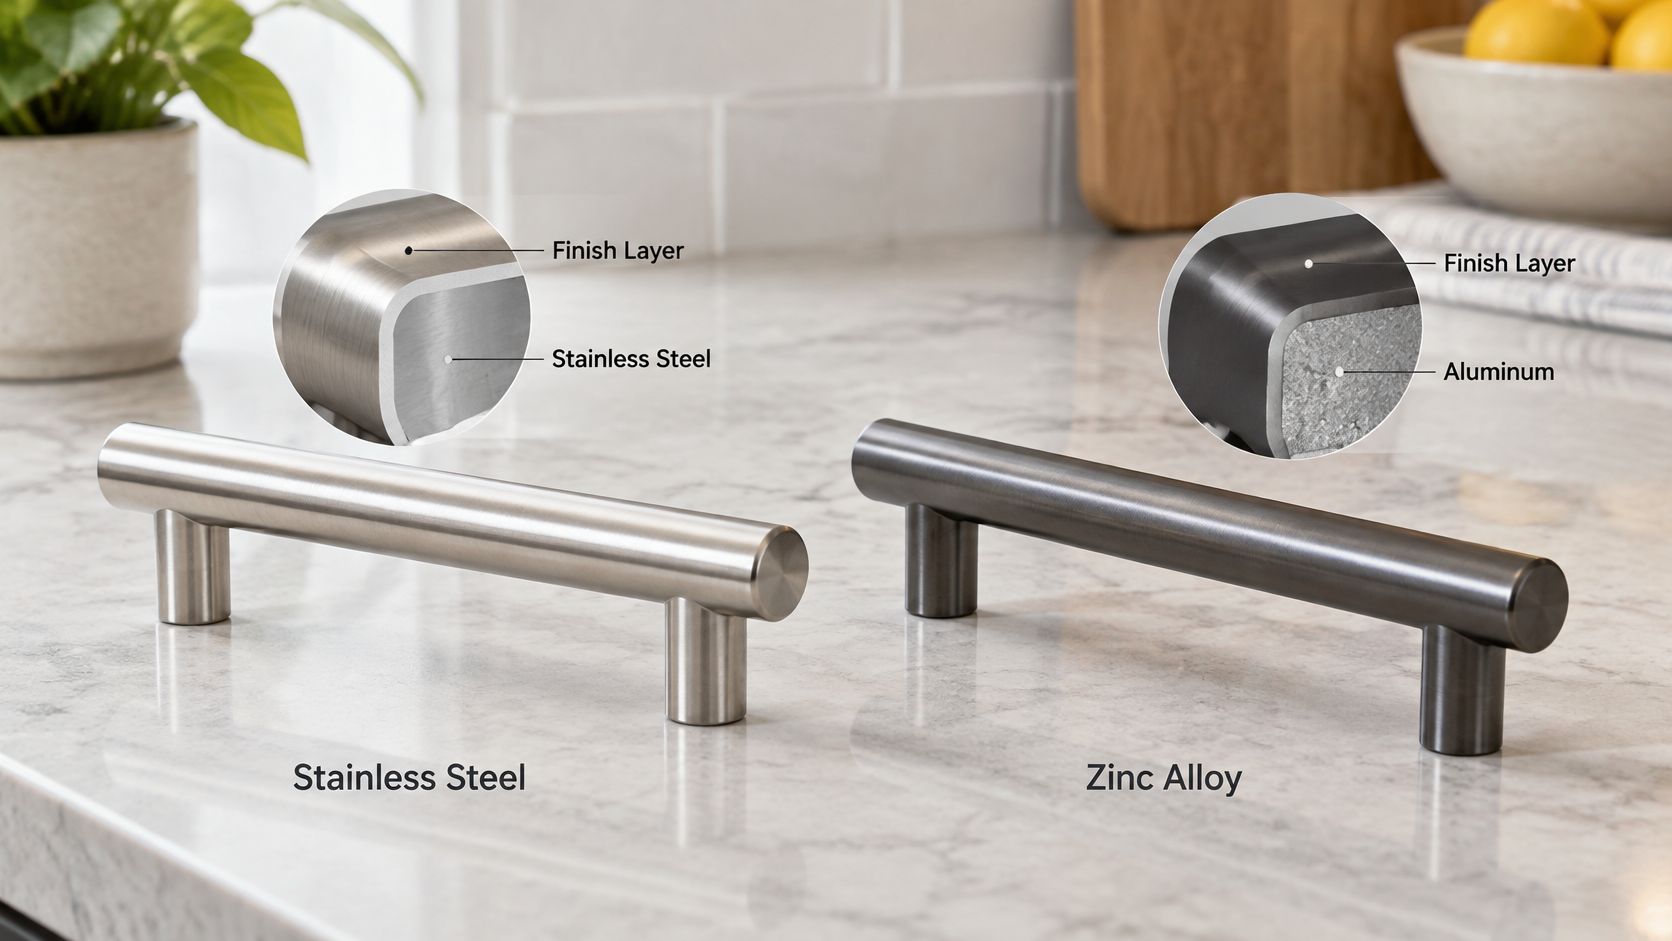
Four ways makers build the surface
- Plating: A thin metal layer is deposited over the base. It can look refined, but wear at edges and around screw heads can eventually reveal a different tone beneath.
- Lacquer: A clear protective coat seals the surface. It keeps color even while it's intact, which is useful if you want brass to stay bright rather than change.
- Powder coat: A dry powder is applied and cured into a colored film. It's common for matte black and other opaque colors, and damage usually shows as a visible break in that film.
- PVD: Physical vapor deposition applies a thin, hard coating, including nitride layers such as titanium nitride or chromium nitride, in a vacuum process. Treat it as an engineered coating system, not just a color.
PVD can be a strong choice for frequently handled pulls, especially near sinks and dishwashers. Its performance still depends on substrate preparation, coating adhesion, and edge coverage. A well made PVD piece and a poorly prepared one may share a color name while behaving very differently after repeated contact with moisture and cleaners.
Brass needs a separate conversation
Brass and bronze complicate the idea that a finish should stay unchanged. Guidance from The Henry Ford on caring for brass and bronze explains that a deliberately applied patina can help protect the underlying metal, while lacquer generally resists corrosion only as long as its surface remains intact. Once that coating is scratched or broken, exposed areas can oxidize and appear as dark streaks.
Think of lacquer like varnish on a tabletop. It's protective and clear, and it works beautifully until a scratch breaks through and moisture reaches the material below. An unlacquered pull takes the opposite approach, allowing handling to deepen and vary the surface over time.
A finish named brass, black, or gold describes appearance. It doesn't prove durability.
Before you order, ask three direct questions. What's the base metal? What's the full coating stack, from substrate to top layer? Which corrosion and wear test method did the maker use, and what does the warranty cover? If a supplier can't answer those questions in writing, you're buying a color sample, not a known level of performance.
How Finishes Hold Up to Kitchen Exposures
Lemon juice on a hand, olive oil transferred from a pan, and dishwasher steam can reach the same pull repeatedly. A single splash is rarely the whole problem. Dwell time matters, especially when residue remains around a seam or screw head.
Cabinet finish testing offers a useful reference for these kitchen exposures. The published summary of ANSI/KCMA A161.1 finish testing includes 24-hour contact with vinegar, lemon, orange and grape juices, ketchup, coffee, olive oil, and 100-proof alcohol. It also describes a 24-hour hot-box test at 120°F and 70% relative humidity.
These are cabinet tests, not guarantees for hardware. They do, however, reflect conditions that finishes may face in a working kitchen: food acids, oils, moisture, and warmth.
| Exposure | Test condition | What it signals for hardware |
|---|---|---|
| Acidic foods | Vinegar, lemon and orange juice, 24-hour contact | Pulls near sinks and prep zones |
| Grape juice and ketchup | 24-hour contact | Staining risk on coated and painted surfaces |
| Coffee | 24-hour contact | Discoloration on light and satin finishes |
| Olive oil and grease | 24-hour contact | Film buildup that dulls matte and satin finishes |
| Spirits | 100-proof alcohol, 24-hour contact | Coating resistance to strong solvents |
| Heat and humidity | 120°F and 70% relative humidity, 24-hour hot box | Hardware near ranges, dishwashers and steamy zones |
| Salt air or seawater | 3.5% sodium chloride solution (lab corrosion test) | Pitting resistance of stainless and PVD substrates |
Turning test conditions into placement decisions
Use the table to identify which exposures matter most where you'll install hardware. Sink cabinets, trash pullouts, and drawers beside the range face food acids and oils. Near dishwashers, ovens, and kettles, repeated warmth and moist air deserve more attention.
Coastal conditions call for particular care. A study of multilayer nitride PVD coatings on stainless steel found that coatings including TiN and CrN improved resistance to pitting corrosion and mechanical wear in 3.5% sodium-chloride solution. These results are useful benchmarks when asking suppliers about performance, not a promise that a particular finish will behave the same way in your kitchen.
Check what substrate was tested, whether edges were covered, and whether the reported test matches the finish you're considering. A flat test coupon does not capture every detail of a pull's curved edges, which hands contact repeatedly. Finish choice should account for both the exposure and how the hardware will wear and be replaced over time.
Cleaning Habits That Keep Each Finish Intact
A finish can look pristine on installation day and still show damage months later if cleaner sits in a seam or around a screw head. Residue in joints and textured areas can continue affecting the surface after cleaning is done. Gentle, consistent care helps the hardware age well and keeps it easier to maintain.
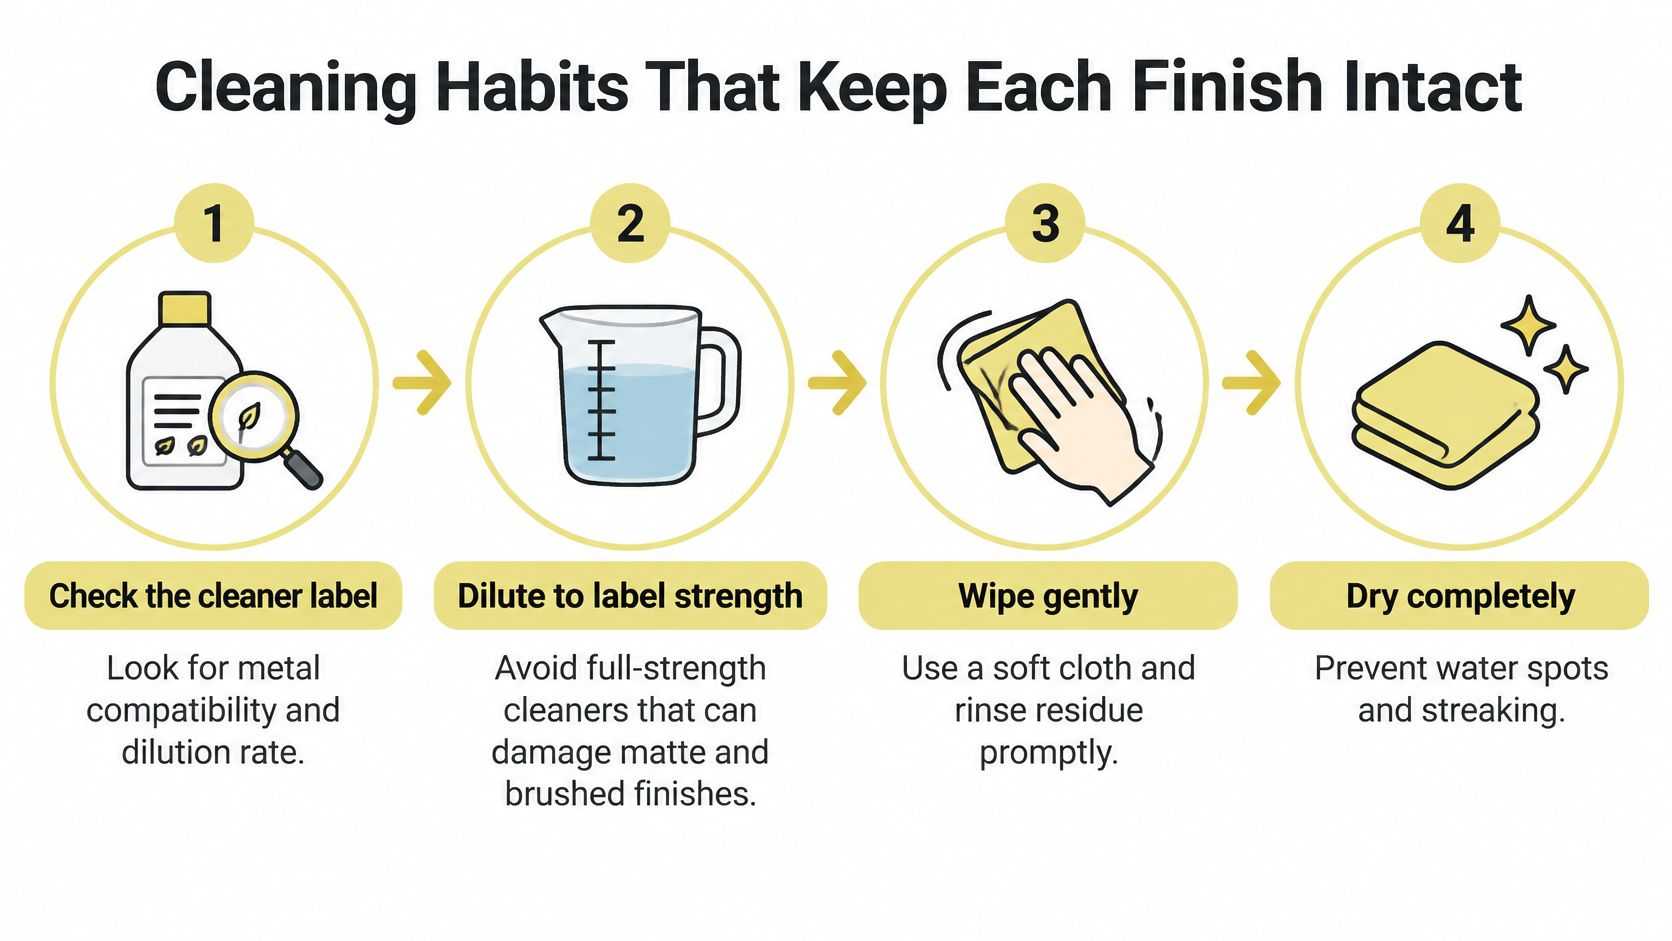
A six-step routine you can repeat
- Check the cleaner label first. Confirm that it is suitable for the metal and note the required dilution. A product that works on counters may not suit plated or lacquered hardware.
- Dilute to label strength. Concentrated cleaner can mark matte and lacquered finishes. Using more product does not make cleaning faster or more effective.
- Apply with a soft cloth. Avoid spraying directly into escutcheons or joints, where liquid can collect. A cloth gives you control over application.
- Keep contact time short. Do not soak hardware or leave cleaner sitting while you move on to another task.
- Rinse if the label allows. Use a clean, damp cloth to remove residue from the surface and around raised details.
- Dry completely with a soft, non-abrasive cloth. Pay close attention to screw heads, seams, and textured areas. Drying also helps prevent water spots on chrome and satin finishes.
An EPA registered disinfectant label warns that prolonged contact with metal may cause pitting or discoloration. The label also distinguishes between use at the recommended dilution and concentrated or extended contact. Follow its directions: a cleaner may be suitable at the stated strength but damaging if left on the hardware.
What to keep away from hardware
Avoid abrasive powders, steel wool, and acidic, chlorine-based, or solvent-heavy products unless the hardware maker explicitly approves them. Abrasion and chemical exposure can alter matte black, living, lacquered, and plated finishes, even if the underlying metal remains sound. This matters when choosing a finish for the long term: cleaning habits affect how it looks with age, and careful upkeep can help delay replacement.
Practical rule: If you would not leave cleaner sitting on a faucet while you eat dinner, do not leave it on a cabinet pull.
When planning a bath as well, tile inspiration for Melbourne bathroom renovators can prompt you to consider how tile, grout, and metal meet moisture. For kitchen hardware, ask for written maintenance instructions and the specific cleaners the manufacturer approves. Keep those instructions with your project records so the next person caring for the hardware knows how to clean it without risking the finish.
Choosing One Dominant Finish and Adding One Accent
Mixed metals work when one finish leads and the other has a clear supporting role. Without that hierarchy, a kitchen can look as if each fixture was ordered on a different day. I would start with the surface you see most, then place the accent where it adds warmth or contrast without competing at every cabinet.
A composed kitchen shows how one metal can carry the room while another appears in a smaller, intentional dose.
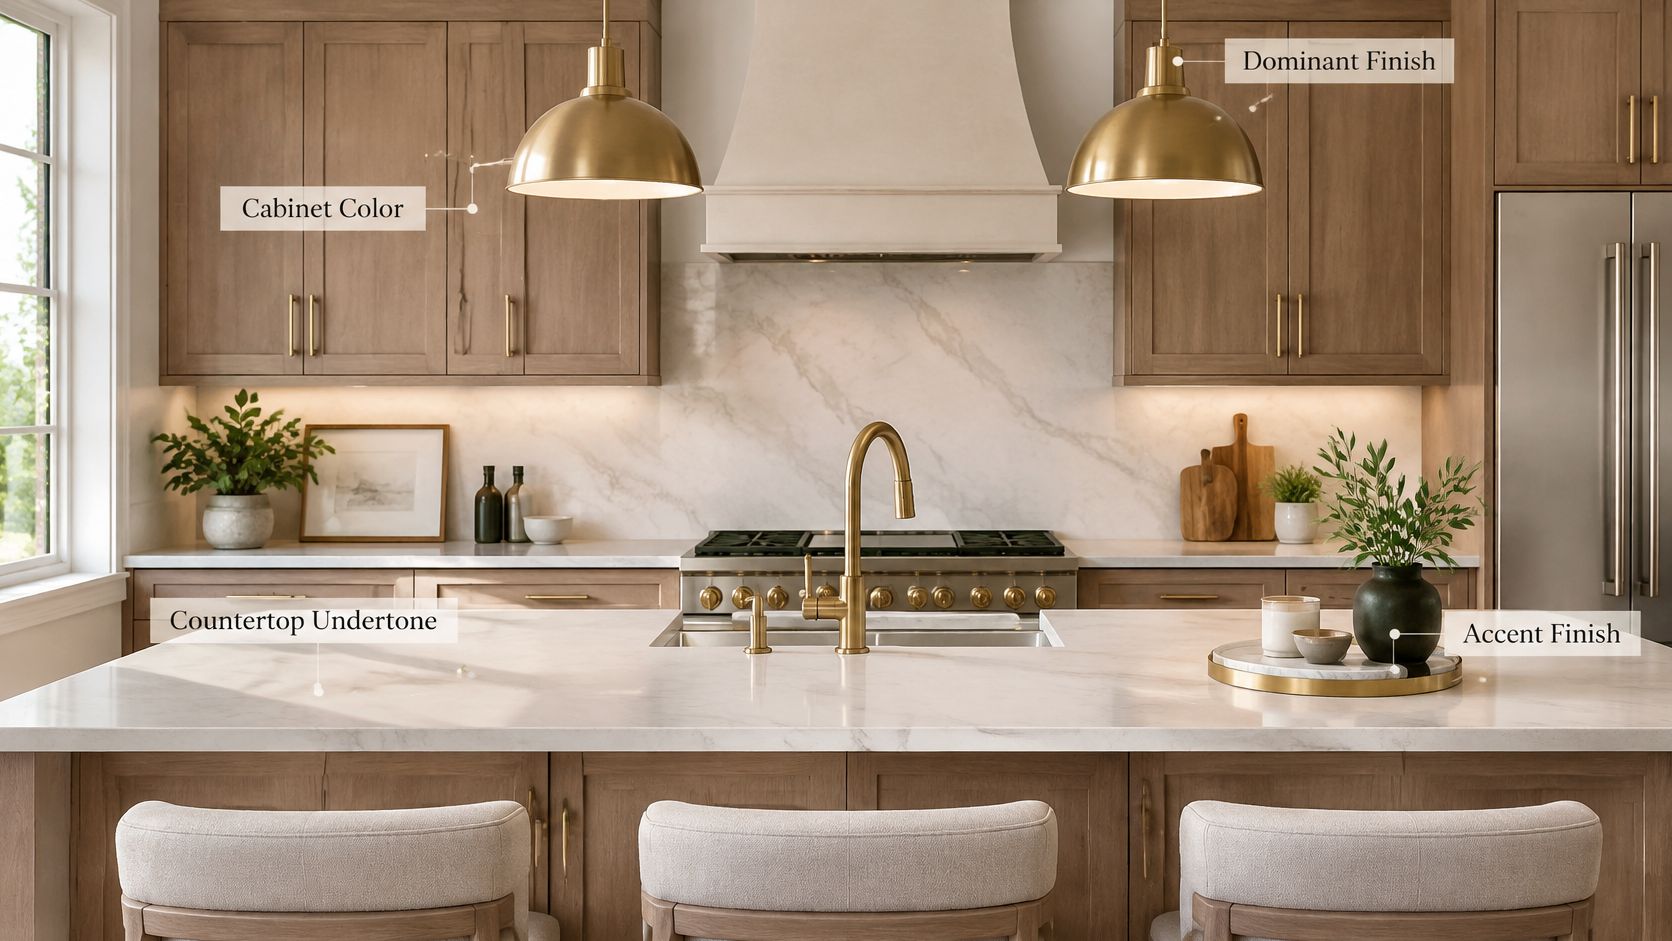
The one-plus-one method
- Choose the dominant finish from cabinet color and countertop undertone. Carry it into the pulls, faucet, and main light fixtures where possible, so the largest group of metal pieces agrees.
- Add the accent in one place only. Warm brass on a range hood or a single pendant can be enough. Keep it to a small share of the visible metal.
- Repeat the accent within its own group. If the pendant is brass, let its stem and canopy share that finish. Repetition makes the choice read as deliberate rather than accidental.
Neutral finishes often make the best dominant choice because they don't demand attention from every angle. In 2025, 31% of surveyed homeowners chose brushed-nickel kitchen cabinet hardware, according to Apartment Therapy's report of Houzz research involving more than 1,600 homeowners. Brushed nickel is also forgiving with fingerprints and suits most cabinet colors, which helps explain its staying power.
Say a 1920s home has painted cabinets, nickel pulls, and a nickel faucet. One warm brass pendant over the island can echo the character of the house without turning every drawer into a period statement. The nickel does the daily work, and the brass provides the note of warmth your eye catches from the doorway.
This short walkthrough is useful for watching how metal reads at room scale rather than on a sample board.
At Jennifer Gilmer Kitchen & Bath, Jennifer Gilmer, CKD, and the design team plan metals alongside lighting and appliances so the accent is placed during design rather than added late. That planning becomes easier when you coordinate hardware with kitchen cabinet finishes from the beginning. Before you decide, look at your candidates in morning daylight and again under evening lamps, because a finish that feels balanced at noon can turn sharp or dull once warm light takes over.
Remodel Decisions That Change Your Finish Choice
Hardware is small, but it sits at the intersection of nearly every larger decision. Cabinet color sets the field, stone contributes its own undertone, plumbing is costly to change, and lighting can warm or cool every metal in the room. Choosing pulls last isn't indecision. It's sequencing.
Use this order to keep each selection from narrowing the next one by accident.
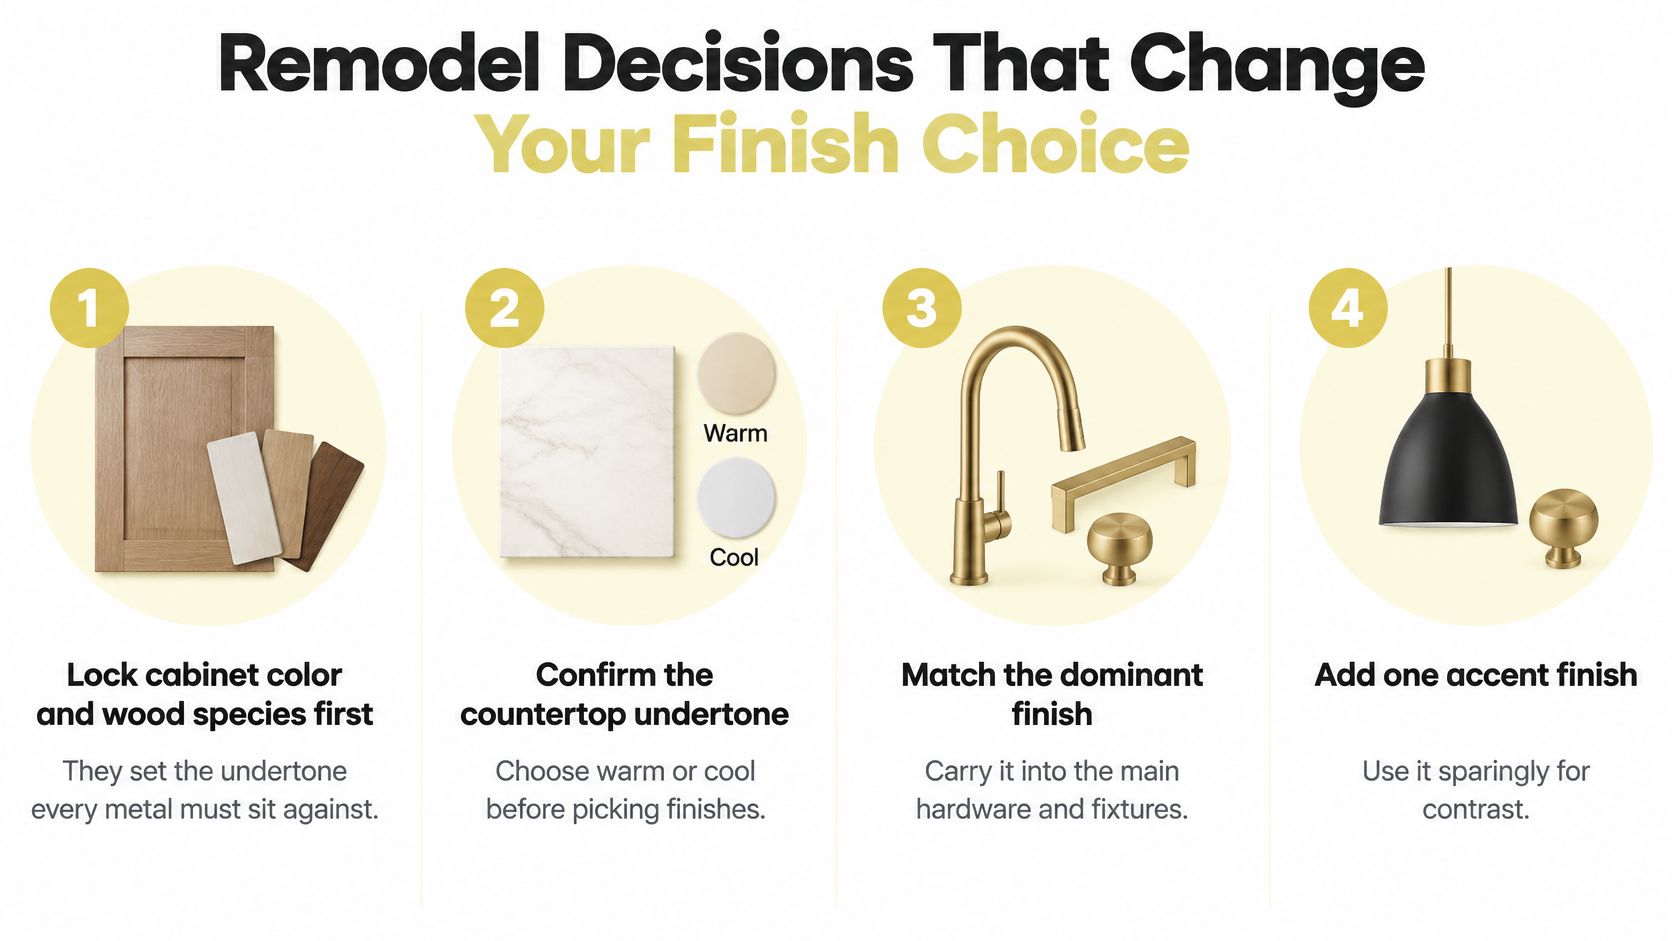
Decide in this order
- Lock cabinet color and wood species first. They set the undertone every metal must sit against, from painted maple to walnut or white oak.
- Confirm the countertop undertone. Decide whether the stone or solid surface reads warm or cool in your actual light, not only in a slab yard.
- Choose plumbing finishes next. Faucets and sinks are harder and more disruptive to change than cabinet pulls, so they deserve priority.
- Set lighting color temperature and fixture finishes. Warm light deepens brass and bronze, while cooler LEDs can flatten nickel and chrome.
- Plan appliance handles and integrated panels. A paneled refrigerator may remove stainless from view, while exposed handles can effectively dictate a cool metal presence.
- Select cabinet hardware last, with samples in hand. By this point you can judge each pull against the actual cabinet, counter, faucet, and light.
Decision points that can change the answer
- Tall pantry and storage doors: They're seen and touched constantly, so choose a finish that tolerates frequent handling without showing every print.
- Phased remodels: Record exact finish names, suppliers, and product codes. That paperwork matters when you need replacement pieces years later.
- Walls of hardware and open shelving: More visible metal at once calls for a quieter finish. A graphic black pull repeated across a long run can become the pattern of the room.
- Budget sequencing: Early planning helps you reserve room for better substrates and coatings where hands and moisture concentrate. A practical framework for budgeting for your kitchen remodel can help you think through allowances before selections begin.
Costs also shape where you concentrate quality. Our guide to kitchen remodeling costs can help you place hardware within the larger project budget. The goal is simple. No single piece should fight the cabinets, plumbing, lighting, or appliances around it.
Test Samples Before You Order Hardware
A photograph can't tell you how a pull feels in your hand, how grease wipes from its underside, or whether its undertone turns green beside your cabinet color at dusk. Full size testing can. Spend a few days with samples before you commit to a full kitchen of any finish.
Five checks before you place the order
- Shortlist three or four finishes at full size. Mount or hold each sample against an actual cabinet door. A small finish chip hides edge wear, scale, and the way light travels across a curved pull.
- View each sample in three kinds of light. Check morning daylight, evening lamp light, and the kitchen's actual bulbs. Move painted cabinet samples too, since coordinating paint color ideas for kitchen cabinets with metal undertones is easier when both are in your hands.
- Handle each sample as you would while cooking. Touch it after washing hands, then wipe it with the cleaner you plan to use. Check for residue around edges and screw heads.
- Request specifications in writing. Ask for the base metal, coating, corrosion and wear test results, and warranty terms before you order.
- Confirm future availability. Ask whether the finish and product line will remain available for replacements, and consider buying a small number of spares for high use locations.
Buy the finish you have handled, cleaned, and seen in your own light. Don't buy the one that only looked convincing online.
Jennifer Gilmer Kitchen & Bath works with clients from initial consultation to final installation, serving Washington DC, Maryland, and Virginia. Countertop and cabinet hardware options can be viewed in the firm's resource room, where you can compare full size samples alongside cabinetry and other materials. Our design process also includes showing clients what the finished project will look like on a screen before starting, so finish choices can be reviewed with layout, lighting, and appliances rather than in isolation.
Bring your cabinet sample, countertop selection, and plumbing choice to that conversation. You'll leave with a shorter list and a clearer sense of which finish belongs in the hardest working spots. Book a consultation at gilmerkitchens.com when you're ready to test your shortlist in person.
If you're planning a kitchen in Washington DC, Maryland, or Virginia, Jennifer Gilmer Kitchen & Bath can guide your hardware, cabinetry, lighting, and layout decisions from concept through installation. Compare full size finishes in person, review how they'll age in your busiest work zones, and build a palette that still feels composed years from now. Start your project conversation with Jennifer Gilmer Kitchen & Bath.