.avif)

The widely cited average kitchen island is about 40 by 80 inches, or roughly 1 by 2 meters. Current Houzz trend data shows that most upgraded islands are now longer than 7 feet, so the “average” depends heavily on the kitchen, the household, and the work the island needs to perform.
You may be standing in the middle of your kitchen with a tape measure, marking an imaginary rectangle on the floor and wondering whether it will make the room feel finished or just harder to use. That uncertainty is sensible. An island isn't a decorative object dropped into empty space. It changes every route through the room, from the refrigerator to the sink and from the cooking zone to the dining area.
Table of Contents
- Length determines how much the island can do
- Depth controls reach and storage
- Height should serve the primary user
What the Average Kitchen Island Actually Looks Like
The classic answer to the average size of a kitchen island is 40 by 80 inches. That benchmark has become a practical starting point because it offers useful prep surface and storage while remaining workable in many medium-to-large kitchens. It isn't a legal standard or a universal prescription, but it gives homeowners a tangible shape to mark out before cabinetry, appliances, and seating complicate the plan. Contemporary kitchen island sizing guidance places common island depths in the 24 to 40 inch range and working height around 36 inches.
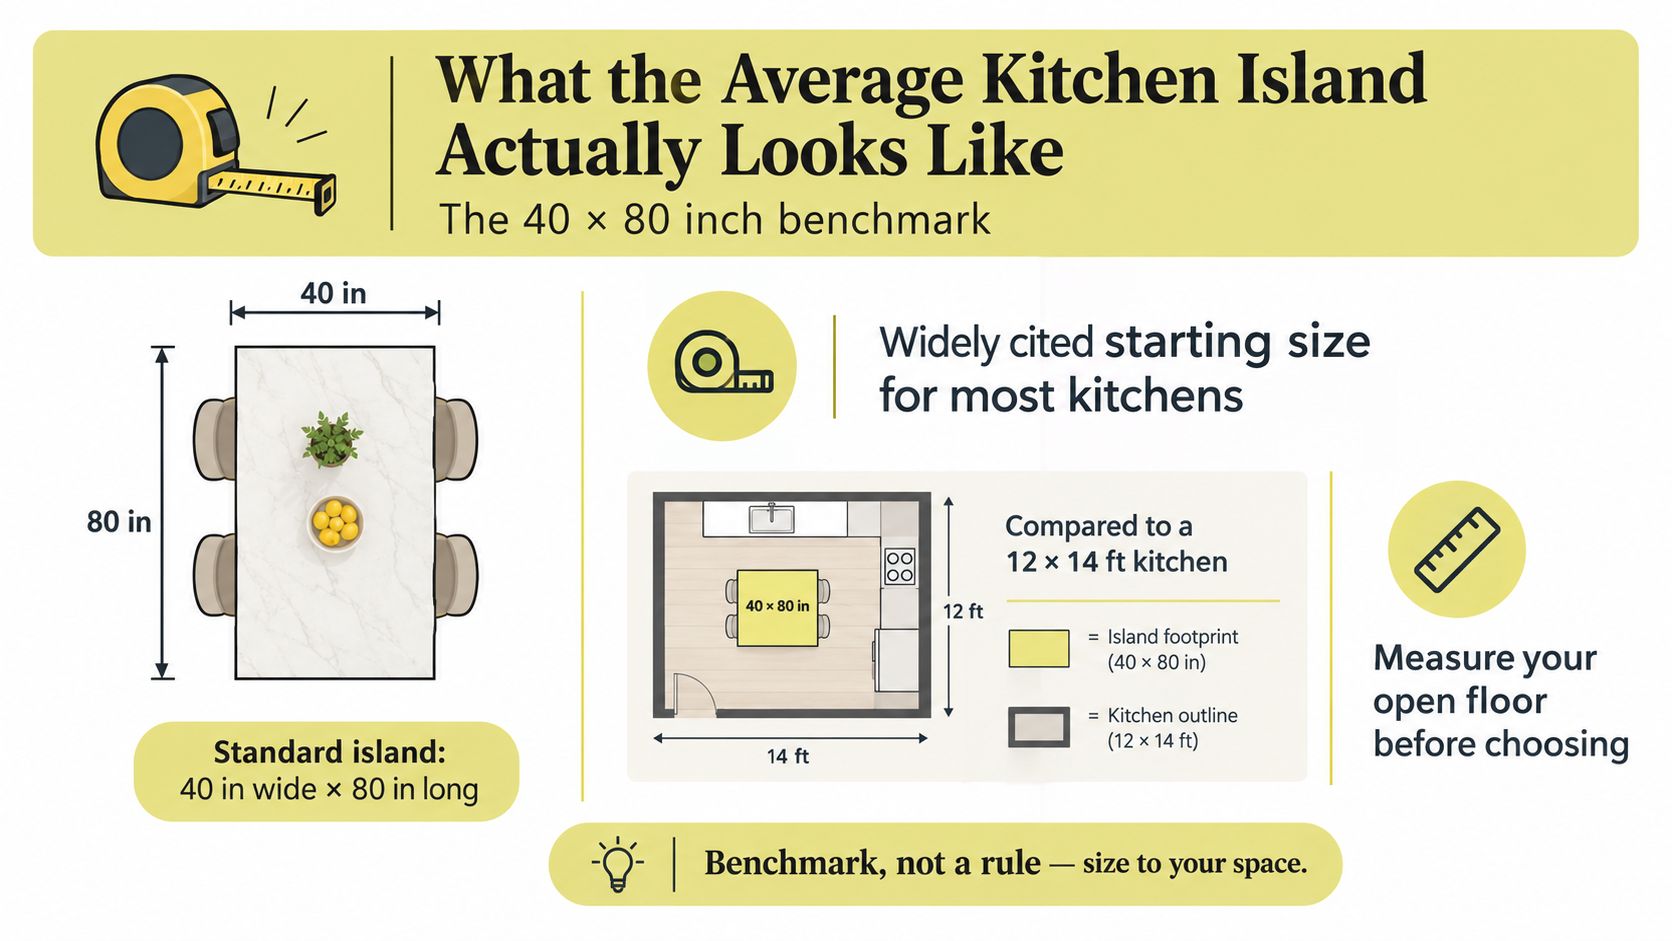
That familiar rectangle is no longer the whole story. The 2026 U.S. Houzz Kitchen Trends Study reports that 52% of upgraded kitchen islands exceeded 7 feet in length, while 30% measured 6 to 7 feet and 18% were under 6 feet. The data makes the point clearly: many remodeled kitchens are choosing longer islands because the island now serves as prep counter, storage wall, serving station, homework surface, and social anchor, not just a place to set down a cutting board. The 2026 Houzz study is particularly relevant to open-plan renovation decisions.
Treat the benchmark as a starting shape
A 40-by-80-inch island may suit a kitchen with a straightforward prep role. It may be too modest for a large open room where the island must include seating, substantial drawers, and a sink. A longer island can also look more appropriate in a generous room, while the same length may dominate a narrower Washington-area kitchen with older proportions, multiple doorways, or a strong sightline from the living room.
A freestanding piece can help you judge scale before committing to millwork. For example, a suburban kitchen island with 6 drawers gives a homeowner a useful reference for how storage, working height, and visual mass occupy the center of a room.
The decision comes down to three questions:
- Dimension: How long, deep, and tall can the island be without crowding the room?
- Clearance: Can people move, open appliances, and work from both sides?
- Function: Is the island primarily for prep, cooking, storage, seating, or several of these at once?
The textbook average answers only the first question, and even then only provisionally. The right island is the one that supports the room's daily rhythm.
The Three Dimensions That Define an Island
An island is custom furniture scaled to the room, the cook, and the way the household lives. Its physical character comes from three measurements: length, depth, and height. Each serves a different purpose, so increasing one does not automatically improve the others.
Length determines how much the island can do
Length sets the available run for drawers, appliances, prep space, and seating. A compact island may stay close to the classic benchmark, while a larger kitchen can support a longer work surface. Contemporary guidance describes full-size islands at about 3 by 5 feet, with seating-friendly examples often measuring 72 to 84 inches. Some extend to 96 to 120 inches when the room and circulation can support them. Homes & Gardens' island planning guidance recommends judging the island as part of the room's proportions rather than choosing its length in isolation.
Every feature consumes part of that run. A sink, cooktop, drawer stack, seating zone, and landing space can make a long island feel short on usable surface. In a Washington, DC area home, the right length must also account for older room proportions, several doorways, or a direct view from the living room.
Depth controls reach and storage
For many residential layouts, 36 to 42 inches deep provides a practical balance between cabinet storage and reachable work surface. Functional island guidance commonly centers on 36 to 40 inches, while depths beyond about 48 inches can make the middle awkward to access in an ordinary kitchen. Cabinet clearance guidance explains why depth must be considered alongside aisle width, drawer pulls, appliance doors, and seating.
A shallow island protects circulation but gives up storage and prep area. A deep island adds capacity on paper, yet may force someone to lean across the surface to clean it or retrieve a bowl. Jennifer Gilmer Kitchen & Bath's layout-planning process treats depth as a working decision, not a default cabinet dimension. The plan should show how the household will reach, clean, load, and use both sides.
Height should serve the primary user
The common working height is 36 inches, which suits standard counter-height preparation and appropriately scaled counter stools. A raised bar tier can be 42 inches, separating work and seating visually while changing sightlines and the seating experience. A lower surface may suit a household where accessibility and reach take priority.
| Dimension | Typical Range | Most Common Value | Notes |
|---|---|---|---|
| Length | About 5 to 10 feet | About 6 to 7 feet | Let function and room proportion set the final length |
| Depth | 24 to 48 inches | About 36 to 40 inches | Avoid excessive depth that makes the center difficult to reach |
| Height | Counter or raised bar format | 36 inches | Coordinate the surface with the user and seating type |
Use these benchmarks to start a scaled plan, not to order from a catalog. The completed layout should show the island beside tall cabinets, windows, door swings, and perimeter work zones. That drawing exposes proportion problems before custom millwork reaches the installation stage.
Why Clearance Matters More Than the Island Itself
A well-sized island can still fail if the floor around it does not support cooking, opening doors, and moving through the room. In Washington DC area homes, clearance often determines whether an island feels useful or oversized.
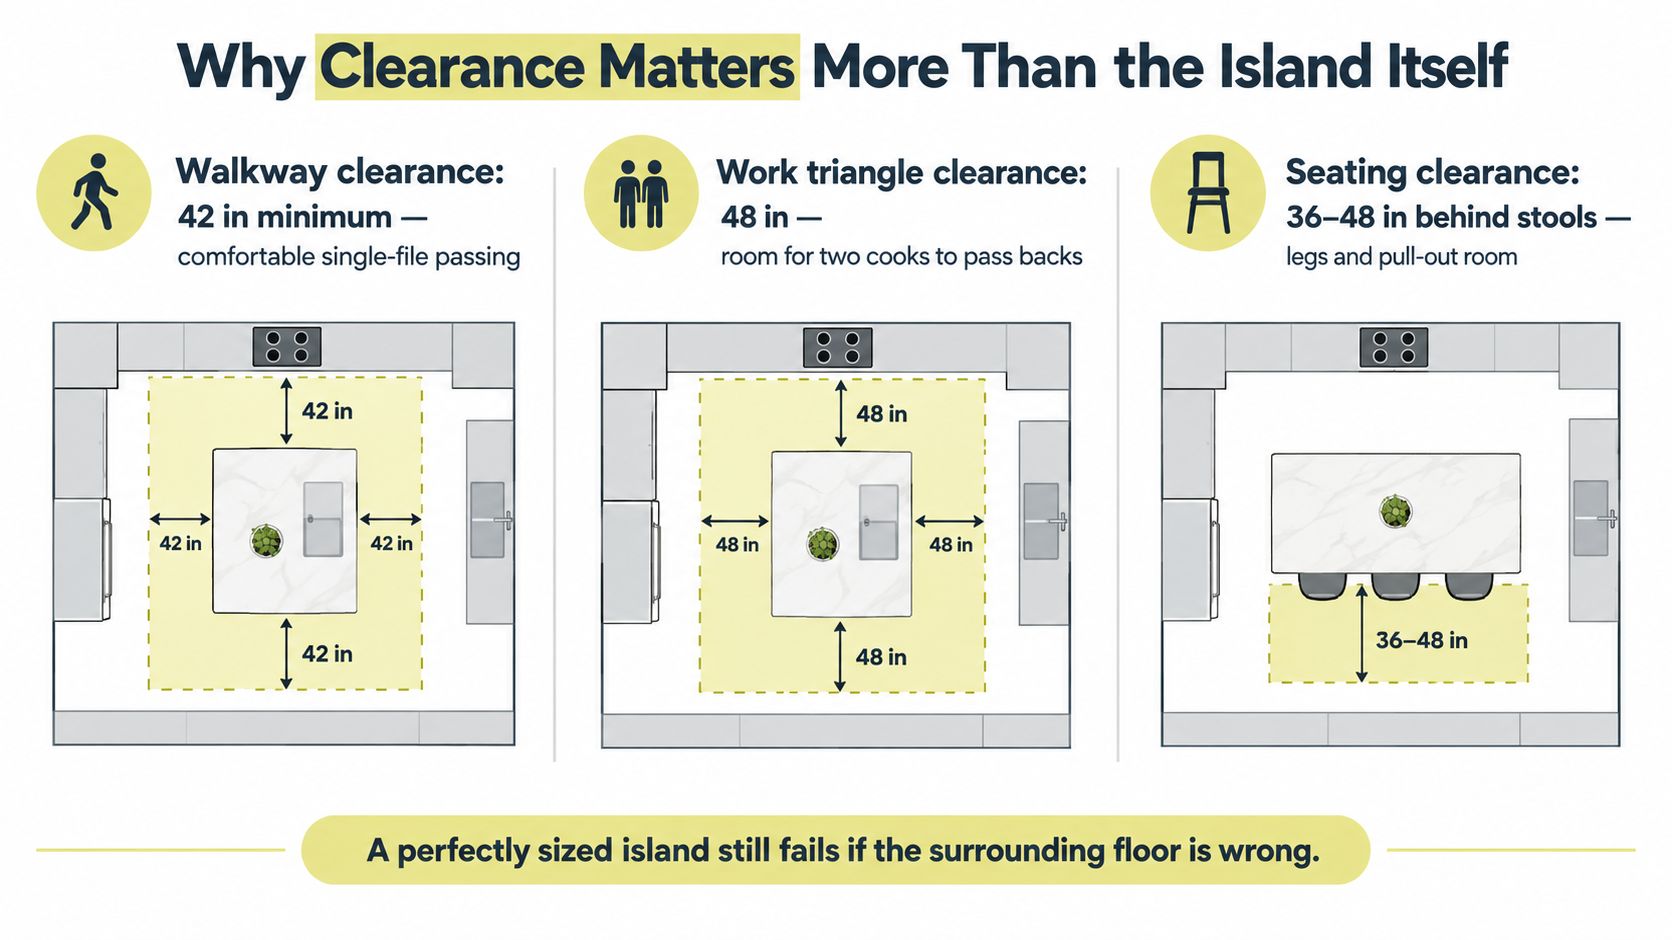
A 40-by-80-inch island may suit a room on paper, yet make the kitchen feel cramped when surrounding aisles are narrow. Measure between counter fronts, tall cabinets, appliances, and the island edge. Measuring from a baseboard or empty wall gives a false sense of space because cabinets and open doors occupy real floor area.
Read the aisle in three thresholds
Thirty-six inches is the practical minimum for movement around an island. It can work as a one-cook passage, but leaves little room for opposing traffic, open drawers, or a busy household. Houzz's kitchen island clearance guidance recommends evaluating the entire room before settling on the island footprint.
Forty-two inches gives one cook a more workable aisle. A person can stand at the island while someone else passes, and perimeter drawers are less likely to compete for the same space. Kitchen work-aisle guidance uses 42 inches for one cook and 48 inches for more than one cook as practical planning anchors.
Forty-eight inches is the sensible target for multiple cooks, heavy traffic, or an island opposite full-height cabinetry.
Practical rule: A smaller island with generous clearance will usually outperform a larger island that blocks the route between the refrigerator, sink, and cooking surface.
Appliance doors need a separate test. An oven, dishwasher, or refrigerator door must open without striking the island or trapping the person nearby. Mark each door in its open position and test the movement. Static counter-to-counter measurements do not show the whole problem.
For the broader planning logic, review kitchen island clearances.
Clearance behind stools also needs a measured plan. Thirty-six inches is commonly treated as the minimum behind a seated diner. 42 to 48 inches gives people more room to pass behind the seats. Seating clearance guidance shows why a seating overhang cannot be judged separately from the aisle behind it.
Prep Islands Versus Cook and Seat Islands
Function should decide the island before style does. A prep-only island and a cook-and-seat island may share a material palette, but they need different footprints, service routes, and technical planning.
A prep-only island keeps the center of the room open for chopping, plating, baking, and staging. It can devote more of its length to uninterrupted surface and drawer storage. It usually doesn't need a cooktop, ventilation system, gas route, or plumbing, which simplifies both the design and the visual composition.
A cook-and-seat island has a more demanding brief. It may need a cooktop, sink, dishwasher, electrical service, ventilation, landing space, and seating on the opposite side. The island becomes a compact kitchen within the kitchen, so length and depth must support safe separation between work zones rather than merely accommodate a larger slab.
| Feature | Prep-Only Island | Cook-and-Seat Island |
|---|---|---|
| Primary role | Chopping, plating, staging, and storage | Cooking, serving, gathering, and casual dining |
| Length | Often a shorter run suited to the room | Usually longer when appliances and seating share the island |
| Depth | Functional depth for drawers and reachable prep | More depth may be needed for appliances and a seating overhang |
| Appliance placement | Often no major appliance | May include a cooktop, sink, dishwasher, or microwave drawer |
| Ventilation | Rarely required at the island | May require a downdraft or overhead hood |
| Seating | Optional and secondary | Planned as part of the island's main purpose |
The most common mistake is to order a generic island and decide its role afterward. That reverses the design process. A sink needs plumbing and landing space. A cooktop needs ventilation and safe adjacent surface. Seating needs a comfortable overhang and enough room behind the stools.
Material selection should follow the work. If the island will handle daily chopping, serving, and informal dining, research into the durability of granite worktops can help frame a conversation about stone performance and maintenance. The surface still needs to be detailed around seams, edges, supports, and the activities below it.
An island with integrated cleanup may also change the entire workflow. Review the planning considerations for an island with sink and dishwasher before assigning the center of the room to appliances. The right choice isn't the one with the most features. It's the one that leaves the primary work surface usable.
Sizing the Island for Everyday Seating
Seating turns an island into part of the household's daily gathering space, so poor dimensions become obvious fast. Stools placed too close together create competing shoulders. A shallow overhang leaves diners without knee room. A narrow aisle becomes difficult to use once chairs are occupied. Countertop material cannot fix those planning errors.
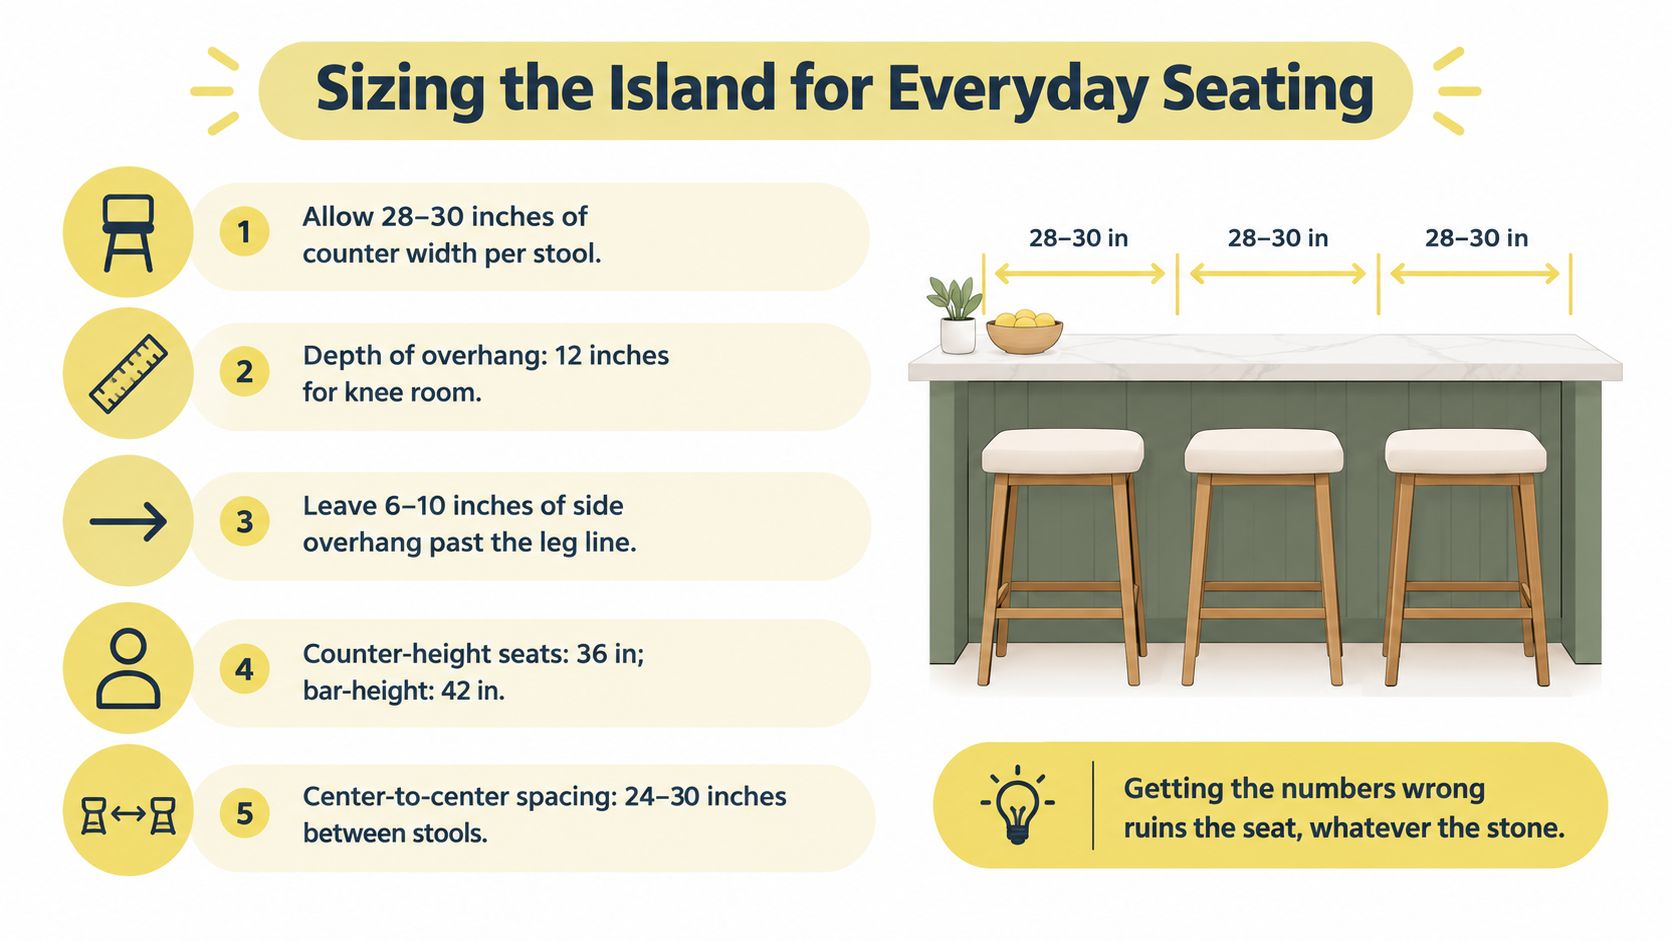
Allow 28 to 30 inches of counter width per person. Island seating guidance supports that range as a practical baseline for comfortable seating. Measure the usable seating run, not the island's overall length. Cabinet fillers, end panels, legs, appliance sections, and other interruptions do not count as places for stools.
Build the overhang around the person
A comfortable seating overhang needs enough depth for knees and adequate support for the countertop. For casual seating, plan around 15 inches of overhang as a starting point, then verify the final dimension against the cabinet construction, countertop thickness, stool design, and support method.
The aisle behind the stools matters just as much. Two parents may prepare dinner while a child works at the counter. A friend may sit with a drink, then stand to help carry plates to the dining room. Those ordinary movements require enough space for people to pull out stools, pass behind seated diners, and return to the work area without collisions.
Match the seat to the surface
A 36-inch counter requires counter-height seating. A 42-inch raised bar requires bar-height seating. Pairing the wrong stool with either surface produces cramped knees, poor posture, or an awkward reach.
A long island does not automatically provide generous seating. A sink, cooktop, drawer stack, or end support can consume a substantial part of the apparent run. Mark every stool position on the plan, then pull a chair back into the aisle. Someone should be able to pass without turning sideways or asking diners to move.
Keep one end of the island available for work when the room allows it. That layout supports homework, conversation, and quick meals while preserving a clear chopping area for the person preparing dinner. In Washington, DC area homes, that separation often makes a compact island feel more useful than a longer one filled entirely with stools.
Room Size, Code, and the 10 Percent Rule
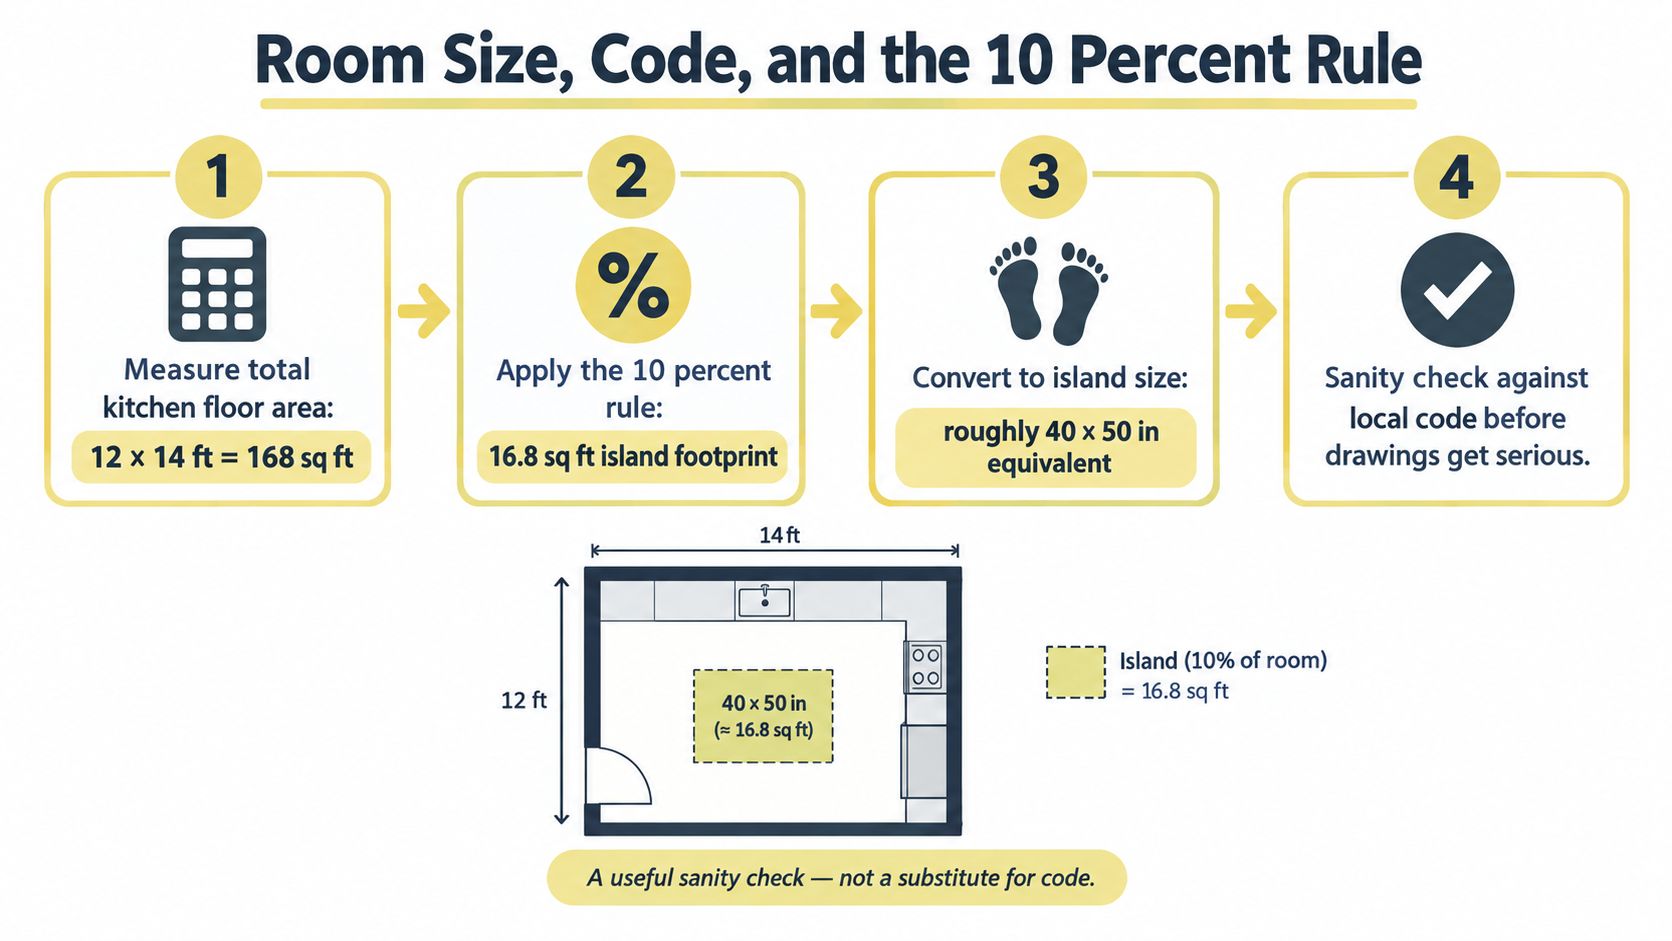
The island may fit the room on paper and still make the kitchen uncomfortable. Start with the 10 percent rule: keep the island footprint near 10% of the kitchen's total floor area. It is a screening tool, not a substitute for a scaled plan, appliance-door checks, or local review. Homes & Gardens' island design guidance uses the proportion as a practical check on island mass and circulation.
A 200-square-foot kitchen would place the upper guideline near a 20-square-foot island. A 28-square-foot island exceeds that proportion before seating, appliance doors, and traffic routes enter the calculation. That does not make the island impossible. It requires a closer review of the room's edges, work aisles, door swings, and the value of the additional surface.
Keep proportion separate from accessibility
Proportion alone does not produce a usable island. Review reach ranges, seated access, appliance controls, and the placement of sinks or cooktops during concept planning. The layout should match who cooks, how people move through the room, and whether a family member needs an accessible work zone.
For Jennifer Gilmer Kitchen & Bath, that review belongs in the concept-through-installation process, before cabinet specifications and fabrication. In Washington DC, Maryland, Virginia, and Delaware, electrical outlets, gas connections, ventilation, and appliance installation may also be governed by local code and project conditions. These requirements can change island depth, cabinet construction, duct routes, and work-zone locations.
Apply the test before the drawings become expensive
A disciplined concept review asks four questions:
- How large is the full kitchen envelope? Measure usable floor area, not only the space between finished walls.
- What footprint does the proportion allow? Use the 10 percent rule as an early limit.
- Do the aisles remain functional? Check working clearances and open appliance positions.
- Can the design satisfy local requirements? Review utilities, ventilation, electrical needs, and accessibility before final specifications.
Washington-area homes also demand context. A rowhouse, detached suburban kitchen, and open-plan addition may need different island proportions even with similar floor areas. Set the island only after considering room geometry, code, daily movement, and the work the island must perform.
Planning Islands for Small and Large Kitchens
A small kitchen doesn't need a miniature version of a large kitchen. It needs a different idea of what the island is for.
In a compact room, an island under 6 feet long may serve as a narrow prep surface, a single-bowl sink base, or a breakfast ledge for two stools. The priority is preserving usable passageways rather than maximizing drawers. A depth around 24 to 30 inches may be more appropriate than a deep multifunctional block when a wider island would compress circulation.
A mid-size kitchen can often accommodate the classic 40-by-80-inch footprint when the perimeter layout leaves about 42 inches for working clearance. The island may carry a cooktop at one end, drawers through the middle, and a modest seating zone at the other, but only if those roles are assigned carefully. A larger room can support an island around 9 to 10 feet long, provided the surrounding architecture gives that mass somewhere to belong.
| Kitchen Size | Recommended Island Dimensions | Seating | Storage Trade-off |
|---|---|---|---|
| Compact room | Shorter than 6 feet, with a restrained depth | One or two stools if circulation permits | Less storage, more open floor |
| Mid-size kitchen | Around 40 by 80 inches when clearances work | Limited seating or a compact dining side | Balanced prep surface and drawers |
| Large open room | Around 9 to 10 feet long when the room supports it | Several stools with a dedicated seating run | More storage, but greater visual mass |
Small rooms reward restraint
A narrow island can act like a rolling butcher-block cart in spirit, even when it's permanently installed. It may provide a place to set down groceries and prepare vegetables without claiming the center of the room as a full cooking zone. If the island forces people to squeeze past one another, a peninsula or wall-mounted work surface may serve the plan better.
Don't judge a compact island by photographs of large homes. A small island with clean circulation can feel intentional, while an oversized one makes every cabinet door and appliance opening compete for space.
Large rooms need visual discipline
A long island can anchor an open-plan kitchen, but length alone doesn't create elegance. A generous footprint may support waterfall ends, dual appliance zones, and multiple stools, yet it can also become a heavy visual block between the kitchen and living area. Ceiling height, sightlines, lighting, and nearby pantry storage should all influence the decision.
An experienced designer can use custom-designed kitchen islands to resolve those relationships rather than forcing a standard rectangle into a room with unusual proportions. The best large islands feel connected to the architecture. They don't just occupy the most floor area available.
Bringing It All Together in Your Own Kitchen
Start with the room, not the countertop catalog. Measure the full kitchen floor area, apply the 10 percent footprint test, and then draw the island into the plan with the surrounding clearances intact. Only after those checks should you decide whether the island can grow in length, gain depth, or include seating and appliances.
Choose the island's dominant job. A prep island needs uninterrupted surface and accessible drawers. A cooking island needs appliance landing space, ventilation, and a clear relationship to the refrigerator and sink. A social island needs comfortable seating width, a suitable overhang, and enough room behind the stools for people to move.
Test the footprint at full scale
Use painter's tape or lightweight boxes to mark the proposed perimeter on the floor. Live with the outline through a normal cooking day rather than judging it during an empty-room walk-through.
Test these movements:
- Refrigerator access: Open the door fully and walk from the refrigerator to the island.
- Dishwasher use: Stand at the open dishwasher and check whether another person can pass.
- Drawer access: Pull out the deepest drawers while someone occupies the opposite work zone.
- Seating: Place stools at the planned locations and check the distance between diners.
- Traffic: Walk from the kitchen to adjoining rooms without treating the island as an obstacle.
Then review the details that tape can't show. Confirm reach distances for the primary cook, identify vent hood ducting routes, locate electrical panels and structural constraints, and check whether the proposed countertop needs additional support. A three-dimensional view should show the island alongside perimeter cabinetry, tall units, windows, and lighting before fabrication begins.
For homeowners in the Washington DC, Maryland, and Virginia area, Jennifer Gilmer Kitchen & Bath develops kitchen layouts, cabinetry, appliance placement, material selections, and installation coordination as part of a concept-through-installation process. The firm serves Washington DC, Maryland, Virginia, and Delaware, with showrooms in Chevy Chase, Easton, and Ashburn where clients can review cabinetry and finish options.
The right answer to the average size of a kitchen island is therefore a range of possibilities, not a single purchase dimension. Begin with the classic benchmark, challenge it against current remodeling patterns, protect the circulation, and let the island's primary job determine the final shape.
Jennifer Gilmer Kitchen & Bath can help you test an island footprint against your room dimensions, cooking habits, seating needs, cabinetry, and local project requirements. Visit Jennifer Gilmer Kitchen & Bath to explore the firm's concept-through-installation kitchen design process and arrange a consultation in the Washington DC, Maryland, Virginia, or Delaware area.