

Your cabinet drawings are nearly ready to sign, six appliance tabs are open on your laptop, and somewhere in that stack of spec sheets is the number that decides whether the kitchen works. It isn't the cabinet color. It's the width printed on the refrigerator listing, and whether it accounts for the door when it swings open.
Buyers often measure once, choose the appliance, and assume the cabinet maker will handle the rest. Then the refrigerator arrives, fits the opening, and the crisper drawer hits the pantry door. Or the dishwasher door stops halfway because the return wall sits two inches too close. These aren't rare accidents. They're the predictable result of reading a product's nominal size and treating it as the space the appliance uses.
Kitchen appliance dimensions come in three versions, and only the last one matters when you're standing in the room with a cup of coffee, watching a door swing. The pages ahead walk through each version, appliance by appliance, with numbers you can measure against today.
Table of Contents
- Typical Sizes for Common Kitchen Appliances
- Nominal, Installed and Metric Sizes
- Base Cabinet Height and Depth Reference
- Refrigerator Dimensions and Door-Open Envelopes
- Range, Dishwasher, Microwave and Hood Dimensions
- Clearances for Approach Space, Ventilation and Walkways
- How to Measure Your Space Before You Order
- Confirm Your Dimensions Before Ordering Appliances
Typical Sizes for Common Kitchen Appliances
A 36-inch refrigerator needs more than 36 inches of room. The width on the listing describes the case, and the case is only part of what arrives on delivery day. The door has to swing open far enough for the drawers to clear, and the whole unit has to pass through your front door and hallway before any of that matters. The table below gives working ranges for the five appliances that shape most kitchen layouts, so you can test whatever model you're considering against the room you have.
Typical width, height and depth by appliance
| Appliance | Typical width | Typical height | Typical depth |
|---|---|---|---|
| Refrigerator | 30–36 in | 65–70 in | 30–36 in |
| Freestanding range | 30 in (36 and 48 in options) | 36 in to the cooktop line | 26–28 in with the door closed |
| Built-in dishwasher | 24 in | 33 5/8 in minimum opening | 24 in, flush with the base cabinet |
| Over-range microwave | 30 in | 13–18 in above the cooktop | 15–18 in, short of the 24 in base line |
| Range hood | 30 in | 24–30 in above the cooktop | 18–22 in including the chimney or duct cover |
Read those figures as starting positions, drawn from manufacturer buying guides and North American cabinet conventions, rather than promises about the model you'll buy. A refrigerator row that spans six inches of width is a range, and the range exists because the appliance behind your future cabinet door hasn't been chosen yet.
Width draws the eye because it's the figure printed largest in the listing. Depth and height decide more. A refrigerator that fits its width exactly can still project six inches past the counter, and a range that matches the cutout can still sit a half inch proud of the counter line.
What each figure means for the opening
Refrigerator. The width tells you which cabinet module to plan around. It says nothing about handle projection or the clearance the door needs to open past square, which is the measurement that decides whether drawers and bins come out. Measure the open-door envelope, then check the delivery path: a 36-inch case still has to round every corner between the truck and the kitchen.
Freestanding range. Thirty inches is the near-universal module, with 36- and 48-inch versions for kitchens that can spare the run and the ventilation. The cabinet plan follows the cutout, drawn to the fraction by the manufacturer, plus the rear gap for the gas line or the cord. The oven door drops open into the walkway, so the width you write down is also a promise about the aisle in front of it.
Built-in dishwasher. Twenty-four inches is the most reliable dimension in the kitchen, and it's also the one most often planned by width alone. The vertical opening decides whether the machine slides under the counter, so it belongs on the drawing beside the width. The door folds down about two feet into the room, which is the standing space you need while loading.
Over-range microwave. Thirty inches matches the range below it and the hood zone above it. The height row sets how the door opens at eye level and how much reach a tall stockpot needs on the back burner.
Range hood. Width follows the cooktop so the hood captures what rises. The height row sets the clearance between the burners and the filter, and it interacts with ceiling height, duct runs and any cabinet sitting over the cooking zone.
Where baking changes the arithmetic
A household that bakes seriously needs oven capacity, a landing surface beside it and proofing space more than it needs a fourth appliance on the counter. The footprint of that gear is a separate sizing problem, and this equipment advice for sourdough and artisan bakers lays out what proofing boxes, mixers and steam-capable ovens ask of a counter run. Plan the cabinet space around the heaviest piece you use weekly and let the rest live in a pantry.
Find your appliance row, write the numbers down, and carry the depth column forward as carefully as the width. Depth is where the open-door envelope lives.
Nominal, Installed and Metric Sizes
Three measurements describe every appliance, and the confusion in most renovation projects comes from mixing them up. Keep them separate and the rest of the planning gets simpler.
The nominal size is the figure in the product name or the retail listing. The installed size is the opening the appliance needs once finished walls, flooring, filler panels, countertops and hardware are in place. The operating envelope is the space it occupies when doors, drawers and handles are open.
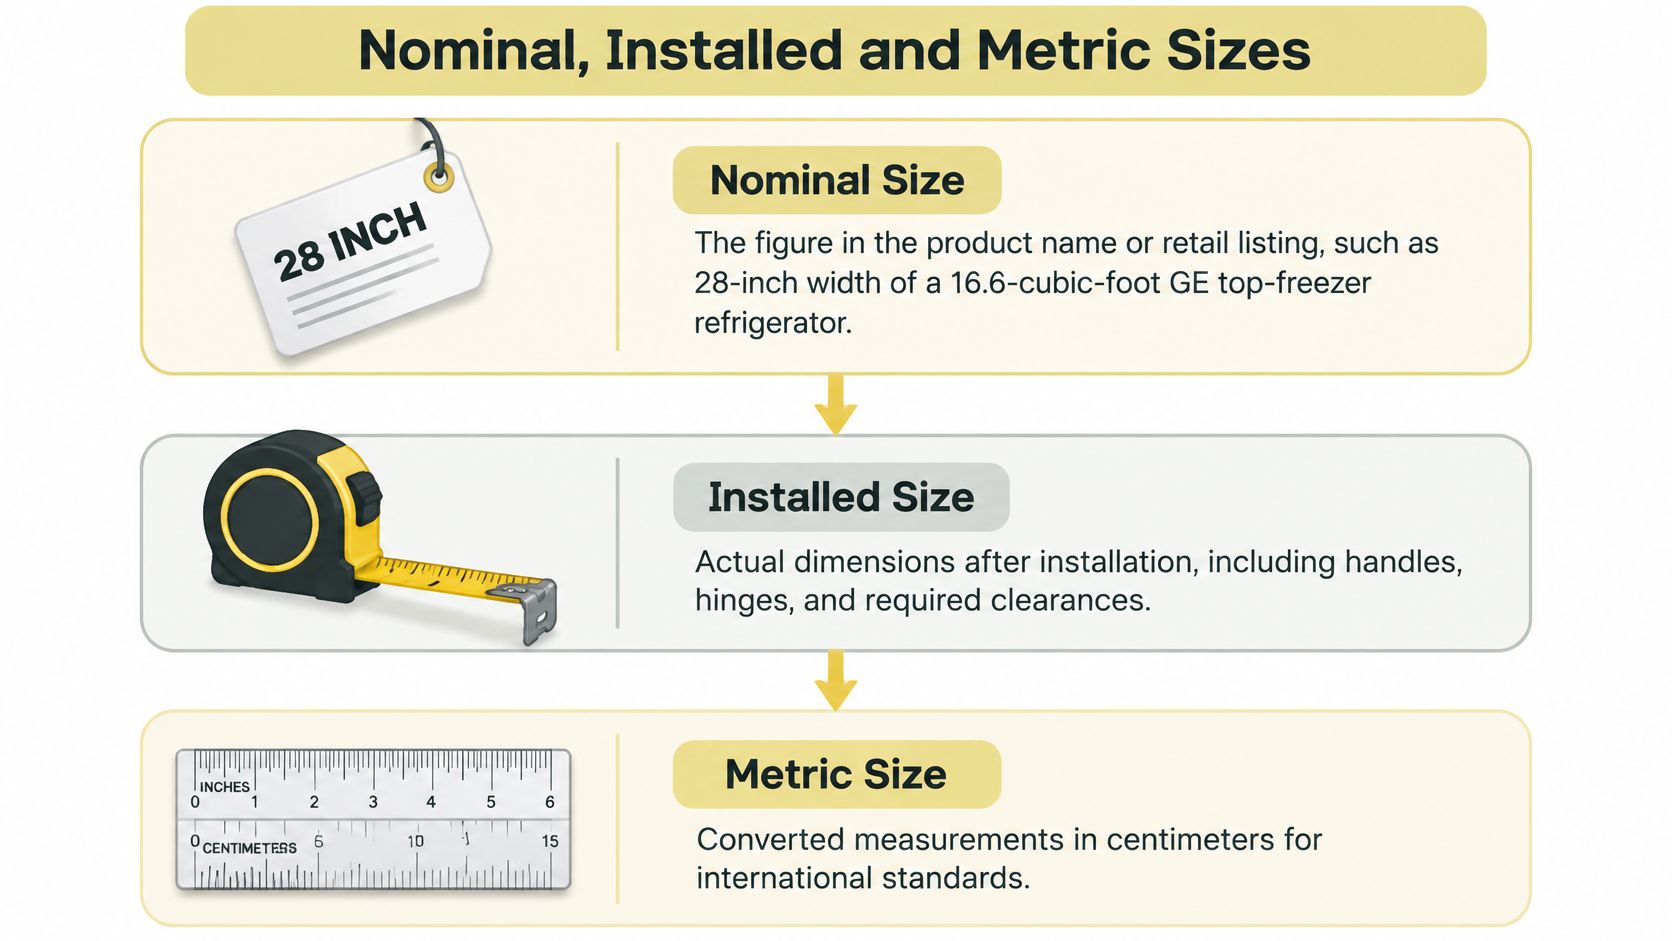
The nominal size is the least useful of the three
Take a 16.6-cubic-foot GE top-freezer refrigerator. GE lists it at 28 inches wide, 64.75 inches high and 32.625 inches deep. Those are real measurements, not estimates, and they still don't establish the cabinet opening or the clearance required at a finished wall. A retail thumbnail and a tape measure can agree with each other and both be wrong about the room.
The installed size depends on what sits around it
Finished surfaces eat space. Drywall, tile, baseboard, filler panels and flooring thickness all shift the opening inward, and the appliance has to survive every one of them. A current dimensions guide treats installation clearances as a category separate from physical dimensions, covering ventilation, operation, approach space and maintenance access, as this installation clearance guide explains. That's the right distinction: the box is the box, and the install is everything you add around it.
The operating envelope changes your layout
GE's dimensional drawing separates the figures that are easy to overlook: 28 inches of case depth, 32.5 inches excluding the handle, 35 inches including the handle, 50.125 inches with the fresh-food door open 90 degrees, and 43.625 inches of width with that door open. A refrigerator with 28 inches of case depth consumes roughly 50 inches of depth when someone opens the door.
That single fact rearranges kitchens. A smaller nominal appliance isn't automatically the space-saving choice, because a narrow unit with a deep door swing can congest an aisle more than a slightly wider model with a shallow one.
The metric module is not a converted inch
North American cabinetry works in nominal inches. European coordination under DIN EN 1116:2018 uses a 10-centimeter grid and a common 60-centimeter module of roughly 24 inches, with nominal furniture widths of 400, 500, 600 and 900 millimeters and built-in appliance recesses at 450 and 600 millimeters.
Cabinet and appliance coordination systems compared
| System | Cabinet or furniture widths | Built-in appliance openings | Planning basis |
|---|---|---|---|
| North American cabinetry | 24, 30, 36 in | 24 in dishwasher, 30 in range allowance | Nominal inches |
| European coordination (DIN EN 1116:2018) | 400, 500, 600, 900 mm | 450 mm and 600 mm recesses | 10 cm grid, 60 cm module |
| Imported appliance without a spec sheet | The model's own cabinet width | Its own recess, not the nominal module | Verify the installation sheet |
A 600-millimeter appliance doesn't drop into a 24-inch opening, because its recess, ventilation and hinge tolerances were engineered to a different system. For anything imported, the order of work is fixed: confirm the regional cabinet module, identify the exact model, obtain its installation sheet, then finalize cabinetry, countertop and utility positions in that sequence.
Write it three times: nominal size, opening size and open-door envelope, each one beside the appliance it describes on the layout drawing.
Base Cabinet Height and Depth Reference
Appliance openings don't float. They sit inside a cabinet run built to a module, and knowing that module tells you what will fit before you commit to a model. Factory-built base cabinets in the U.S. settled early on a working standard: roughly 36 inches high and 24 inches deep, with widths stepping up in 3-inch increments. Planning allowances followed the same grid, reserving about 36 inches for a refrigerator and 42 inches for a range.
Those proportions explain the modules in use today, where a 24-inch dishwasher, a 30-inch range and a 36-inch refrigerator opening all map to standard cabinet widths. They also explain why cabinet runs step in threes, and why an odd appliance width usually leaves a gap that a filler panel has to absorb.
Read each figure as operating space, not just a fit check. The 24-inch depth is the face line every door, drawer and handle crosses on its way out, and the 36-inch height is where controls and work surfaces land. An appliance that projects past the cabinet face shrinks the aisle every time someone stands in front of it, and the projection grows the moment its door swings open.
A four-step check on the plan
- Lay out the run in width increments starting from the wall on the hinge side, so door swings land inside the room instead of against a wall.
- Place each appliance module and mark two lines across the plan: the 24-inch base depth and the 36-inch base height.
- Compare the module with the appliance's nominal width and note any leftover gap as a filler panel, an item that gets priced and ordered rather than improvised on site.
- Confirm the countertop thickness and overhang against the appliance's top clearance, because the work surface height is its own figure sitting on top of the cabinet height.
A deep refrigerator projects well past the 24-inch base line, so draw its door and handle beyond the cabinet face before you approve the run. The countertop line matters here too: if the work surface ends up thicker than planned, every appliance that tucks under it needs rechecking.
Practical rule: an appliance that fits the cabinet module and not the countertop overhang is still the wrong appliance.
Refrigerator Dimensions and Door-Open Envelopes
No appliance punishes a generic size more than the refrigerator. Samsung's refrigerator sizing guide describes common refrigerators as roughly 65 to 70 inches high, 30 to 36 inches wide and 30 to 36 inches deep, and recommends 2 to 4 inches of clearance on all sides where conditions allow. When the unit sits beside a wall, Samsung advises the same 2 to 4 inches on the hinge side.
That hinge-side figure is where custom kitchens live or die. It can decide whether the doors open far enough to pull a shelf out, whether a pantry can sit beside the appliance at all, and how much usable counter survives on the other side of the run.
What changes between configurations
Counter-depth models sit closer to the cabinet face, which keeps the run looking level but usually trades capacity. Standard-depth models project further into the room and change how the aisle feels. French-door and side-by-side units need swing room a top-freezer never asks for, because both doors travel outward and the drawers behind them slide forward. If the counter-depth question is already on your mind, the trade-offs are laid out in this guide to counter-depth refrigerator size.
Four measurements to lift from the drawing
From the manufacturer's dimensional drawing, record case depth, depth excluding the handle, depth including the handle, and width with the door open 90 degrees. Add door-open depth at 90 degrees when the drawing gives it, because that's the number that tells you how much of the aisle the appliance consumes during ordinary use.
The pantry beside the refrigerator
Say the plan puts a tall pantry directly beside a refrigerator, both set into a run 24 inches deep. The gap on the hinge side decides everything: whether the pantry door and the refrigerator door can be open at the same time, whether the crisper bin pulls clear, and whether the two doors trade paint every morning. Draw both doors at 90 degrees, at full width, and check where they meet. If they collide, the fix is a filler panel or a different model, and only one of those is cheap.
What the cabinet shop needs from you
Send the model number, the case dimensions and the minimum side clearance from the installation guide. The manufacturer's document outranks any broad size range in a buying guide, and it outranks a retailer's listed width every time. That level of coordination is standard in the projects we design across Washington, DC, Maryland and Virginia, and it's the reason refrigerators get specified before cabinet drawings are approved rather than after.
Range, Dishwasher, Microwave and Hood Dimensions
Each of these four appliances fails in its own place. A range that fits the cutout can still crowd the counter beside it. A dishwasher that slides into 24 inches can be unable to open its door. An over-range microwave can sit too high for the person who uses it most, and a hood can be the right width while mounted at a height the manufacturer never intended.
Read the four entries as parallel checks, then go to the model sheets for the exact figures.
Range
The standard freestanding unit is 30 inches wide, with 36- and 48-inch versions for larger kitchens. Height and depth come from the model, and they matter more than the width because they set the counter line and the rear gap. Confirm the cutout and the rear gap before the countertop is templated, since a template cut for one range rarely suits another of the same nominal width.
Dishwasher
Twenty-four inches is the width standard, but the vertical dimension is what stops an installation. Whirlpool's dimension guide specifies a minimum opening height of 33 5/8 inches, and the same guide identifies a 2-inch minimum clearance between the side of the dishwasher door and an adjoining wall or cabinet when the appliance sits in a corner, as Whirlpool's dimension guide sets out.
That second figure gets overlooked and it's expensive to fix. It decides whether the door opens far enough to load a rack comfortably, and whether a composed run of cabinetry behaves the way it looked on paper. We draw that corner clearance on the plan before a cabinet order goes out, particularly when the dishwasher sits beside a sink, tall cabinet or return wall. Published dimensions are planning figures, and the model's installation instructions still control the final opening.
Microwave
Over-range microwaves are specified at 30 inches wide to match the range and the hood zone below and above. Height above the cooktop and the reach across the burners matter as much as the width, and they're the reason nobody should specify an over-range unit for a household where reaching over a hot burner is difficult or unsafe. A drawer microwave sits at counter height instead and needs a clear landing beside it for whatever comes out hot.
Hood
Width usually matches the cooktop so the hood can capture what rises off the pans. Height above the cooktop is set by the model, and because the hood shares its vertical zone with the microwave, the upper cabinets and the duct run, plan those as one assembly rather than three separate decisions made weeks apart.
The cells a table can't fill
Range height and depth, hood height and over-range microwave height aren't fixed by any single standard, and that's not a gap in the research. It's the honest answer. Two kitchens with identical cabinet plans can carry hoods at different heights and both be correct. Read each figure from the installation sheet, write it on the drawing, and let the model resolve the question mark one appliance at a time.
Clearances for Approach Space, Ventilation and Walkways
Clearance is where a fit becomes a kitchen. An appliance can occupy its opening exactly and still leave a room that doesn't work: a dishwasher door that blocks the aisle, a refrigerator whose crisper drawer opens into a wall, a range where nobody can pass behind the cook.
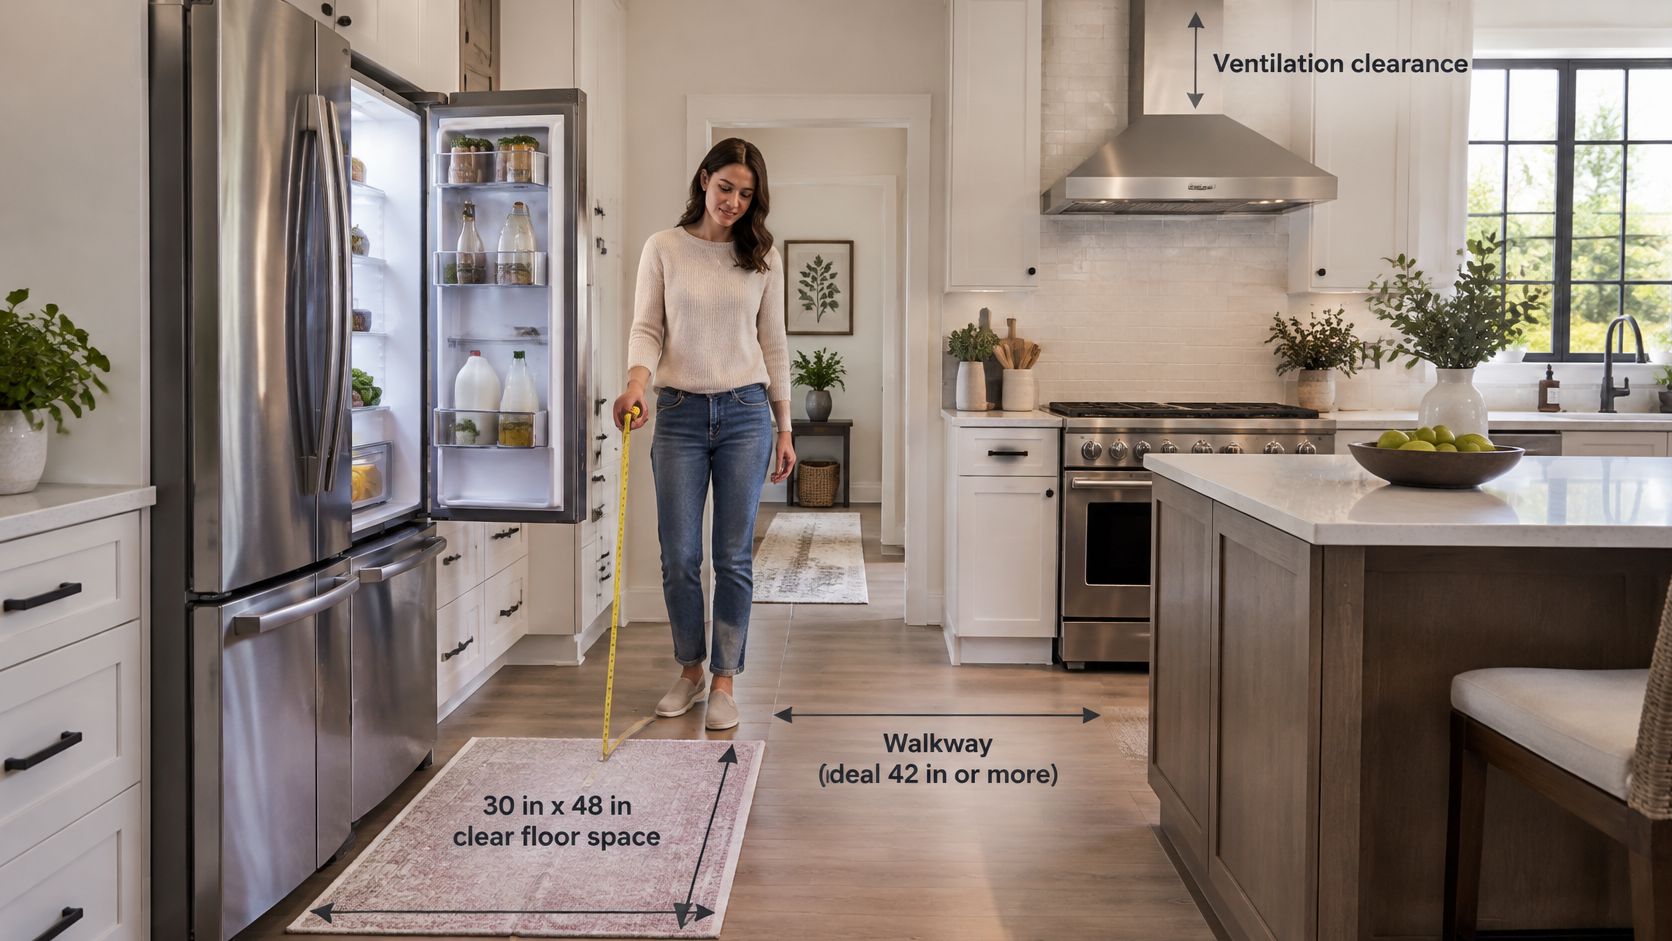
The National Kitchen & Bath Association's kitchen planning guidelines set the baseline: a clear floor space of at least 30 by 48 inches (762 by 1,219 mm) at each appliance, and those spaces may overlap where appropriate. In a U-shaped kitchen, the minimum clearance between opposing arms is 60 inches (1,524 mm), which accommodates appliance doors, movement and two people working at once. For an accessible refrigerator, the same guidelines call for a 30 by 48-inch parallel approach space with its centerline offset no more than 24 inches toward the handle side.
Clearance requirements by appliance and case
| Requirement | Value | Applies to |
|---|---|---|
| Clear floor space at each appliance | 30 × 48 in | All major appliances (NKBA) |
| Aisle between opposing arms | 60 in minimum | U-shaped kitchens (NKBA) |
| Refrigerator ventilation | About 2 in at back, top and sides | Refrigerators (LG) |
| Refrigerator door clearance | At least 24 in in front | Refrigerators (LG) |
| Hinge-side gap beside a wall | 2–4 in | Refrigerators placed by a wall (Samsung) |
| Door-to-wall gap in a corner | 2 in minimum | Corner dishwashers (Whirlpool) |
| Delivery passageway | 33 in top or bottom mount, 38 in some French-door | Refrigerator delivery route (LG) |
| Control height | 15–48 in above floor | Accessible controls |
What manufacturers add to the baseline
The planning guidelines set the floor, and each manufacturer tightens it for a specific product. LG's installation guidance calls for roughly 2 inches of clearance at the back, top and sides for ventilation and at least 24 inches in front so the doors open without obstruction. It also notes the site must leave room for connections and for walking the unit into position.
Delivery belongs in the same conversation, because an appliance that can't reach the kitchen isn't the right size no matter how well it fits. LG's measuring guidance recommends passageways at least 38 inches wide for some French-door refrigerators, with a narrower 33-inch path for top- or bottom-mount models, along with a dedicated grounded 120-volt, three-prong outlet and a level, solid floor.
Accessibility adds a dimension most plans miss entirely. Home Depot's summary of ADA kitchen clearances puts controls between 15 and 48 inches above the floor and cautions against placing a microwave above a range where reaching over burners is required. That's a useful test on any plan, whether or not anyone in the household uses a wheelchair today.
For a walkthrough of how these distances behave in a real layout, this short video covers the working clearances around a kitchen:
Minimum clearance and comfortable use are different numbers
A 30-inch walkway satisfies a guideline and still feels tight when the dishwasher is open and someone is carrying a roasting pan. The minimums exist to prevent a kitchen from being unusable, not to guarantee it feels generous. Build in the extra few inches where the plan allows, especially on the work side of the sink and the cooking zone, and note where a clearance only works because a door is normally closed.
Island spacing has its own arithmetic, and this guide to kitchen island clearances works through the distances that keep an island from turning a generous kitchen into a corridor.
Mark each clearance on the floor plan in its own color. Overlapping zones then show themselves on paper, before cabinets are ordered and long before a refrigerator is unwrapped in the driveway.
How to Measure Your Space Before You Order
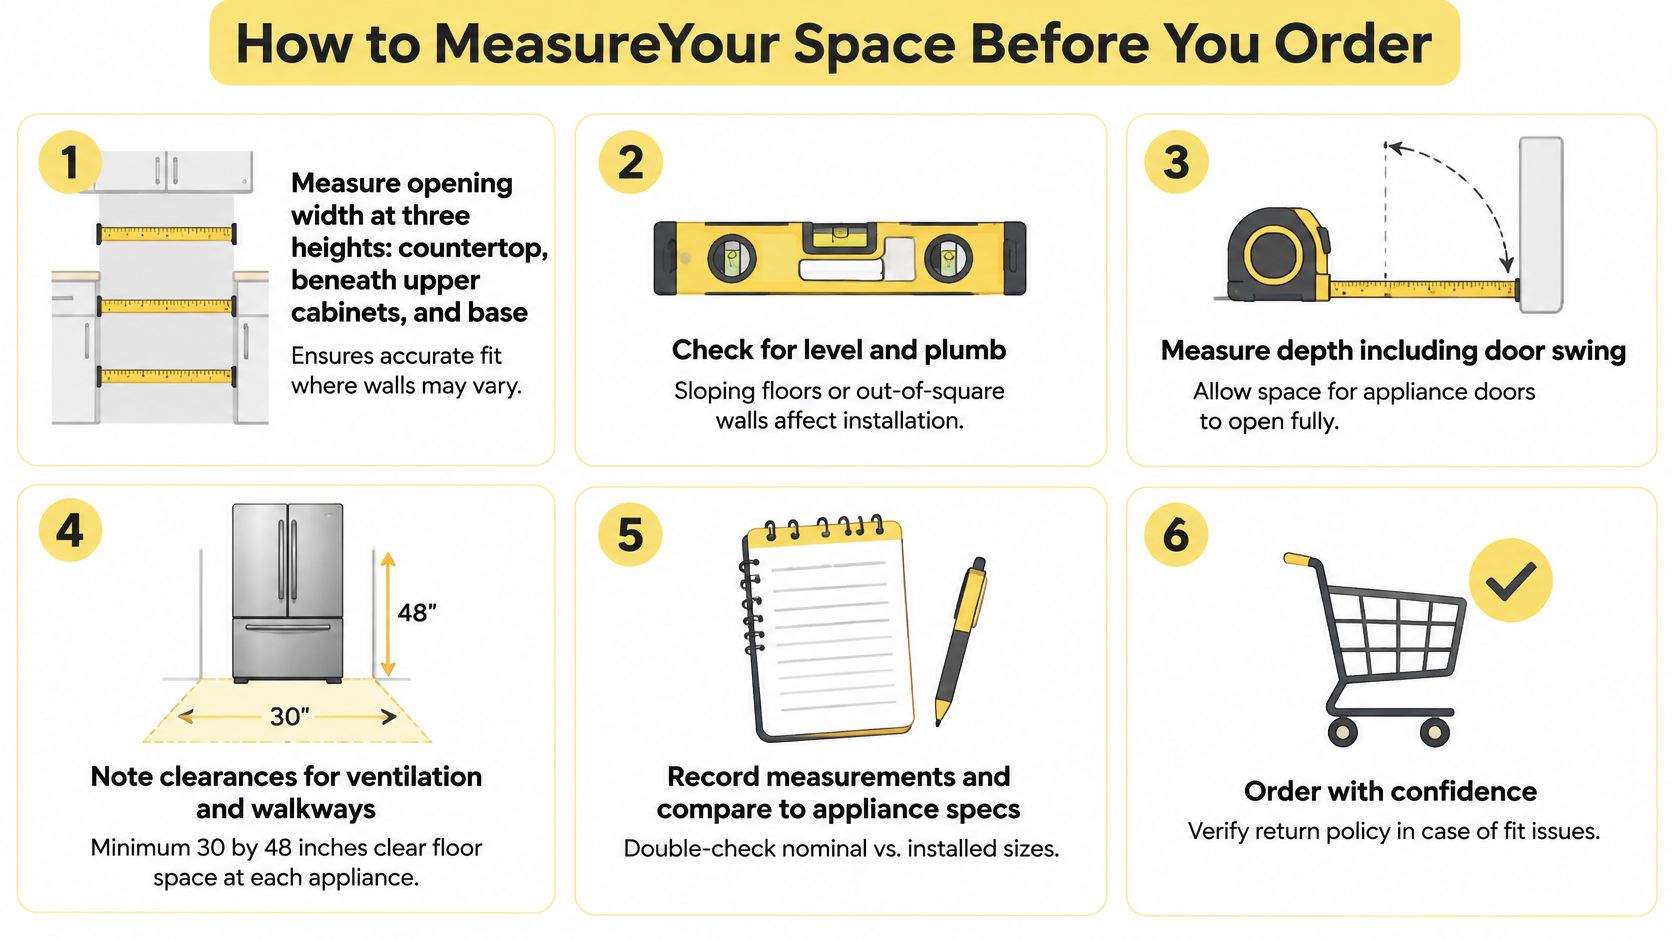
Two dimensions decide whether a kitchen layout works, and neither appears on the appliance's spec sheet: the space an open door sweeps through, and the narrowest point between the delivery truck and the kitchen. The steps below produce both, along with every number a cabinet maker will ask for. Take them in order and write down what each one gives you.
Measure the opening width at three heights: at the countertop, beneath the upper cabinets, and at the base where molding or baseboard can narrow the gap. Walls bow, and the narrowest of the three is the one the appliance has to clear.
Measure the height at the front and back edges and check whether the floor is level. An opening that reads 70 inches at the front and 69 1/2 at the back is a 69 1/2-inch opening, and a refrigerator needs a solid, level base beneath it.
Record the depth from the finished wall to the front of the cabinet face, including trim and any tile. Finished depth is what counts, not the framing depth in the drawings.
Trace the delivery route from the entry door through hallways, stairwells and corners, and note the tightest passage. Compare it with the 33-inch or 38-inch paths refrigerator manufacturers publish for their own models. This is the measurement everyone skips and the one that turns delivery day into an argument at the front door.
Check the utilities for each appliance: the outlet location, the water supply for the refrigerator and dishwasher, and the gas or electrical connection for the range. Boiling-water taps and filtered systems need resolving at this stage too, and this kitchen upgrade guide for Melbourne homeowners covers the supply, clearance and cabinet-space questions an under-sink unit raises, all of which apply in any kitchen.
Mark the open-door envelope with painter's tape at the door-open dimensions from the drawing, then open every drawer and pantry door inside the marked zone. This is the step that catches the collision nobody modeled.
Attach the model number and the manufacturer's installation guide to the finished sheet. The guide sets the rough opening, and your measurements confirm the room can hold it.
When a designer joins the project, ask what their measuring visit covers: finished surfaces, the delivery path, utility locations, or all three. At Jennifer Gilmer Kitchen & Bath, a designer or design associate visits the home to take precise measurements of the space for remodeling projects. How those measurements feed into the cabinet plan is laid out in this guide to kitchen appliance integration.
By the end you should be holding a measured sketch with three widths for each opening, the narrowest point on the delivery route, and tape on the floor showing every door at 90 degrees.
Confirm Your Dimensions Before Ordering Appliances
A refrigerator can clear the rough opening and still fail the room: the door hits the island, the crisper drawer stops short, or the delivery path turns one inch too narrow. Confirm the operating space before the order is placed, in this order.
- The final model is chosen. A shortlisted favorite leaves room for a substitution at delivery, which is how openings fail.
- The manufacturer installation sheet is on file, in the folder the cabinet maker and installer both use. It controls the opening more than retail listings or buying guides.
- The open-door envelope is taped on the floor, with pantry, island and drawer fronts opened against it so collisions show up before cabinets do.
- The delivery path is measured and clear, with the narrowest doorway, hallway and turn written beside the clearance the appliance needs.
Hold cabinet drawings and countertop templating until all four are done. Once stone is cut or cabinets are ordered, fixing the sequence costs more than the appliance did.
Jennifer Gilmer Kitchen & Bath handles kitchen and bath projects from concept through installation for clients in Washington, DC, Maryland, Virginia and Delaware. The design team prepares the appliance list, helps clients order from a trusted source, shows the finished project on screen before work begins, and oversees builders while coordinating with contractors so the clearances on the drawing reach the installation. The conversation starts well before anyone orders a refrigerator.
Bring your measured sketch to a design consultation. The team can check the numbers against the cabinet plan while there is still time to change them.
Jennifer Gilmer Kitchen & Bath designs kitchens around the appliances that will live in them, testing every opening, door swing and delivery route against the cabinet plan before anything is ordered. With showrooms in Chevy Chase, Easton and Ashburn, the team can walk you through cabinetry, countertops and hardware in person while your model numbers sit on the table. Visit Jennifer Gilmer Kitchen & Bath to book a design appointment and bring your measurements with you.