

You've saved photographs of bathrooms you love, but your own room presents a less photogenic list: a fan that rattles, grout that won't stay clean, a vanity with too little storage. You're ready to make changes, but you don't want a modest update to become an open-ended construction project.
Bathroom remodeling on a budget starts with deciding what protects the room, not what photographs best. Good space planning and a restrained material palette can make everyday routines more pleasant. But first, the shower needs to keep water where it belongs, the plumbing needs to work, and the room needs to dry properly.
Table of Contents
- DIY or licensed trade by bathroom task
- Where homeowner labor makes sense
- Where professional work protects the investment
Where Your Budget Goes in a Bathroom Remodel
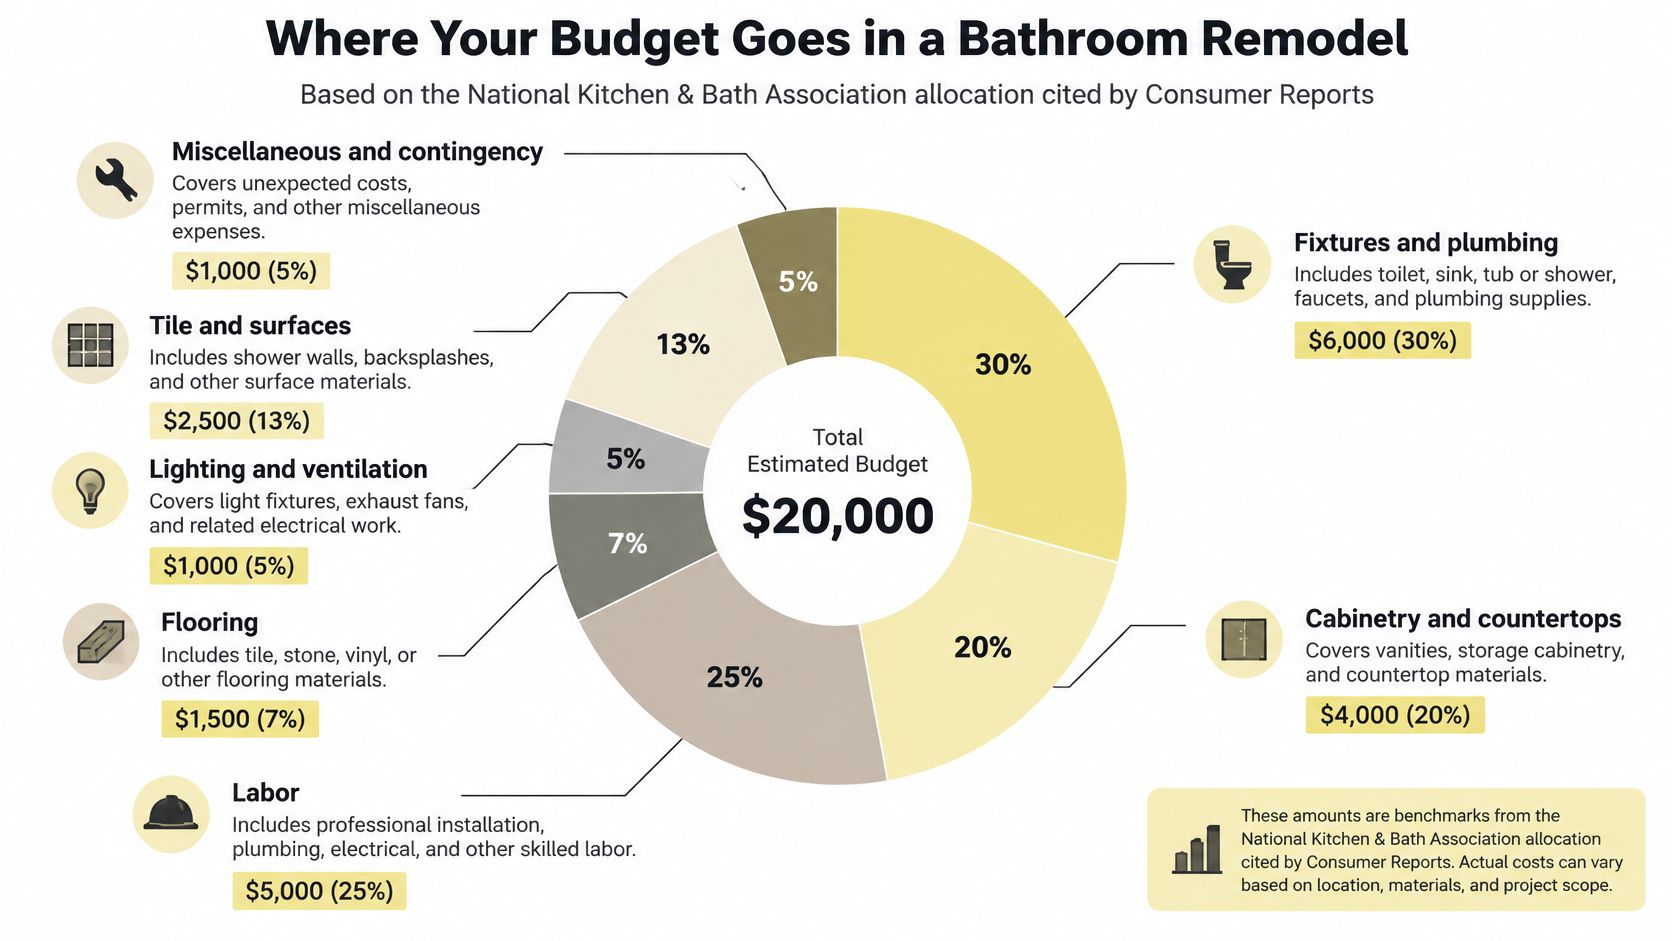
The benchmark budget split for a bathroom remodel, using the National Kitchen & Bath Association allocation cited by Consumer Reports, assigns approximately these shares to the following categories.
| Category | Share of budget | What it covers |
|---|---|---|
| Fixtures and plumbing | 29% | Toilet, shower valve, faucet and supply connections |
| Counters and surfaces | 21% | Vanity top, floor tile, shower walls |
| Labor | 20% | Trade work across demolition, plumbing, tile and finish |
| Cabinetry and hardware | 16% | Vanity cabinet, drawers, pulls and hinges |
| Lighting and ventilation | 5% | Exhaust fan, ceiling and task lighting |
| Design and miscellaneous | 5% | Planning, consultations, small materials and cleanup |
| Doors and windows | 4% | Door swap, frosted glass or window trim |
These are planning proportions, not a contractor's quote. A shower valve belongs in fixtures and plumbing, but accessing it can also require demolition and wall repair. A vanity cabinet belongs in cabinetry, while its stone top belongs in surfaces; an exhaust fan needs both an equipment allowance and installation labor.
Use the following illustration as a visual budgeting aid, then reconcile its categories with your actual estimate.
Test the scope before choosing finishes
Keeping the toilet, shower and sink in their existing locations is usually the strongest cost-control decision. Moving them adds work beyond the pipe itself: opening floors, repairing walls, coordinating trades and obtaining applicable permits. In Washington DC, Maryland and Virginia, allow room for substantial local labor and permitting costs rather than assuming a national allocation will match your estimate.
For context, Houzz reported a 2024 median spend of $17,000 for major primary-bathroom remodels smaller than 100 square feet, up 13% from $15,000 in 2023. Separately, Remodeling Magazine's 2024 Cost vs. Value Report, as reported by HGTV, estimated a midrange bathroom renovation at $25,251, with 74% expected resale cost recoupment.
Those figures describe different project benchmarks, not targets you need to hit. A targeted refresh and a rebuilt shower aren't interchangeable purchases.
Before committing funds, Fintrack's guide to set up a monthly personal budget can help distinguish comfortable household spending from money available for construction. Then use our bathroom renovation cost breakdown to organize the project itself.
Write the scope and divide your available funds into the table's categories before choosing a tile or faucet. Keep a separate reserve for unknown conditions rather than treating every available dollar as a finish allowance.
Essential Repairs Versus Optional Upgrades
An attractive vanity won't compensate for a leaking shower. Before shopping, sort the work into essential repairs, optional upgrades and major changes. This makes the difficult choices clearer when estimates arrive.
Essential repairs protect the room
Start with failed waterproofing, damaged subflooring, leaking connections, corroded supply lines and shutoff valves, and an exhaust fan that no longer removes moisture effectively. Cracked caulk and deteriorated grout also deserve attention, but don't assume fresh sealant will solve a deeper leak.
Tile and grout aren't the shower's waterproofing system. If the assembly behind them has failed, covering the surface or replacing a few joints won't restore it. Have the cause assessed before deciding whether a repair is sufficient.
A noisy fan may need cleaning, repair or replacement. Confirm that it exhausts outdoors rather than into an attic or enclosed cavity; buying a quieter grille won't correct an unsuitable duct route.
Optional upgrades improve daily use
Once the room is sound, consider changes that don't require rebuilding its infrastructure:
- Improve the light. Place flattering task lighting beside the mirror rather than relying entirely on a ceiling fixture.
- Keep useful cabinetry. A sound vanity may need adjusted hinges, new pulls or a replacement top rather than complete removal.
- Simplify the palette. Coordinated paint, hardware and a well-scaled mirror can make an older room feel intentional.
- Replace awkward fittings. Lever handles and a better showerhead can improve everyday comfort without enlarging the room.
Major changes belong in a separate decision column. Relocating fixtures, expanding a shower, adding heated floors or installing new circuits can require several trades and substantial finish repair.
For historical context, Harvard's Joint Center for Housing Studies classified a professionally completed major bath remodel in 2021 as exceeding $15,000, and a major DIY bathroom improvement as exceeding $6,000. These are historical classification thresholds, not current local quotes or guarantees of what a particular budget will buy.
A hall-bath decision
Say you're updating a hall bathroom with an attractive but worn vanity. Inspection reveals damp framing beside the shower and ineffective ventilation.
The sensible scope keeps the serviceable vanity, corrects the moisture source and rebuilds the affected shower assembly. That repair might cost more than the vanity you wanted, but it avoids paying for new cabinetry that must later be removed to reach damage.
Spending priority: Fund the work that makes the room sound, dry and usable. Choose visible finishes with what remains.
Water-Saving Fixtures That Pay Back Quickly
WaterSense certification gives you a practical way to compare efficiency without choosing by appearance alone. The limits and reported savings below describe different fixtures and household replacement scenarios, not savings to add together automatically.
WaterSense fixture limits and reported savings
| Fixture | Certified limit | Reported savings |
|---|---|---|
| Bathroom faucet and aerator | 1.5 gpm maximum | About 700 gallons per year for an average family, nearly 11,000 gallons over product life |
| Showerhead | 2.0 gpm maximum | More than 2,700 gallons and over 330 kWh per year |
| Toilet | 1.28 gallons per flush or less | About 13,000 gallons and $130 per year when inefficient toilets are replaced throughout a home |
| Main bathroom package (toilet, showerhead, aerator) | WaterSense certified | Can pay back in as little as one year |
The EPA's bathroom-faucet guidance gives the faucet limits and savings above; its 1.5-gpm maximum is at least 30% below the conventional 2.2-gpm standard, and the accompanying estimates include the whole-home toilet replacement savings shown. The EPA's showerhead guidance specifies the 2.0-gpm maximum and annual savings of more than 2,700 gallons and over 330 kilowatt-hours for an average family.
For the package estimate, the EPA's statistics and facts states that a main-bathroom makeover with a WaterSense toilet, showerhead and faucet aerator can pay for itself in as little as one year. That's a possible outcome, not a promise for every installation: existing fixtures, utility rates and installation costs affect your result.
Make the installation as thoughtful as the selection
A replacement aerator is a different purchase from a concealed shower valve. If the faucet body works well, an appropriate certified aerator may be the restrained choice; if the valve leaks or the finish is failing, replacing the complete fitting may make more sense.
Give your installer this checklist:
- Test water pressure. Check household pressure with a gauge and investigate abnormal readings before selecting fittings.
- Verify certification. Look for the WaterSense label rather than relying on a low-flow description.
- Check shower performance. Choose pressure-compensating components suited to the existing system, and consider spray coverage as well as flow.
- Inspect connections. Replace corroded supply lines and shutoff valves instead of reconnecting new fixtures to suspect parts.
- Test before covering. Run the fixtures and inspect every connection before closing access panels or walls.
Keep the fixture locations unchanged where practical. A restrained specification can improve comfort and operating costs without turning an equipment replacement into a plumbing relocation.
Planning for Future Access Without a Luxury Price
Preparing for future mobility is often simpler while walls and floors are already open. It doesn't require making the bathroom look institutional or specifying every possible adaptation today.
The bathroom below illustrates how access features can sit comfortably within a warm material palette.
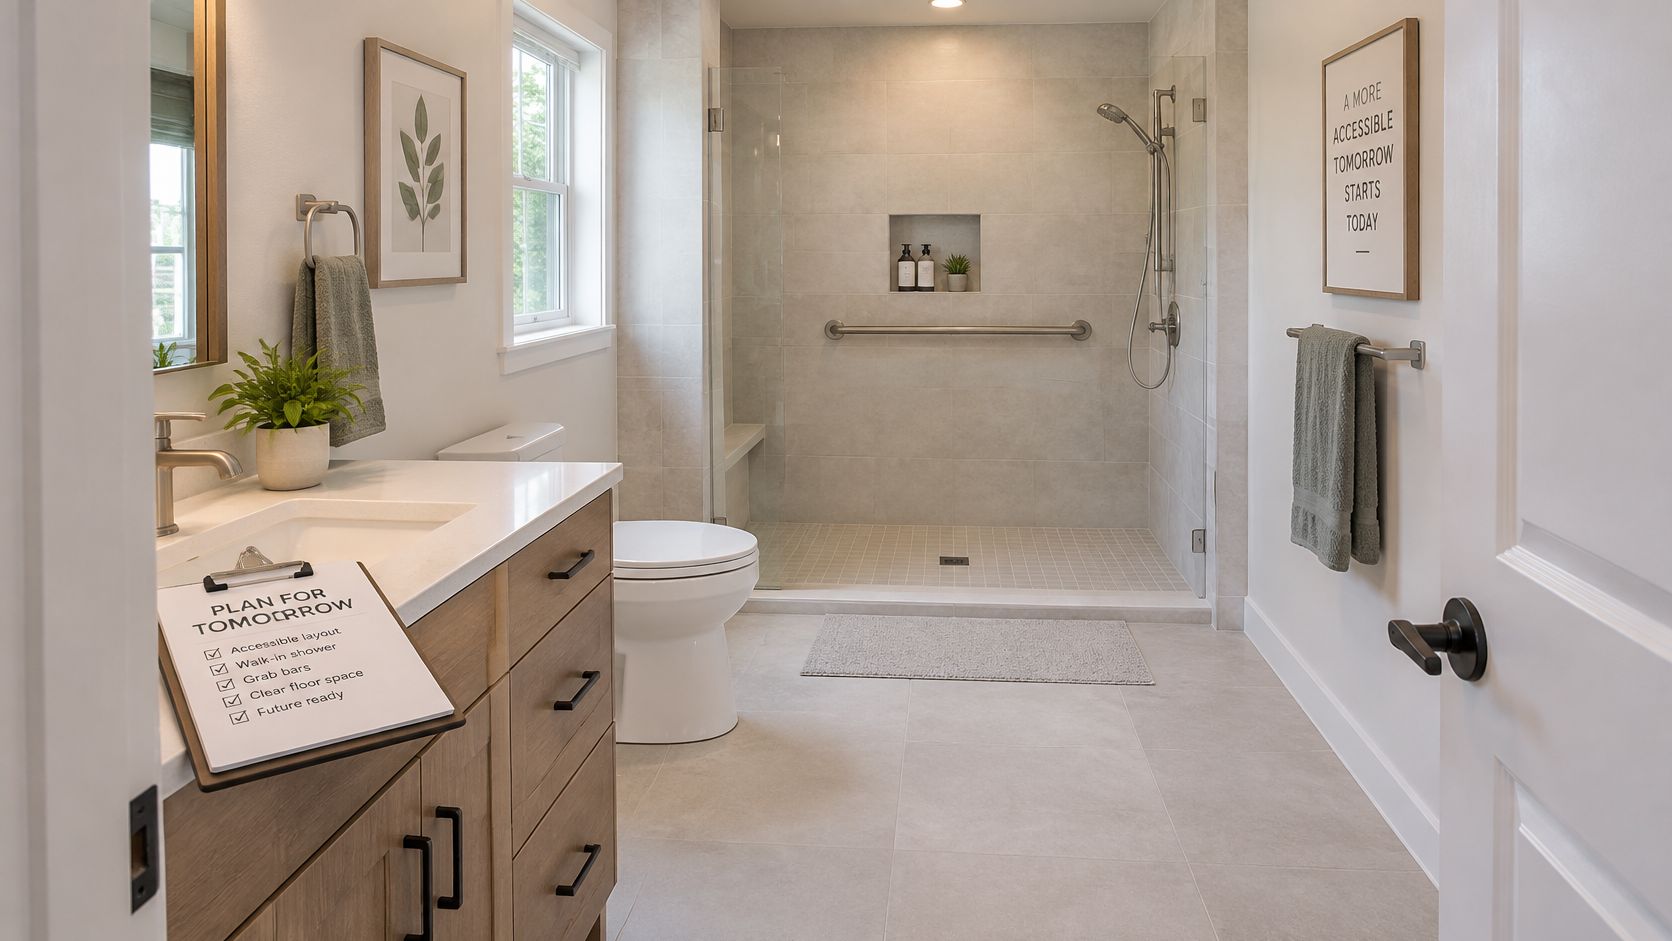
In the 2025 Houzz Bathroom Trends Study, 68% of homeowners considered special needs in their bathroom projects; reported additions included 61% grab bars, 55% nonslip flooring, 52% low-curb showers and 28% curbless showers. Separately, Harvard's 2025 housing report counted 3.2 million owners undertaking accessibility-related remodeling in 2022–2023, up from 2.3 million in 2018–2019.
Prepare discreetly and choose selectively
Ask the contractor to install solid blocking at planned grab-bar locations beside the toilet and in the shower. Record those locations before the wall is closed so future installers aren't guessing.
Lever handles, clear lighting at the vanity and shower, and flooring selected for wet-area slip resistance deserve consideration now. Don't assume every matte tile is slip-resistant; check the manufacturer's intended application.
A shallower vanity can also improve circulation. Our guide to bathroom vanity depth helps you weigh storage against comfortable passage and door clearance.
For another view of bathroom planning, watch the following video.
A low-threshold shower may be a sensible compromise. A linear drain is an option, not a requirement, and its detailing should suit the floor assembly and available budget.
A true curbless conversion needs coordinated drainage, floor slope and waterproofing, sometimes with structural changes. Evaluate it when the floor is already open rather than assuming it's an inexpensive finish upgrade.
Plan for the room you'll want to keep using, not only the room you need today.
DIY Tasks and Work for a Licensed Trade
Choose DIY work by the consequence of a mistake, not by how approachable a tutorial looks. Painting a wall and building a watertight shower require very different levels of judgement.
DIY or licensed trade by bathroom task
| Task | Who should do it | Why |
|---|---|---|
| Painting with mildew-resistant paint | DIY | Low risk and easy to correct |
| Installing towel bars and hardware | DIY | No plumbing or wiring involved |
| Replacing a faucet on tested shutoff valves | DIY with caution | Confirm valves hold before disconnecting |
| Shower waterproofing and tile setting | Experienced tile setter or contractor | Water damage behind walls is costly to fix |
| Moving a toilet, shower or drain | Licensed plumber | Permits, inspection and concealed plumbing work |
| New circuits, fan wiring or GFCI outlets | Licensed electrician | Code and safety requirements |
| Removing a wall or changing structure | Licensed contractor with engineer input | Structural risk and permit review |
The 2025 How America Renovates Report from Block Renovation found that 37% of renovation projects exceeded their original budgets, with materials, labor and unexpected repairs among the main causes. The relevant comparison is total cost of ownership, including correction and replacement, rather than the lowest initial expense.
Where homeowner labor makes sense
Painting can be satisfying work if the surface is dry and sound. Clean away soap residue, address mildew and its moisture source, scrape loose paint, patch defects and use the appropriate primer before applying bathroom-suitable paint.
For towel bars, use a stud finder and check for concealed pipes or wiring before drilling. Fasten into framing where possible, or use anchors matched to the wall construction and expected load. A towel bar isn't a substitute for a properly supported grab bar.
A faucet replacement is reasonable only if you can isolate the water reliably and reach the connections without damaging the sink or cabinet. Test the shutoff valves first; if a valve won't close completely, stop before disconnecting the supply.
Where professional work protects the investment
Shower work requires compatible waterproofing components, properly detailed corners and penetrations, and testing before tile conceals the assembly. Attractive tile setting alone doesn't establish that the shower will remain watertight.
Plumbing relocation, electrical work and structural changes also require coordination beyond the visible installation. Permit rules vary by jurisdiction, so confirm requirements with the local building department before agreeing to the scope.
Ask for written allowances describing how concealed deterioration, unsafe wiring or unsuitable framing will be evaluated and priced. An allowance should identify an unknown, not exclude necessary work from an appealing quote.
The hidden-wall test: If a mistake would be concealed behind a finished wall, hire the appropriate professional.
How to Sequence a Phased Bathroom Remodel
Phasing works when you separate complete, usable packages of work. It doesn't work when you install finishes that the next trade must remove. Arrange the contractor before demolition, and agree on when the bathroom will be unavailable.
Establish the scope and reserve
Write the scope before demolition. Record the layout, plumbing locations, fixture count, finish level and labor assumptions. Describe what stays as clearly as what gets replaced, including the protection of retained fixtures and adjacent rooms.
Inspect and identify unknowns. Book a plumbing and moisture assessment, then create a distinct allowance for concealed damage. Establish who will document discoveries and obtain your approval before additional work proceeds.
Price the work separately. Request line items for fixtures, surfaces, cabinetry, lighting, ventilation, permits and labor. Confirm whether delivery, disposal, protection and final cleanup are included so you're comparing equivalent proposals.
Protect a contingency. For a hypothetical planning budget, you might reserve roughly 10% to 20%, with a larger cushion for an older house with uncertain conditions; that's a planning choice, not a universal requirement. Adobe's 2024 homeowner survey found that 56% of homeowners who had remodeled exceeded their budgets, according to Pro Remodeler, which makes an uncommitted reserve a sensible precaution.
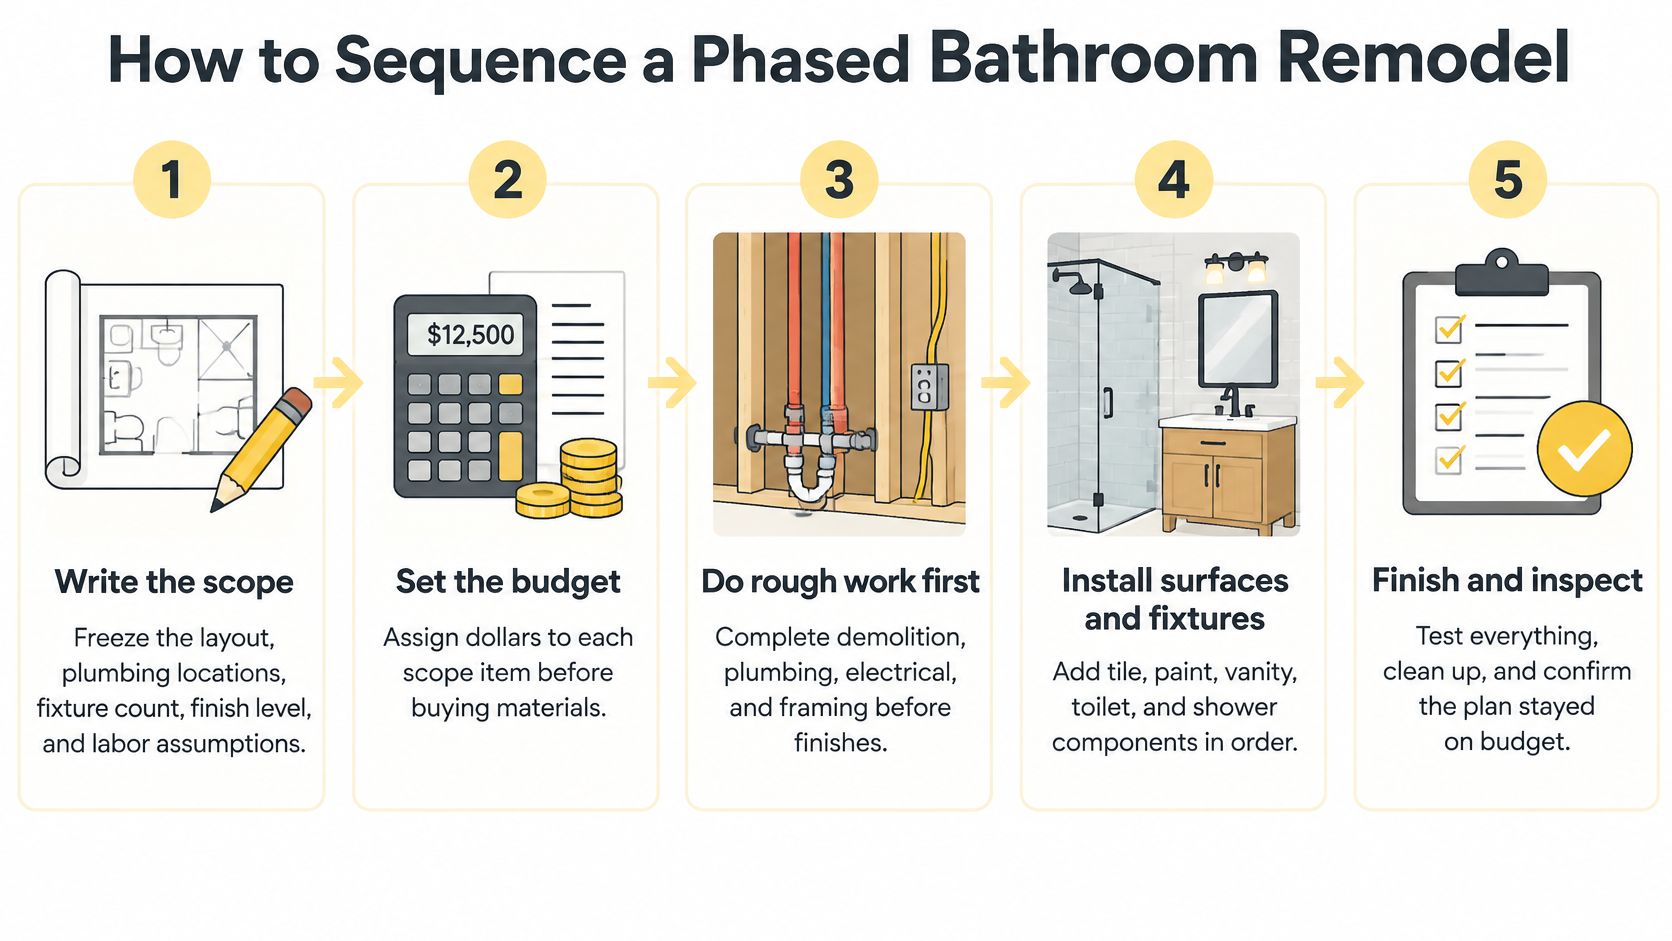
The process illustration offers a compact way to keep the major stages in view.
Coordinate construction and purchasing
Complete rough work before finishes. Follow demolition and inspection with necessary framing, plumbing and electrical rough-ins. Then complete the shower assembly and tile work before installing the remaining cabinetry, fixtures and decorative finishes, with inspections and testing at the appropriate stages.
Confirm specifications before releasing orders. Approve fixture models and obtain technical drawings early enough for the trades to plan rough-ins correctly. Where dimensions remain uncertain, hold final vanity or fixture orders until field conditions and applicable rough-in approvals are confirmed, but coordinate lead times so the crew isn't left waiting for essential components.
Record every change. Put the scope, cost and schedule effect of each change order in writing before authorizing it. As a household control, you could require a full budget review when the reserve falls below half its starting amount rather than continuing to approve small additions independently.
- Your tiered scope. Separate repairs from optional upgrades and larger changes so fixed needs are clear and negotiable choices stay visible.
- Your target budget. State what you're comfortable spending, separately from your contingency.
- Your daily frustrations. Note the drawer that won't open fully, the shadow at the mirror or shower controls that are difficult to reach.
A useful bathroom remodel timeline includes decisions and procurement, not just days on site. If you're postponing decorative work, leave the completed construction phase safe, dry and usable rather than partially finished.
At Jennifer Gilmer Kitchen & Bath, we provide realistic timelines from design to completion and can help clients find a contractor to implement the design. Early coordination gives everyone a clearer understanding of what must be selected, ordered and approved before work begins.
Book a Scope Review Before You Demolish
Before choosing tile or ordering fixtures, confirm that the proposed scope addresses the room's actual problems. Cosmetic updates can be costly if failing waterproofing or plumbing remains unresolved beneath them.
For remodeling projects, a designer or design associate from Jennifer Gilmer Kitchen & Bath visits the home to take precise measurements. The measurements capture details that photographs can miss, such as awkward corners, door swings and the space between fixtures.
Turn a wish list into a workable room
Jennifer Gilmer begins by identifying what feels clunky, disjointed or ineffective, both aesthetically and functionally. The design should reflect how you get ready, store belongings and move through the bathroom, rather than impose a signature look.
The design process includes showing you what the finished project will look like on a screen before work starts. Use that view to test whether choices such as a cabinet, shower enclosure or lighting arrangement justify their place in the budget.
Before the visit, prepare:
Choose materials against the budget
Jennifer Gilmer Kitchen & Bath serves Washington, DC, Maryland, Virginia and Delaware, with showrooms in Chevy Chase and Easton, Maryland, and Ashburn, Virginia. Seeing materials and finishes in person can help you judge how they look and feel before making selections.
Ask how a showroom visit fits into the design process, and request an estimate that connects choices to the budget before committing. Settle on finishes against understood allowances, rather than hoping a collection of purchases will fit afterward.
A scope review can clarify which work protects the room and which choices are optional. Jennifer Gilmer Kitchen & Bath provides design and remodeling services; visit Jennifer Gilmer Kitchen & Bath to arrange a conversation and bring your repair list, priorities and target budget.