

The best kitchen lighting combines three layers, ambient, task and accent, on separate controls, with task light placed in front of or above the counter at about 500 lux and 3000 to 3500 K. That gives you light where you're working without making the whole room feel overly bright.
You might already have a kitchen that looks well lit from the doorway, yet you lean closer to read a recipe or find yourself chopping vegetables in your own shadow. Then, when dinner's finished, the ceiling lights feel too sharp for sitting over coffee. The answer usually isn't another fixture. It's a more thoughtful relationship between the light, the work surface and the person using it.
Table of Contents
- Why the Best Kitchen Lighting Combines Three Layers
- Read color temperature and color quality separately
- Verify the light where you use it
- Map the room before selecting fixtures
- Coordinate the hidden details
- Confirm the plan before walls close
Why the Best Kitchen Lighting Combines Three Layers
Layered lighting combines ambient, task and accent light, each on its own control. Think of a stage: ambient lighting is the house lighting that lets everyone see the room, task lighting is the spotlight on the cutting board, and accent lighting is the set lighting that gives the space depth.
The Ideal Home guide to layered kitchen lighting describes this combination as a way to support both practical work and a welcoming atmosphere. A decorative pendant can look lovely above an island without delivering enough useful light for preparing dinner beneath it.
Three layers of kitchen lighting and what each one does
| Layer | Job in the room | Typical fixtures | Where it sits |
|---|---|---|---|
| Ambient | Even overall brightness for walking, cleaning and gathering | Recessed or flush ceiling fixtures with diffusers | Ceiling, spaced for even coverage |
| Task | Focused light on countertops, sinks, islands and cooktops | Continuous under-cabinet strips, island pendants, closely spaced recessed lights | Front or above the work surface |
| Accent | Depth and mood on cabinets, shelves and decorative objects | In-cabinet or toe-kick LEDs, glass-front cabinet lights, picture lights | Inside or beneath cabinets and on feature walls |
A kitchen can look bright overall and still leave the work surface in shadow, especially when light comes from behind the person cooking.
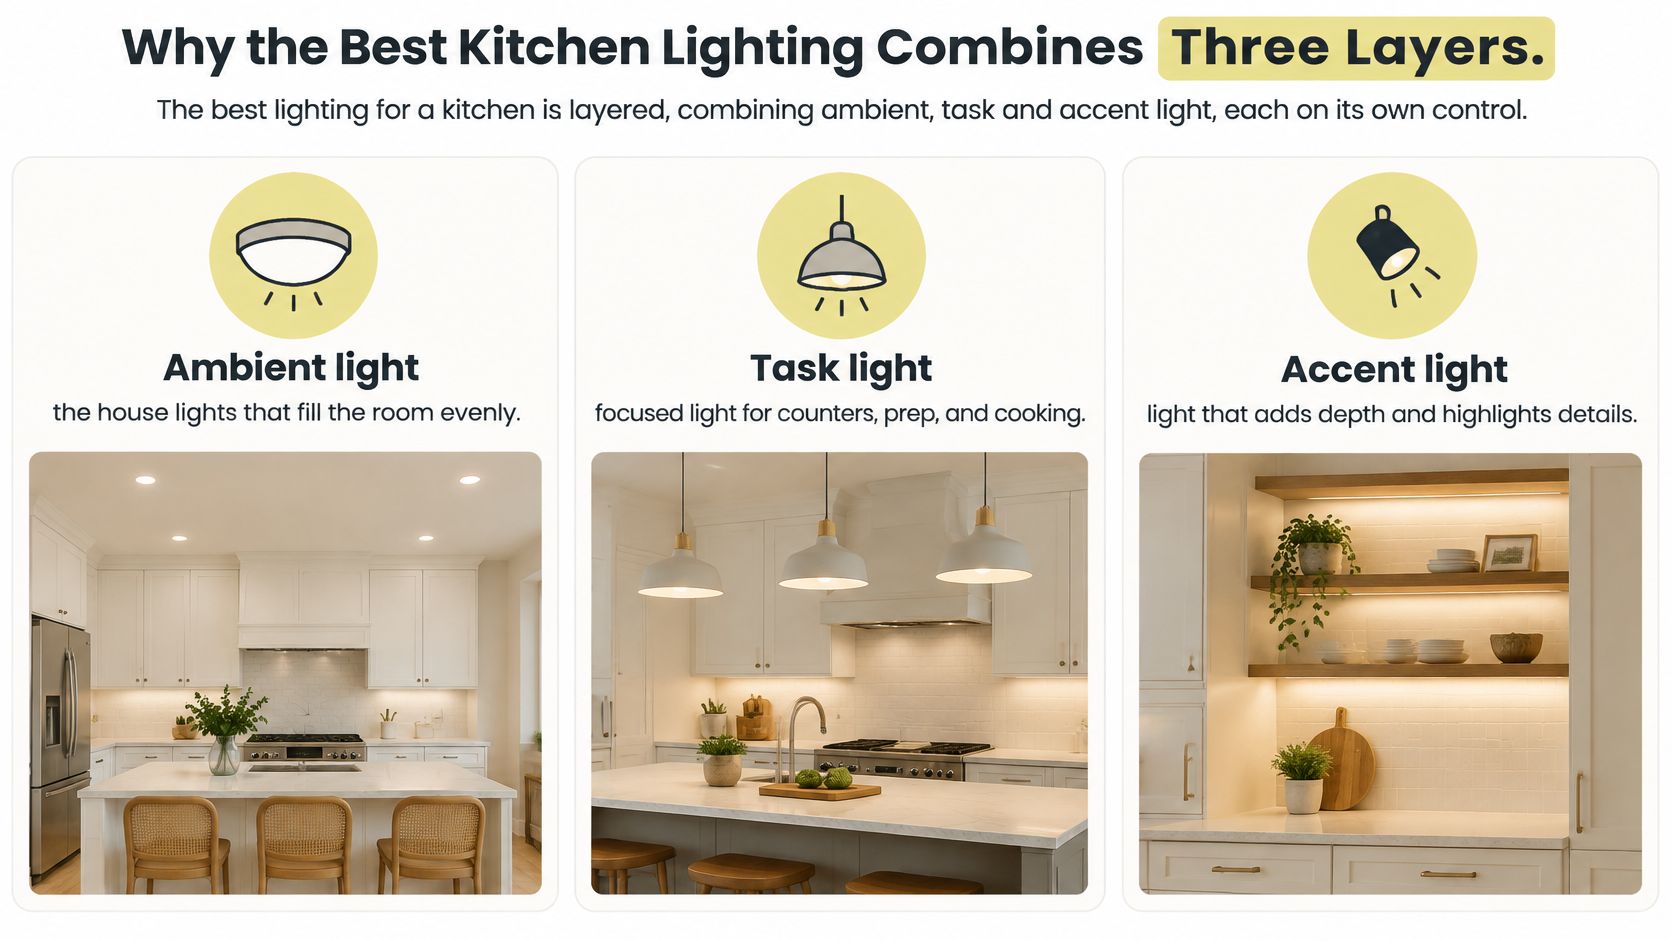
Independent controls make the arrangement useful. You should be able to illuminate the prep counter without turning every ceiling light up, then leave a gentle cabinet glow when the dishes are done.
Lighting also belongs alongside layout decisions. The RBA Home Plans kitchen design guide is a useful companion when you're considering how circulation and work areas fit together. Jennifer Gilmer's book The Kitchen Bible: Designing the Perfect Culinary Space likewise addresses layouts, materials, appliances, lighting and budgets as connected choices.
At Jennifer Gilmer Kitchen & Bath, that coordinated approach carries from concept through installation for homes in Washington, DC, Maryland and Virginia. Start your own assessment by listing the lighting layers you have, then mark any missing layer or any job you're asking a single ceiling fixture to perform.
Target Lux, Color Temperature and CRI by Zone
Lux measures the light arriving at a surface, not the brightness printed on a bulb package. For preparation areas, LEDVANCE's IES-based lighting guidance gives a commercial-kitchen benchmark of approximately 538 to 1,076 lux, or 50 to 100 footcandles, useful as a residential work-zone reference rather than a whole-room requirement.
The WELL visual lighting design standard provides a more conservative commercial reference of about 500 lux for primary preparation and cooking surfaces, with about 200 lux for dishwashing. These are planning references, not a requirement to make a residential kitchen feel commercial.
Target lux, color temperature and CRI by kitchen zone
| Zone | Target illuminance | Color temperature | CRI |
|---|---|---|---|
| Primary countertops and cooking surfaces | About 500 lux as a starting point; 538 to 1,076 lux is the higher task benchmark | 3000 to 3500 K | 90 or higher |
| Sinks and dishwashing areas | About 200 lux for dishwashing; increase for preparation tasks | 3000 to 3500 K | 80 or higher |
| Whole-room ambient layer | Comfortable general illumination, below detailed task-light levels | 3000 K | 80 or higher |
| Island and dining pendants | Task target where preparing food; dimmed for dining | 2700 to 3000 K | 90 |
| Cabinet and shelf accent lighting | Low-level illumination sufficient to reveal displayed details | 2700 to 3000 K | 90 |
The table combines the task-light benchmarks above with residential design selections for color appearance and rendering. Dining and accent settings are recommendations, not minimum illuminance standards.
Read color temperature and color quality separately
Kelvin describes appearance, from warmer to crisper white. CRI, the color-rendering index, describes how faithfully colors appear under the light. ENERGY STAR's connected residential lighting presentation includes 2700 K, 3000 K and 3500 K kitchen-related options and CRI 90 in several recommended room settings.
I'd generally start with a warmer white beside wood and traditional finishes, and consider a crisper white alongside contemporary materials. Choose high color rendering when you want to appreciate the undertones in stone, painted cabinets and tile. A warmer lamp with poor color rendering isn't automatically a flattering lamp.
Verify the light where you use it
Use a lux meter at countertop height, with the sensor facing upward. Check the cutting-board position, the counter beneath upper cabinets and the island's working edge, rather than taking a reading in the room's center.
Cabinet depth, dark counters and reflective backsplashes all affect the result. Test after installation, including after dark, then set dimming levels that preserve useful task light while allowing a softer atmosphere for dinner.
Placing Each Layer So the Countertop Stays Lit
Stand at the counter and hold your hand where you'd normally chop. If your head and shoulders sit between the ceiling light and that spot, you've found a placement problem, not necessarily a brightness problem.
Light should reach the work from in front of or above the cook. The Illuminating Engineering Society's residential guidance emphasizes adjustable light levels with minimized glare. That's a better starting point than drawing a tidy grid of ceiling fixtures without looking at the cabinetry below.
This is the kind of everyday activity the lighting plan should support.
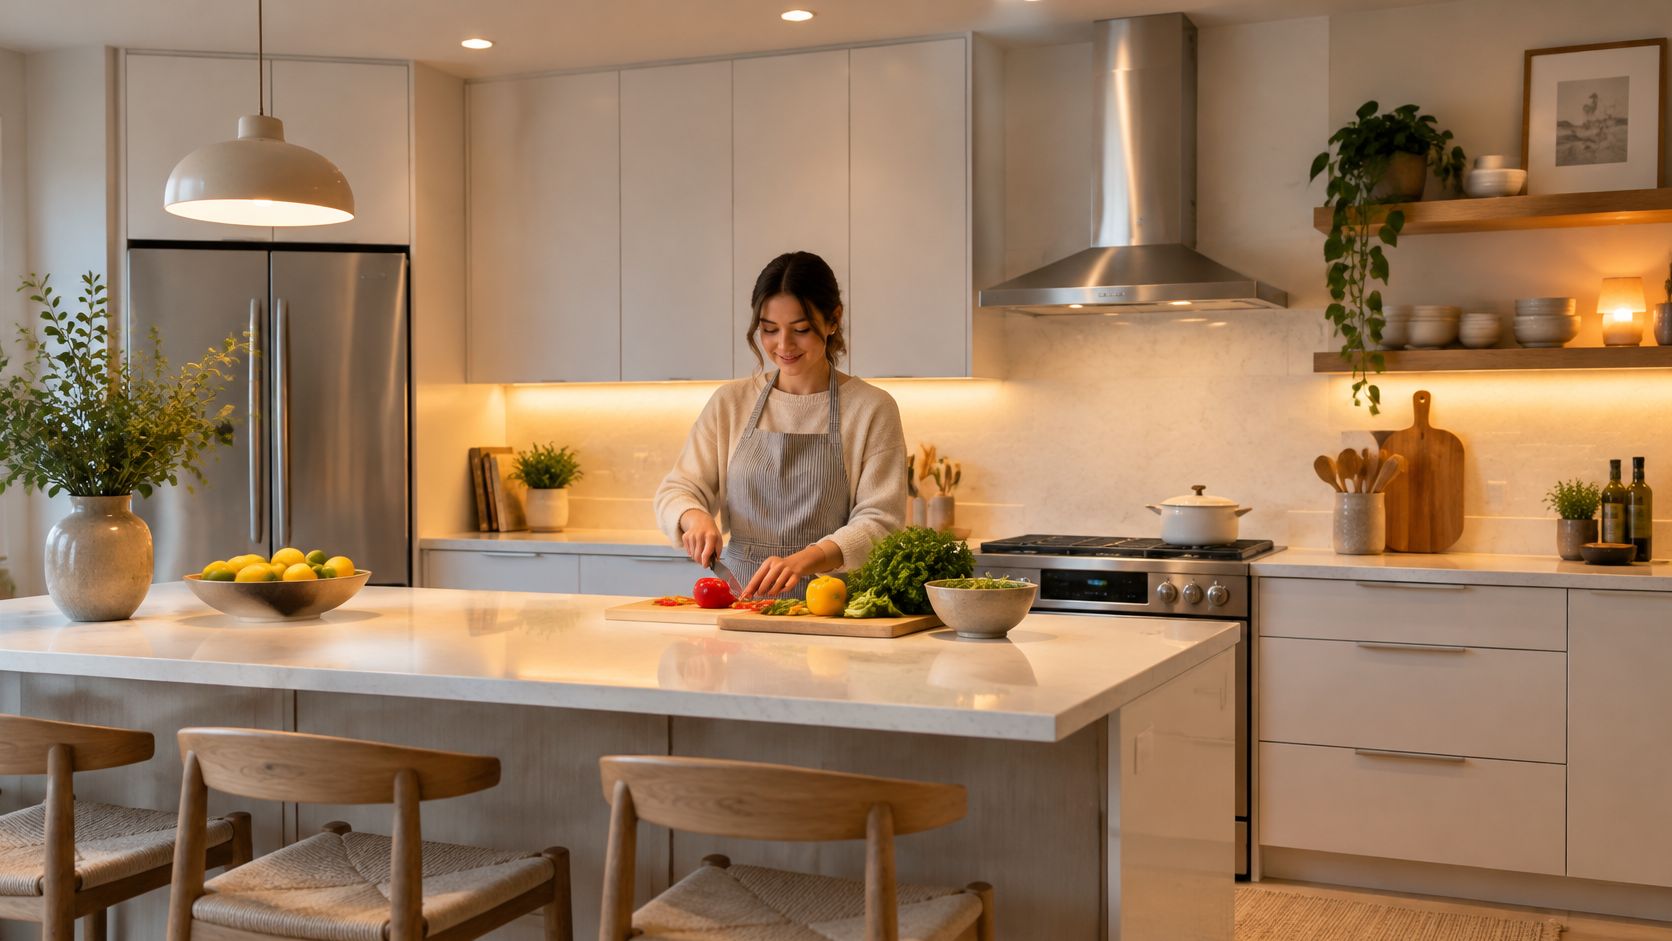
Place the fixtures around the work
- Run continuous under-cabinet lighting across usable counters. Fit diffused LED strips near the front underside of wall cabinets, concealed behind the cabinet lip. Aim adjustable channels across the counter and toward the backsplash, rather than outward into someone's eyes.
- Size island pendants to the island and the sightlines. Mock up the shade position before fixing the drop. Check that a seated guest can see across the island and that someone standing doesn't look directly into an exposed lamp.
- Coordinate ceiling fixtures with the sink and range. Don't automatically center a bare downlight over either position. Consider the hood's integrated light, cabinet projections and where the user stands before locating supplementary ceiling lighting.
- Give display areas quieter light. Concealed fixtures inside glass-front cabinets or beneath open shelves can reveal ceramics and wood grain without competing with the prep counter.
- Keep the layers independently switched or dimmed. A useful fixture loses much of its flexibility when it can only operate with every other light in the room.
Check the beam, not just the ceiling plan
Several shielded fixtures with broad distributions can create a more even result than a few widely spaced, narrow downlights. Diffusers and recessed light sources also help keep the brightest parts of a fixture out of view.
Our recessed lighting placement guide can help you think through that ceiling-to-counter relationship. The same geometry matters in other work areas: Modern Bathrooms' mirror lighting advice for Dublin homeowners offers a useful comparison when considering how source position changes shadows.
Before ordering, walk the proposed work zones with a tape measure and the cabinet plan. Mark where a hand, knife or sink bowl falls into shadow, then adjust the fixture locations on paper.
Why a Bright Kitchen Can Still Feel Harsh
The room is bright, yet you don't particularly enjoy being in it. You might notice a sharp reflection across polished stone, a visible row of LED dots beneath a cabinet or a ceiling light that catches your eye whenever you look up from the sink.
Brightness and comfort aren't the same thing. A study published in the Journal of Asian Architecture and Building Engineering found that higher luminous intensity can increase glare, while higher color temperature may negatively affect physiological and psychological responses; in its dimming test, reducing general lighting by 60% changed working-plane illumination from 300 lux to 200 lux. That's a reason to plan dimming around the light remaining on the work surface, not just around how low a switch can go.
The distinction is easier to see when you separate useful illumination from visual discomfort.

Trace the discomfort to its source
Exposed LEDs are an obvious culprit. A diffuser softens the visible source, while a cabinet lip or shield keeps it out of ordinary sightlines. Adding a dimmer alone won't necessarily fix a fixture you're looking directly into.
Misdirected beams create another problem. An adjustable fixture should send its light toward the counter or backsplash, not toward someone seated at the island. Bare downlights over the cooking zone deserve particular scrutiny.
Reflective finishes need a sample test. Glossy counters, white backsplashes and stainless-steel appliances can return a bright image of the source toward your eyes. A high-Kelvin scheme across glossy surfaces can feel especially clinical; try a warmer sample without sacrificing color quality.
Comfort comes from light placed on the work, not from more light overall.
Before installation, power a sample fixture and inspect it from seated and standing eye heights. Move through the positions you use: washing, chopping, unloading the dishwasher and talking across the island.
Look at both the fixture and its reflection. Then test the general lighting and task lighting separately, so you can soften the room without losing visibility where you're still working.
Controls, LEDs and Dimmers Worth the Added Cost
The best kitchen lighting isn't necessarily the most automated. A well-labeled dimmer you use every evening can be more valuable than a connected system whose settings nobody understands.
The strongest starting point is efficient, well-specified light. ENERGY STAR's LED lighting bulletin reports that certified LEDs use up to 90% less energy than traditional incandescent lighting and can last up to 25 times longer. According to Houzz data reported by Home Accents Today, 67% of renovating homeowners selected LED bulbs and 47% selected light dimmers as sustainable kitchen features in 2024.
Separate lamp savings from control savings
A Connecticut residential lighting program document estimates potential savings of 29% for connected LED lighting and 17% for occupancy sensors, while observed project savings ranged from 10% to 76%. The document also discusses an evaluation reporting 53% energy savings and 67% demand savings for residential LED bulbs and dimmers, with much of the reduction attributable to replacing inefficient lamps rather than controls alone.
Those figures aren't a prediction for your household. They show why the equipment choice and the way people use it both matter.
Match controls to daily routines
- Food preparation: Use dimmers that let you adjust brightness without switching off the work surface.
- Nighttime navigation: Set a low-level scene using concealed cabinet or toe-kick lighting.
- Window-side counters: Consider daylight-responsive adjustment where changing daylight meaningfully affects the workspace.
- Automatic shutoff: Reserve occupancy sensing for places where it won't interrupt normal activity. A poorly configured sensor can turn the lights off while someone stands relatively still at the sink.
Check LED, driver and dimmer compatibility before purchase. A fixture that flickers or drops out near the bottom of its dimming range won't deliver the quiet evening setting you wanted.
Our under-cabinet lighting installation guide helps connect those equipment decisions to cabinetry and wiring. Before handover, commission the controls, label the switches and demonstrate the scenes to the household. Complicated settings that people override are unlikely to deliver their intended benefits.
Remodel Sequence and Pre-Wall Confirmation
Consider an illustrative composite remodel: a kitchen receives generous daylight but still feels heavy, particularly when someone stands at the perimeter counter. Its single ceiling fixture illuminates the floor more successfully than the worktops, and the homeowner keeps postponing a pendant purchase because nothing seems quite right.
That starting point echoes a real client situation at Jennifer Gilmer Kitchen & Bath: a builder-grade kitchen felt drab and heavy despite natural light. The resulting design created a bright, open room with clean lines that acknowledged the home's original 1920 character. The lesson isn't that every kitchen needs the same palette, but that daylight alone doesn't resolve the room's layout and lighting.
A useful remodel sequence begins with the activities, not a fixture catalogue.
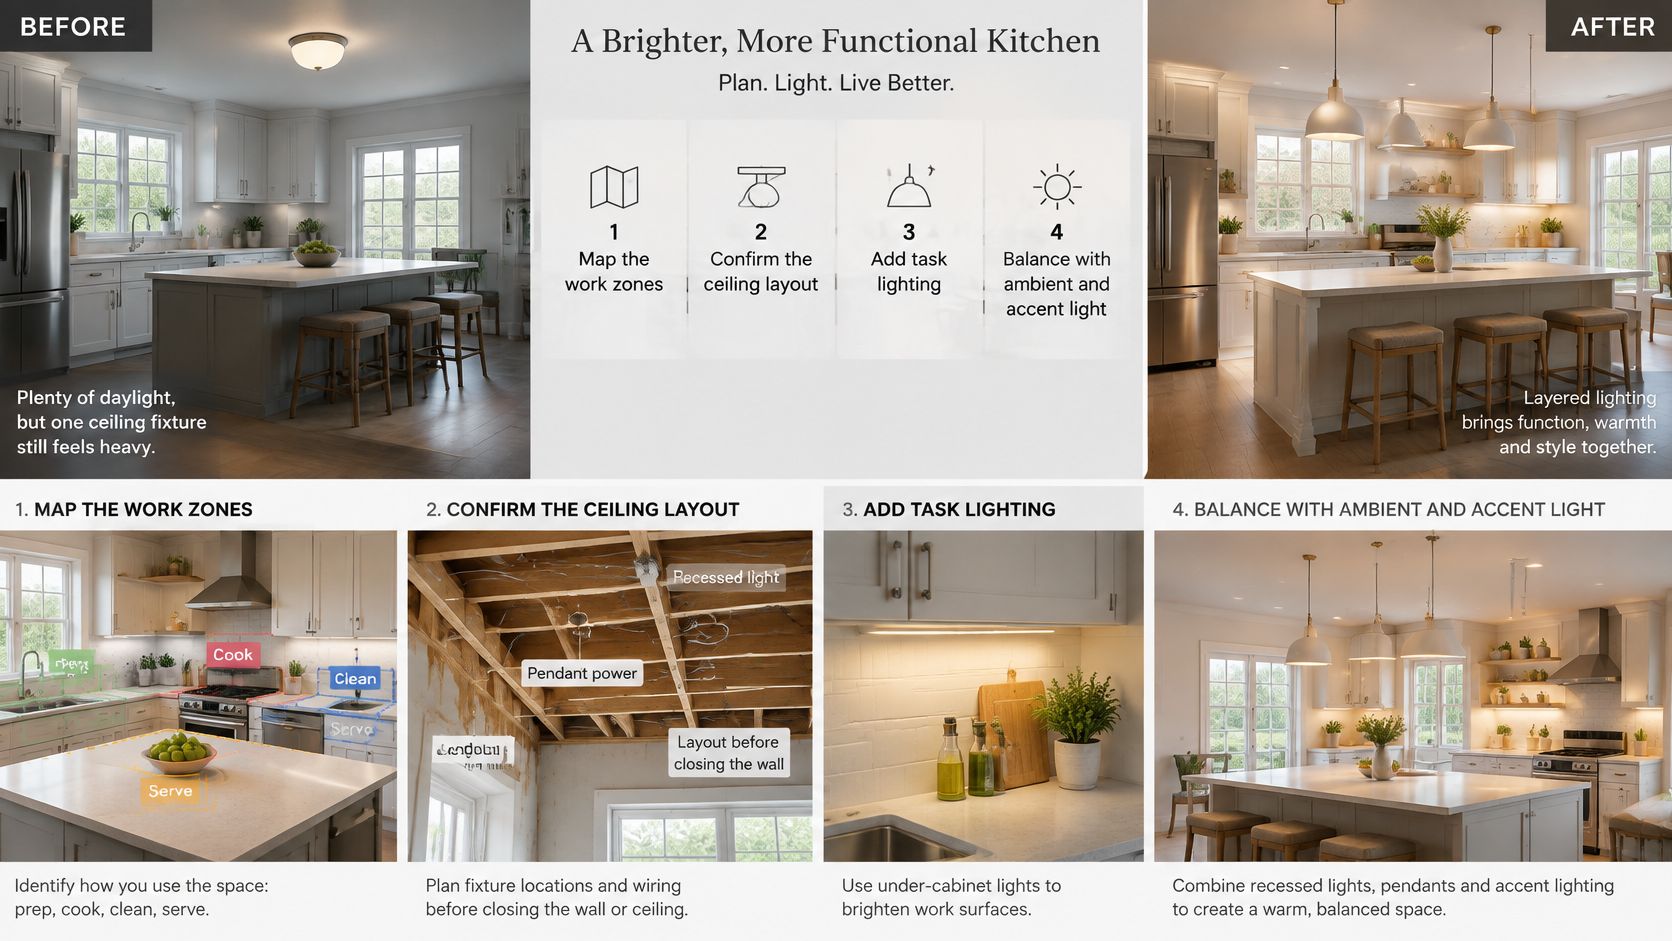
Map the room before selecting fixtures
Start with the work zones. On the floor plan, mark the sink, cooktop, preparation counter, island and dining edge. Add the position of the person using each area, including someone who prefers to sit while preparing food.
Next, assign an illuminance target and color specification to each zone. A residential lighting table attributed to the Illuminating Engineering Society distinguishes 20 to 50 footcandles for general kitchen illumination from 50 to 100 footcandles for counters and cooking surfaces. The distinction helps avoid specifying the entire room as though every surface were a chopping board.
For the illustrative kitchen, the designer can now select concealed task strips for the perimeter counters, diffused ceiling fixtures for circulation, pendants suited to the island and a dimmable accent circuit. The pendants no longer need to solve every lighting problem.
Jennifer Gilmer, CKD, considers what's working aesthetically and functionally when assessing an existing space. Our design process also includes showing clients the finished project on a screen before construction begins, so cabinetry proportions, fixture scale and sightlines can be considered together.
Coordinate the hidden details
Bring the electrician into the conversation while the layout is still adjustable. Identify switch locations, circuit groupings, LED driver positions and access for future maintenance.
Lighthouse Energy Services' guide to choosing an electrician for lighting upgrades is a useful resource when preparing for that conversation. The electrical plan should describe how the homeowner will operate the room, not merely where power is required.
Then test actual samples. Place cabinet, stone and backsplash samples together beneath the proposed light, and inspect them in daylight and after dark. A screen rendering helps explain the design, but it can't replace seeing the installed light's color and reflections.
Keep the overall room in view as you evaluate individual choices.
Confirm the plan before walls close
Use the broader kitchen remodeling checklist to coordinate lighting with cabinetry, appliances and construction decisions. Before closing walls, obtain signoff on the details that are expensive or disruptive to change:
- Work-zone performance: Confirm the intended light at the prep counter, sink, cooking surface and island.
- Finish appearance: Approve the lamp color and high-color-rendering specification against the actual materials.
- Fixture and driver access: Verify that concealed equipment remains accessible without dismantling finished cabinetry.
- Switching and scenes: Agree on which controls operate which fixtures, including cooking, dining and nighttime settings.
After installation, measure the work surfaces and commission the scenes before handover. Our team oversees builders and works with contractors to implement the design, carrying decisions through installation rather than leaving the homeowner to reconcile separate plans.
Bring your list of work zones and existing fixtures to a consultation. Our showrooms in Chevy Chase, MD; Easton, MD; and Ashburn, VA provide places to discuss materials, cabinetry and the way you want the finished kitchen to feel.
Jennifer Gilmer Kitchen & Bath offers kitchen planning that coordinates lighting with cabinetry, finishes and daily routines, from concept through installation across Washington, DC, Maryland and Virginia. Visit Jennifer Gilmer Kitchen & Bath to arrange a consultation, and bring photographs of your kitchen with the lights on so we can discuss where better-placed light would make the greatest difference.