.avif)

You've found the tile, saved the fixtures, and started imagining a quieter, more beautiful morning routine. Then the condo board asks for drawings, your contractor mentions the service elevator, and someone points out that the bathroom floor sits above a neighbor's ceiling. Suddenly, the project is less about choosing a vanity and more about coordinating a small construction site inside a shared building.
That's condo bathroom renovation. The design still matters, but governance, waterproofing, access, ventilation, and plumbing often determine what's possible before aesthetics enter the conversation. Plan those constraints early and the finished room can feel considered rather than compromised. Ignore them and even a carefully selected bathroom can become a sequence of approvals, delays, and expensive corrections.
Table of Contents
Why a Condo Bathroom Renovation Is Its Own Kind of Project
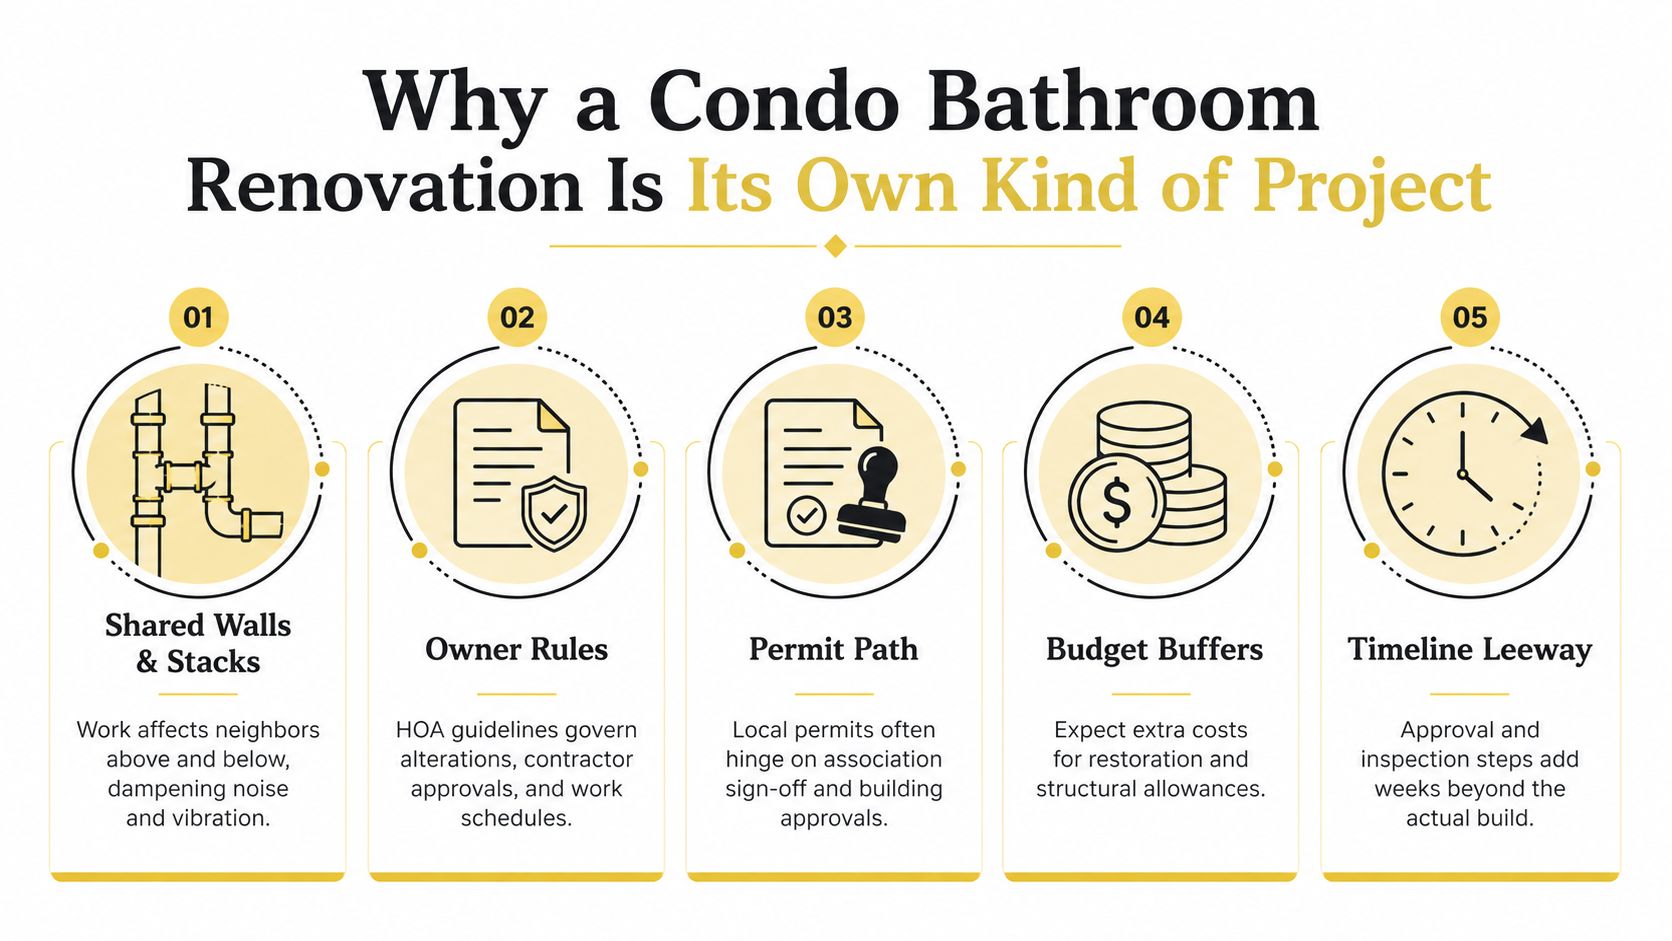
A condo bathroom is governed by the building around it. Shared walls, structural elements, plumbing stacks, ventilation chases, hallways, elevators, and work-hour rules can shape the project before you choose a finish. A detached-home contractor may control access from the driveway to the demolition bin. A condo team must coordinate with the association, building management, neighbors, inspectors, and sometimes an engineer before opening a wall.
The room's boundaries need a technical review first. Confirm which walls are partitions, which contain risers or chases, where the existing vent connects, and whether the floor structure supports the drainage changes under consideration. Then review access logistics. Ask how workers and materials enter, whether the service elevator requires reservations, where debris may wait, and whether the contractor needs a certificate of insurance or approved-vendor status.
The building's rules can influence design as directly as the room's dimensions. A flooring change may require review because of noise transmission. A plumbing alteration may need association approval and a local permit. Work involving common-property components can bring additional conditions, as the official New South Wales strata renovation guidance explains for apartment owners in that market.
Treat the room as three connected problems
A workable plan addresses these areas together:
- Building governance: Association approvals, alteration agreements, insurance documents, contractor restrictions, elevator bookings, and work-hour limits.
- Technical constraints: Shared stacks, waterproofing assemblies, ventilation routes, electrical capacity, shutoff access, and concealed conditions.
- Interior design: Layout, storage, lighting, materials, fixture scale, and the experience of using the room.
Waterproofing demands particular care because a leak can reach the unit below and become the owner's liability. The broader bathroom remodeling market was valued at USD 412.80 billion in 2025, with a projection of USD 428.07 billion in 2026 and USD 615.61 billion by 2036, according to Future Market Insights' bathroom remodeling market forecast. That market demand does not simplify condo construction. It reinforces the need to treat the work as a serious residential project rather than a decorative weekend update.
Practical rule: Do not approve a tile palette until you know which walls, floors, ducts, stacks, and building procedures control the room.
Defining the Scope Before You Fall in Love with Tile
Before selecting finishes, clarify what the bathroom needs to do on a typical morning. Is the project a cosmetic refresh, a layout adjustment, or a full gut renovation? Those labels may look similar in a showroom, but they carry different consequences for permits, waterproofing, plumbing access, demolition, and scheduling. In a condo, the building's shared systems and access rules shape each category.
Write down the daily requirements and the building constraints together. Note how many people use the room, whether storage must hold linens or cleaning supplies, and whether aging-in-place features matter. Decide whether the household needs a tub, a shower, or both, then identify which fixtures can stay near their current locations. Keeping the toilet, shower drain, and vanity plumbing close to their existing positions usually protects the budget and the construction schedule.
Moving a toilet is rarely a casual change. The new location may conflict with a vertical stack, floor joists, or the ceiling below. Relocating a shower can create drainage and waterproofing complications when the floor assembly leaves little room for slope. Shared walls make concealed conditions more consequential, so have the designer map these constraints before presenting a plan that only looks effortless on paper.
Use a written scope so every contractor prices the same project. The bathroom remodeling planning guide from Jennifer Gilmer Kitchen & Bath provides a useful reference for organizing priorities, selections, and project decisions before construction.
Renovation Scope at a Glance
| Scope level | Typical work | Planning implication |
|---|---|---|
| Cosmetic refresh | Paint, mirrors, accessories, selected fixtures, and limited finish updates | May avoid major wall opening, but building rules can still apply to flooring, plumbing, or electrical work |
| Layout reconfiguration | Vanity, door, shower, or fixture adjustments within the existing bathroom | Requires careful review of stacks, drains, clearances, waterproofing, and permit requirements |
| Full gut renovation | Demolition to the substrate, new plumbing and electrical rough-ins, waterproofing, tile, cabinetry, and fixtures | Needs coordinated drawings, inspections, building approval, detailed access planning, and allowances for concealed conditions |
Protect the budget from hidden conditions
Separate construction allowances from finish selections. Premium tile, custom millwork, specialty glass, and special-order plumbing fixtures can consume funds before labor and building costs are fully defined. Keep a contingency for concealed leakage, older shutoffs, corroded piping, uneven subfloors, and framing repairs.
The 2025 U.S. Houzz Bathroom Trends Study reported median bathroom renovation spending of $13,000 in 2024, compared with $15,000 in 2023. A separate project-decision study cited by the Home Improvement Research Institute reported average spending of $12,061 and median spending of $7,800. Condo pricing can run higher because shared walls, approval procedures, and access requirements add work that broad bathroom averages do not capture. Keep the tile decision behind the scope, not ahead of it.
HOA Rules, Permits, and the Approval Timeline Most Owners Underestimate
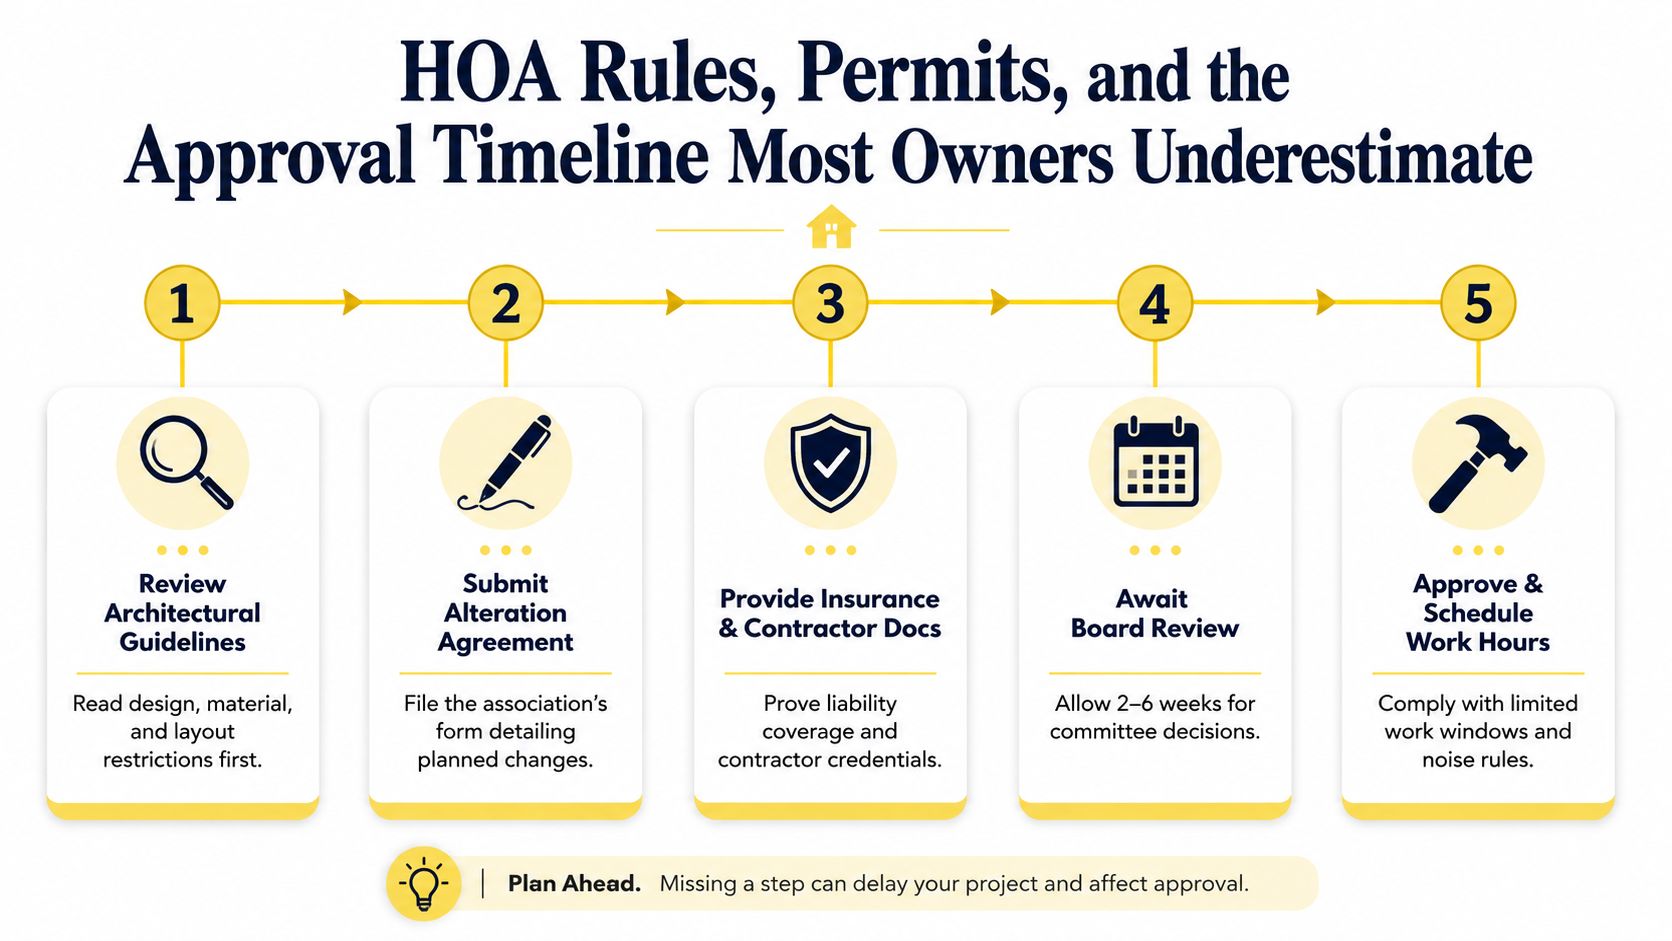
Condo approval isn't one form. It's a sequence of reviews that can involve the association's architectural guidelines, alteration agreement, insurance requirements, contractor credentials, work hours, noise rules, waste removal, and common-element access.
Ask for the complete building package before your designer finalizes the plan. Confirm whether plumbing changes, flooring replacement, ventilation work, or alterations to shared walls need additional documentation. In Washington, DC, Maryland, Virginia, and Delaware, local permit requirements vary by jurisdiction, so the association's approval doesn't automatically replace a city or county permit.
Florida illustrates the distinction clearly. In a condo renovation, HOA approval is separate from a city permit. The board can review work before it begins, while plumbing, electrical, or structural changes may still require a building permit. Some Miami-area buildings also restrict construction to Monday through Friday, 8 a.m. to 5 p.m., as outlined in this Miami condo bathroom renovation rules guide.
Build the schedule backward
Pick the desired construction window, then work backward through design completion, board submission, permit filing, contractor documentation, material ordering, elevator reservations, and neighbor notices. Don't schedule demolition based on the date you hope the board will approve the work.
A complete submission should include the drawings, finish information, plumbing and electrical scope, contractor contact details, insurance documents, and any required alteration forms. Keep copies of approvals, revisions, and inspection records. The bathroom remodel timeline guide from Jennifer Gilmer Kitchen & Bath can help organize the design and construction sequence, but your building's review process remains the controlling factor.
Find the gaps before submission
Most preventable delays come from incomplete packages, unapproved contractors, missing insurance information, or assumptions about elevator access. Ask these questions in writing:
- Who reviews the work: Is approval handled by a property manager, board, architectural committee, or building engineer?
- What needs a permit: Does the jurisdiction require review for plumbing, electrical, ventilation, or structural changes?
- Who receives notice: Must adjacent owners or residents be informed about water shutoffs or noisy work?
- How is access controlled: When can the service elevator be reserved, and where can materials and debris be staged?
- What happens after approval: Are inspections, closeout documents, or photographs required before the alteration is complete?
The right team treats the approval package as part of the design, not as paperwork someone handles after the drawings are finished.
Designing a Small Condo Bathroom to Feel Twice as Big
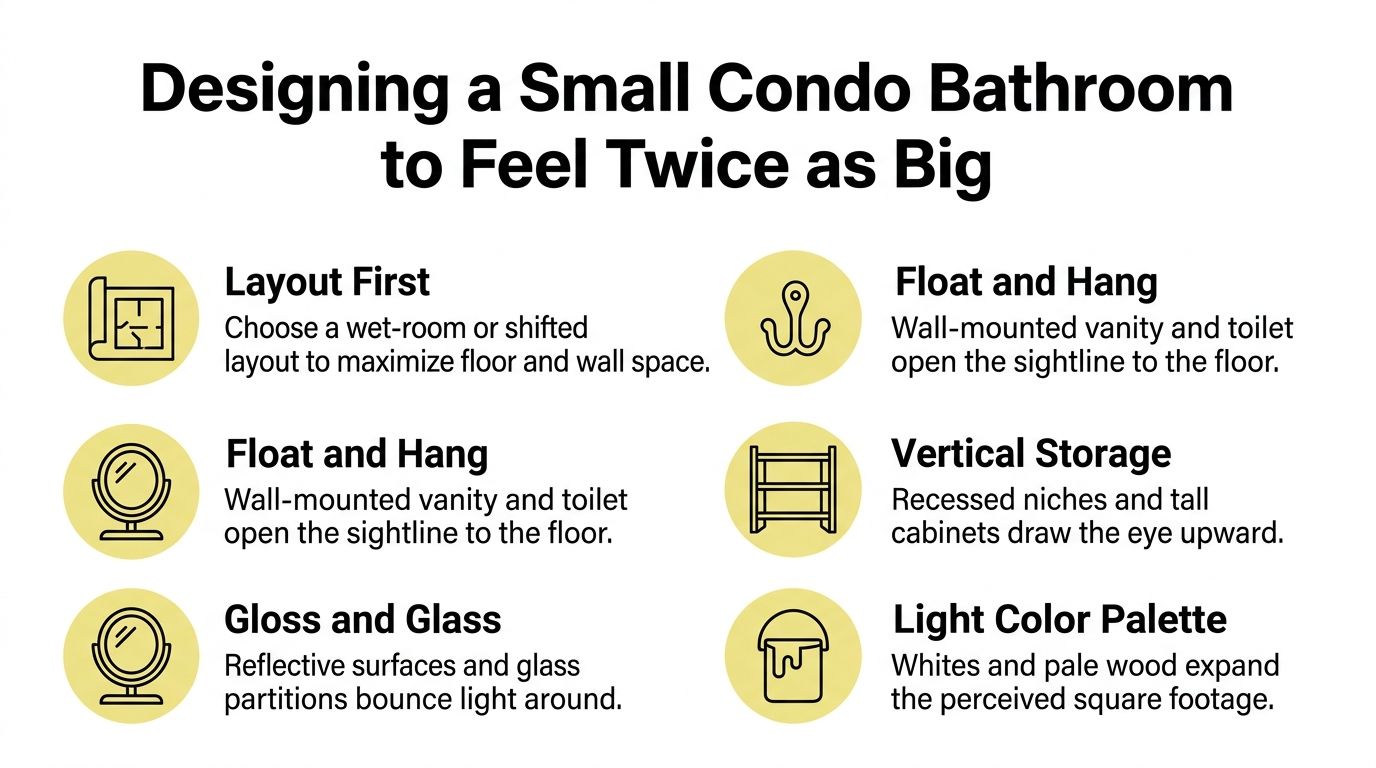
Small bathrooms reward disciplined space planning, not oversized fixtures. Begin with the plan after accounting for finished wall thickness, waterproofing, tile, door clearances, and cabinetry depth. A layout that works on the rough framing plan can feel crowded once every finish is installed.
A wet-room configuration can make sense when the shower and the rest of the room can share a carefully engineered waterproofing strategy. In other rooms, shifting the vanity or reversing the door swing may recover more practical floor area without moving the plumbing stack. A pocket door can outperform a swinging door where the hinge arc interferes with the vanity or toilet. Barn-style doors can solve a clearance problem, but they need wall space and may not provide the same privacy or acoustic separation as a properly installed pocket door.
Use sightlines before decoration
Large-format tile can reduce visual interruptions when the room's geometry supports it. Continuous grout lines, full-height glass, a generous mirror, and a restrained palette help the eye read the room as one volume. Mirrored or high-gloss cabinetry can bounce light, while pale wood introduces warmth without making the space feel busy.
The same principle applies to lighting. Layer ambient, task, and accent sources rather than relying on one ceiling fixture. A bathroom renovation needs coordinated placement for mirror lighting, shower illumination, and controls. For help with the electrical side of a lighting plan, a qualified lighting installation electrician can coordinate fixture locations, switching, and safe installation with the broader renovation team.
Store upward and protect clearances
Recessed niches between studs keep bottles out of the shower footprint. A shallow-depth vanity can preserve the approach to the toilet, while a tall cabinet adds capacity without consuming the entire floor. Use drawers for daily items, a vertical tower for linens, and a removable access panel wherever future shutoff or service work may be needed.
Avoid the fixtures that look luxurious in a large room but become obstacles in a compact one. A freestanding tub can crowd circulation. An oversized vanity can block the door clearance. A wall-mounted toilet or vanity may open the sightline to the floor, but only if the wall structure and concealed plumbing support it. Coordinate fixture scale with the room's finished dimensions, not the rough opening.
Waterproofing, Ventilation, and the Plumbing and Electrical Layer
The technical layer deserves the same design attention as tile and cabinetry. In a condo, a finished surface can conceal a failure that affects another home, the building structure, and your relationship with the association.
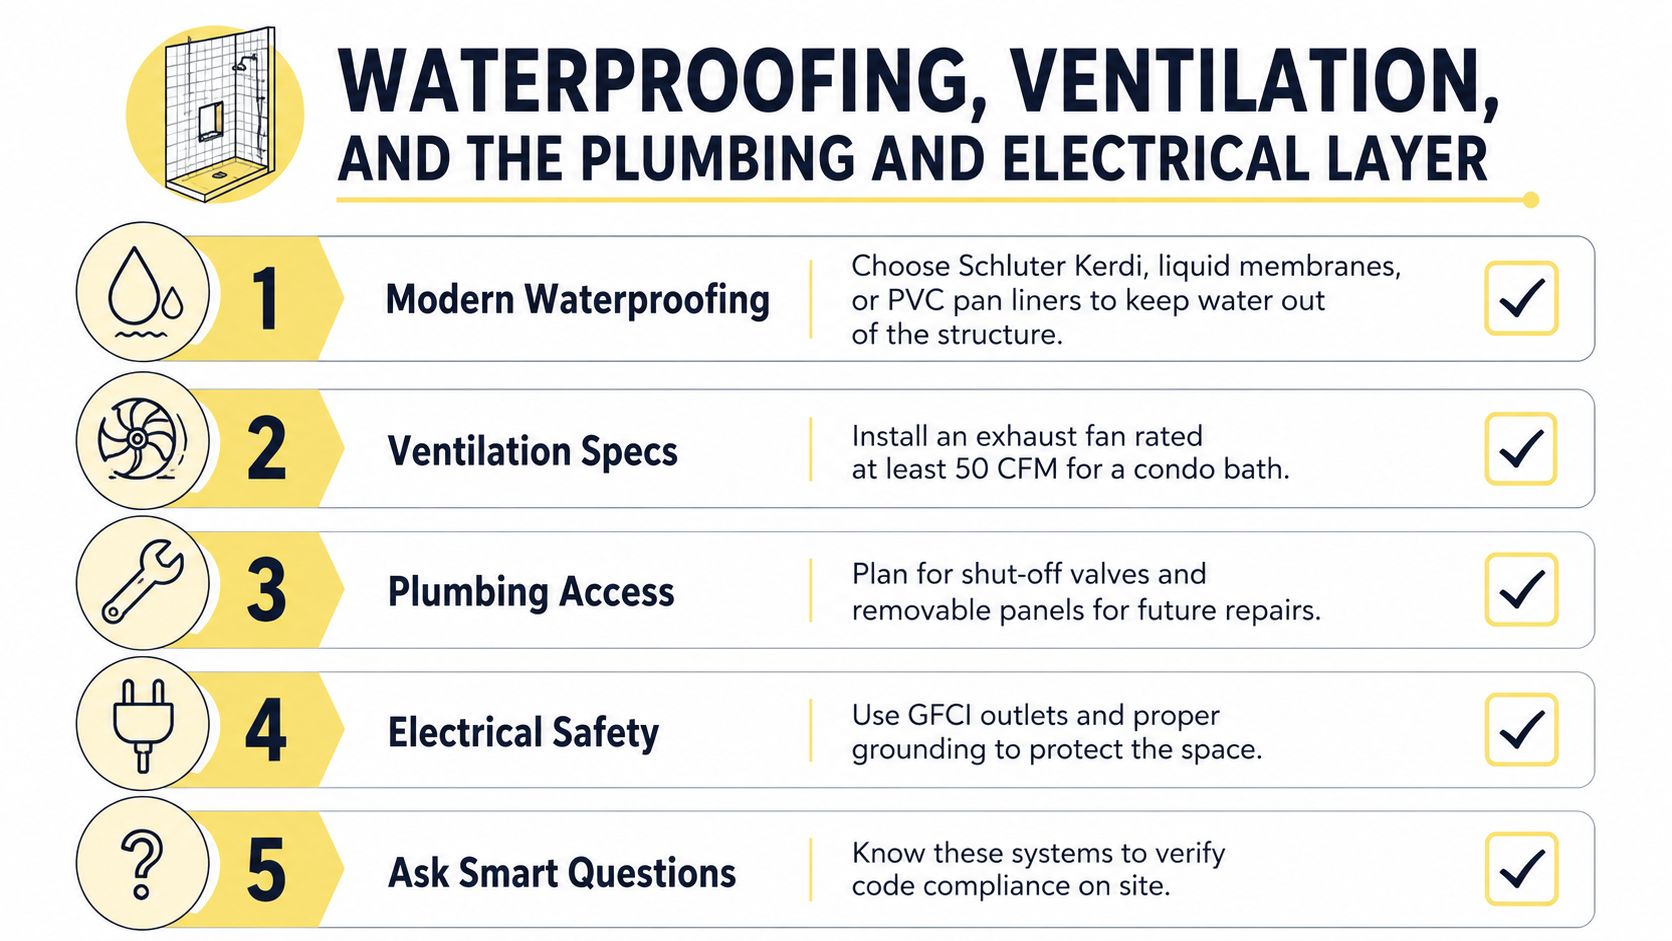
Modern waterproofing systems may use a sheet membrane such as Schluter Kerdi, a liquid-applied membrane, or a PVC pan liner. The product matters less than the continuity of the assembly. The installer must prepare a sound substrate, seal corners and penetrations, treat transitions carefully, and verify containment before the tile conceals the work.
Water damage repairs can cost about $2,000 for localized damage and $12,000 or more when mold remediation and structural repair are required, according to renovation guidance on bathroom mistakes and water damage. Tile and grout aren't waterproofing. They're finish materials installed over a waterproofing system.
Verify the wet area before tile
The workflow should include:
- Demolish to a sound substrate: Remove questionable finishes and inspect framing for hidden leakage.
- Install the membrane continuously: Cover shower and other wet zones, including corners, seams, niches, curbs, and penetrations.
- Protect drainage: Confirm the pan and drain assembly direct water correctly.
- Flood-test or otherwise verify containment: Complete the required test before tile and wall finishes close the assembly.
- Document the work: Photograph membranes, penetrations, and concealed plumbing for the project record.
New York City apartment requirements can be particularly demanding. Some co-op boards require waterproofing across the entire bathroom floor, with the membrane extending 4 to 6 inches up the walls around the perimeter, and may require a 24 to 48 hour flood test, as described in this New York apartment bathroom waterproofing guide.
Ask about air, water, and power
Many residential bathroom remodeling guidelines call for an exhaust fan with a backdraft damper, ducted directly outdoors, with at least 50 CFM intermittent capacity even when a window is present. Some jurisdictions allow 20 CFM continuous ventilation. Confirm the permit requirements, room sizing, duct route, exterior termination, and shared-chase conditions before ordering the fan. The bathroom ventilation requirements guide from Jennifer Gilmer Kitchen & Bath provides a useful starting point for that conversation.
Plumbing should stay near existing supply, drain, and vent locations whenever possible. Electrical planning should address GFCI protection, grounding, dedicated circuits for heated floors or larger vanity loads, and switch placement that doesn't depend on borrowing power from another circuit.
Before tile goes up, ask the contractor to verify membrane coverage, drain slope, flood-test results, fan ducting, shutoff access, plumbing pressure, GFCI protection, lighting locations, and inspection status.
Staging the Build in a Building With Limited Access
A condo bathroom renovation needs a staging plan before demolition. The service elevator may have limited booking windows, the building may require a certificate of insurance, and construction hours may exclude evenings or weekends. Noise and vibration rules can force a crew to pause even when the next trade is ready.
Plan the movement of every major item. Where can tile, drywall, cabinetry, and fixtures wait before they enter the unit? Where will demolition debris go? Can the elevator accommodate long materials and protective padding? Who reserves it, and who pays for additional access or damage deposits if the building requires them?
Off-site preparation can reduce pressure on the occupied building. A vanity carcass, shower niche components, or tile panels can be prepared away from the unit when the design allows. That keeps the apartment cleaner and reduces the number of delivery windows, but it requires accurate field measurements and early decisions.
Use a controlled construction sequence
A practical sequence looks like this:
- Demolition: Protect corridors, elevator interiors, neighboring surfaces, and the unit's occupied areas before removal begins.
- Rough plumbing and electrical: Open walls and floors, then install new lines, boxes, circuits, shutoffs, and ventilation connections.
- Inspection: Schedule required building or jurisdictional inspections before closing the walls.
- Waterproofing and testing: Complete the wet-area assembly and verify containment before tile installation.
- Tile and wall finishes: Install the planned surfaces only after concealed work is accepted.
- Finish plumbing and electrical: Set fixtures, lighting, switches, accessories, and final connections.
- Punch list and closeout: Correct details, clean shared paths, submit records, and confirm building requirements are complete.
Quiet hours and elevator availability can interrupt this sequence. Communicate with neighbors before demolition, post the approved work window, protect common hallways, and use dust containment at the unit entrance. A short-term storage arrangement can also keep materials and personal belongings out of the work zone. This home renovation storage secret offers practical perspective on keeping renovation items organized away from the active site.
Budgeting Honestly and Taking the Next Step Toward a Showroom Visit
A condo bathroom budget has three layers. Hard costs cover demolition, labor, tile, cabinetry, fixtures, glass, waterproofing, plumbing, electrical, and ventilation. Pre-construction costs may include design services, permits, association submissions, insurance documents, engineering coordination, and building deposits. Contingency addresses concealed leakage, damaged substrate, old piping, and conditions that cannot be confirmed before demolition.
A 2026 condo-specific pricing guide places typical project totals at $6,000 to $20,000, with an average near $11,000 and an estimated $140 to $420 per square foot, depending on scope and finish level. It also lists $0 to $2,000 for permits and HOA-related expenses. Treat these figures as planning markers. Your building's approval process, shared-wall conditions, elevator rules, and required protection can change the final budget.
Regional conditions can push costs higher. A Toronto condo renovation guide estimates average bathroom projects at $5,000 to $13,000 and cites condos as running about 30% more than comparable house bathrooms because of association and access restrictions. A separate 2025 to 2026 breakdown estimates condo-specific soft costs at roughly $200 to $1,000 for approval fees and $1,000 to $3,000 for access logistics on multi-week projects, as discussed in this Vancouver renovation risk and cost guide. Ask every contractor what the quote includes, especially protection, deposits, approvals, delivery handling, and time lost to building restrictions.
Prepare for a productive consultation
Bring these items before requesting a consultation:
- Building information: Association guidelines, alteration forms, approved work hours, elevator procedures, insurance requirements, and permit instructions.
- Existing conditions: Room dimensions, ceiling height, door swing, window location, fixture positions, plumbing access, and photographs of adjacent walls.
- Priorities: Bathing preference, storage needs, accessibility concerns, desired lighting, and fixtures that must remain.
- Inspiration: Tile, cabinetry, hardware, glass, and lighting references that show the atmosphere you want, rather than isolated products.
- Budget boundaries: A working investment range, with must-haves separated from optional upgrades.
Jennifer Gilmer Kitchen & Bath serves Washington, DC, Maryland, Virginia, and Delaware, with showrooms in Chevy Chase, Easton, and Ashburn. The firm supports bathroom projects through concept development, selections, drawings, layout planning, and installation coordination. For condo owners, that process helps resolve design and construction decisions before the building reviews the final package.
Visit Jennifer Gilmer Kitchen & Bath to discuss your condo bathroom renovation with a team that can coordinate space planning, material selections, and project details from concept through installation. Bring your building guidelines, measurements, and priorities to a showroom consultation in the Washington, DC, Maryland, Virginia, or Delaware area.