.avif)

You've finished a new bathroom, the ceramic tile is bright, the grout is crisp, and then the first cloudy film appears around the shower corners. A quick spray seems like the obvious answer, but the wrong cleaner can dull the glaze, weaken grout protection, or leave behind more residue than it removes.
Learning how to clean a ceramic tile shower starts with treating the room as a designed material system. The tile, grout, sealers, glass, fixtures, ventilation, and drainage all work together. A thoughtful routine preserves that system, rather than forcing you into repeated heavy scrubbing.
Table of Contents
Why Ceramic Tile Showers Need a Thoughtful Cleaning Approach
A ceramic tile shower is one of the most hardworking finished surfaces in a home. It handles constant moisture, soap, body oils, mineral-rich water, and temperature changes, often while displaying carefully selected tile proportions, grout colors, trim pieces, and patterns. Cleaning should preserve those decisions, not gradually erase them.
In a Washington-area bathroom, a pale handmade-look wall tile may be paired with a contrasting grout and a glass enclosure. The same room can look beautifully elegant when it's dry and carefully maintained, yet appear dull when soap film settles into the grout lines and water dries repeatedly on the surface. The solution usually isn't a stronger chemical. It's a better sequence: remove residue before it hardens, rinse completely, and dry the surfaces.

Preserve the original material choices
Glazed ceramic tile is durable, but durability doesn't make it immune to abrasion or chemical wear. Grout is more absorbent and vulnerable, particularly in corners, floor joints, and areas where water lingers. Repeated use of an unsuitable cleaner can affect sealers and leave the surface more likely to collect residue.
That's why thoughtful bathroom design includes maintenance in the conversation from the beginning. Jennifer Gilmer Kitchen & Bath considers how materials will perform in daily life, alongside layout, lighting, storage, and finish selection. Ventilation matters too, and the firm's guidance on bathroom ventilation requirements is a useful reminder that moisture control begins beyond the tile itself.
A few minutes of regular care can keep restoration work occasional rather than routine. The design remains easier to read, grout stays more consistent in color, and homeowners spend less time trying to recover a finish that was allowed to deteriorate.
Common Shower Tile Conditions and How to Tell Them Apart
The white or gray material on a shower surface isn't always the same problem. Identifying it first helps you choose a treatment that removes the buildup without attacking the tile, grout, or sealer.
Soap scum
Soap scum usually appears as a dull, slightly sticky or cloudy film on wall tile, glass, corners, and fixtures. It forms when soap ingredients combine with body oils and minerals in water. A neutral or mildly alkaline cleaner designed to dissolve soap film is the appropriate first response.
Limescale
Limescale is a harder, chalky deposit associated with hard water. It often gathers around faucets, shower controls, glass edges, and places where droplets dry repeatedly. A suitable acidic descaler can help with limescale on glazed ceramic or porcelain, but it shouldn't be used casually across every bathroom finish.
Grout haze
Grout haze is a cement-based film left after grouting or installation. It can look like general dullness, but it isn't ordinary shower dirt. Once the grout has cured, a sulfamic-acid cleaner may be appropriate for compatible ceramic or porcelain surfaces, following the product directions and protecting surrounding materials.
Efflorescence
Efflorescence appears as a powdery white deposit caused by moisture moving through cementitious material and carrying dissolved salts to the surface. It signals moisture-driven salt migration rather than a simple dirty tile. Applying a descaler without addressing the moisture path can leave the underlying issue unresolved.
Material judgment: A cleaner that works on mineral scale can be the wrong choice for grout haze or efflorescence.
These distinctions matter in high-quality installations, where textured tile, decorative trim, and carefully chosen grout may respond differently to abrasion or acids. If the deposit returns quickly, grout is cracking, or moisture appears behind or beneath the tile, stop escalating household cleaners and ask a tile professional to evaluate the assembly.
Routine Cleaning Steps for Ceramic Tile and Grout
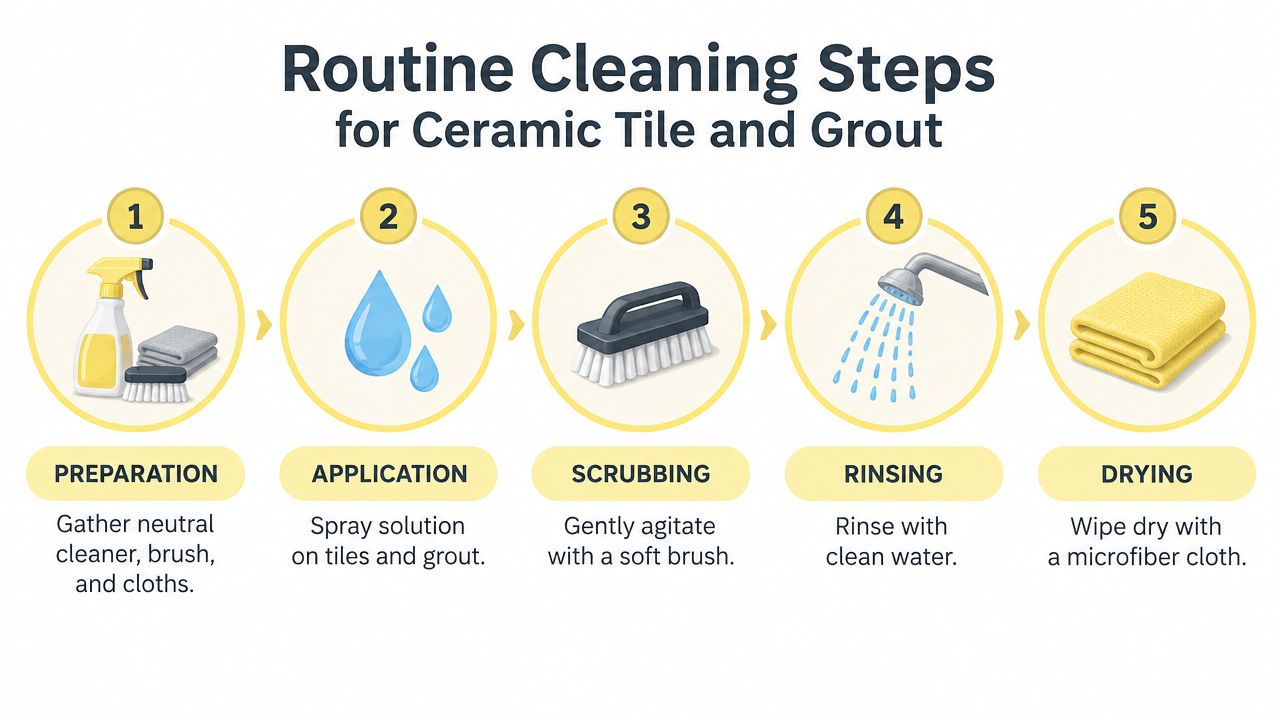
A reliable routine has two stages. First, loosen and dissolve the residue. Then agitate it gently, rinse away the suspended soil, and dry the surface so the residue doesn't settle again.
Start with a gentle two-stage method
Prepare the surface. Remove bottles and loose debris, then pre-wet the tile and grout with clean water. Pre-wetting helps prevent the cleaner from drying too quickly on porous grout.
Apply the cleaner. Use a pH-neutral or mildly alkaline cleaner formulated for shower soap film. Routine cleaner guidance favors products around pH 7 because repeated high- or low-pH use can break down grout sealers that protect against oils, dirt, and soap residue. Routine ceramic and porcelain tile maintenance guidance supports this approach.
Use the right tool. Work wall tile with a non-scratch sponge. Use a soft-bristle brush on floors and grout lines, where texture and joints hold more residue. Avoid stiff brushes on polished or delicate surfaces.
Rinse completely. Clean water removes both loosened soil and cleaner residue. Incomplete rinsing can leave a film that attracts fresh dirt.
Dry the finish. Use a microfiber cloth on tile, corners, fixtures, and glass edges. A squeegee is particularly useful on shower walls and glass after use.
For homeowners comparing floor patterns or grout widths during a renovation, choosing bathroom tile grout is a helpful design and maintenance consideration. More grout surface can mean more areas where residue collects, so the visual effect should be weighed against the care routine.
Treat stubborn grout selectively
For mold, mildew, or persistent grout-line staining, spray 3% hydrogen peroxide, allow it to dwell for about 5 minutes, then agitate with a grout brush or toothbrush. Rinse thoroughly and wipe dry with microfiber. This targeted shower-tile cleaning method is more controlled than repeatedly scrubbing the whole shower with an aggressive product.
Here's a visual walkthrough of the cleaning sequence:
Use the smallest effective treatment area. If discoloration persists after cleaning, the cause may be failed sealing, moisture intrusion, or damaged grout rather than surface soil. For broader bathroom care routines, homeowners may also find these affordable office cleaning guides useful as general organization references, though shower materials still require tile-specific judgment. Jennifer Gilmer Kitchen & Bath also provides porcelain tile for shower guidance for clients weighing finish, durability, and upkeep during design.
Safe Cleaning Choices and Products to Avoid
The safest routine is usually the least dramatic one. A pH-neutral shower or tile cleaner, soft tools, clear water, and prompt drying protect more finishes than a powerful product used repeatedly.
| Approach | Effect |
|---|---|
| pH-neutral cleaner around pH 7 | Suitable for regular ceramic and porcelain tile care, with less risk to grout sealers. |
| Mildly alkaline soap-scum cleaner | Useful when body oils and soap film are the main buildup. |
| Soft nylon brush or non-scratch sponge | Loosens residue without the unnecessary abrasion of harsh pads. |
| Targeted acidic descaler | Can address limescale on compatible glazed ceramic or porcelain, but requires careful use and thorough rinsing. |
| Vinegar as a routine cleaner | Not a good general choice for repeated shower cleaning because acids may affect grout, glaze, sealers, and nearby finishes. |
| Bleach or ammonia-heavy products | Can be harsh on grout and sealers, and shouldn't become the default answer to ordinary residue. |
| Abrasive powders and scouring pads | May scratch delicate surfaces and create a rougher finish that holds residue. |
The distinction between occasional targeted treatment and routine exposure is important. Vinegar may be reserved for compatible ceramic or porcelain limescale, but several tile-care references advise avoiding vinegar, bleach, ammonia, citrus acids, and abrasive powders for regular cleaning because acidic or highly alkaline products can damage grout, glaze, or sealers. This shower-cleaning guidance offers a practical summary of those cautions.
The product under your sink isn't automatically suitable for every finish in the room.
Never mix cleaning products. Test an unfamiliar product in an inconspicuous area, follow the manufacturer's instructions, protect metal fixtures and natural stone, and rinse thoroughly. If you're unsure whether the deposit is soap scum, scale, or grout haze, identification is safer than escalation.
Grout Sealing and Long-Term Maintenance Scheduling
A shower can look clean while moisture is reaching unprotected grout. Sealing helps protect the grout itself, so wet-area care should follow a schedule rather than wait for visible failure. That matters in high-end installations, where tile, grout color, texture, and drainage are selected as one material system, a design approach reflected in Jennifer Gilmer Kitchen & Bath projects.
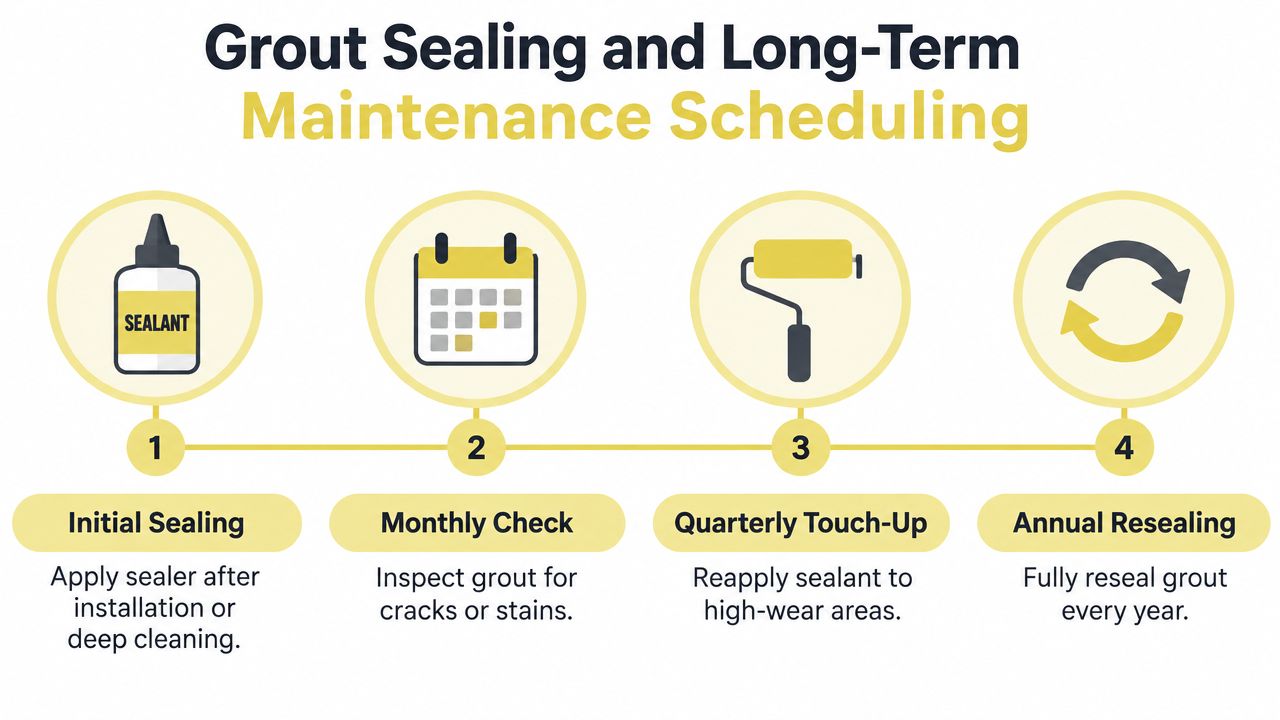
Industry-aligned guidance recommends resealing shower grout about every 6 to 12 months, while low-traffic tiled areas may wait 2 to 3 years. Unprotected grout in wet zones can begin to degrade within 12 to 18 months when routine sealing is skipped. Use the grout and sealer manufacturer's instructions as the final reference, since porosity, water exposure, and installation conditions vary.
A workable rhythm
- After use: Squeegee glass and tile where practical, then leave the enclosure open so moisture can escape.
- Weekly: Clean with the gentle two-stage method. A consistent routine can extend deep-cleaning intervals from about every 4 to 6 weeks to every 2 to 3 months in many moderately hard-water homes, according to this ceramic tile and grout cleaning guide.
- Every 2 weeks: Inspect corners, niches, floor grout, and fixture edges for residue or mildew.
- Monthly: Look for cracks, darkening, pinholes, loose caulk, and areas that remain damp.
- Every 6 to 12 months: Assess the sealer and reseal when water no longer beads on the grout.
Water conditions can shorten the interval. Areas with total dissolved solids above 180 mg/L may still require deep cleaning every 4 to 6 weeks, while soft-water homes may extend it to 8 to 12 weeks. Drying the enclosure remains the simplest preventive measure.
For broader material planning, compare shower care with bathroom flooring options, since flooring choices, grout coverage, texture, and drainage all affect upkeep.
Practical Bathroom Upkeep Checklist
A shower stays easier to maintain when care fits the household routine. Keep a squeegee and microfiber cloth nearby, use one gentle cleaner consistently, and inspect areas that are easy to miss.
- Weekly habits: Wipe ceramic tile, remove visible soap scum, and squeegee the glass and walls. This limits residue before it hardens.
- Every 2 weeks: Check corners, niches, floor grout, and fixture edges for buildup, mildew, or areas that stay damp.
- Monthly inspections: Look for cracks, loose caulk, darkening grout, failed sealer, and water that does not drain properly. These signs may indicate a repair issue rather than a cleaning problem.
- Deep-cleaning decisions: Identify the condition first. Soap scum responds to a different approach than limescale, grout haze, or efflorescence. Choosing the wrong treatment can spread residue or wear the surrounding finish.
- Seasonal planning: Check the calendar for the last grout-sealing date and schedule appropriate care. Use this grout maintenance guidance as a reference when planning the shower's maintenance.
- Professional attention: Contact a tile specialist when staining returns quickly, grout crumbles, cracks widen, moisture persists, or cleaning does not explain discoloration.

For bathroom renovations in Washington, DC, Maryland, Virginia, or Delaware, Jennifer Gilmer Kitchen & Bath coordinates tile, grout, layout, ventilation, storage, and installation details. Visit Jennifer Gilmer Kitchen & Bath to review materials with daily cleaning and long-term care in mind. Their showrooms in Chevy Chase, Easton, and Ashburn support practical material decisions.