.avif)
You're standing in a gutted primary bath with two porcelain samples in hand, trying to decide which one will still look right after years of daily showers. One has the quiet veining of marble. The other has a softly textured, stone-like finish. Both are attractive, but only one may be appropriate for the shower floor, and neither can protect the framing without the waterproofing system behind it.
That distinction is where good bathroom design begins. Porcelain tile for shower walls and floors is not a single product decision. It's a system involving the tile body, the surface finish, the grout, the slope, and the waterproofing layer beneath everything visible. Jennifer Gilmer Kitchen & Bath approaches these choices with the client experience in mind, from early material selections through installation coordination across Washington DC, Maryland, and Virginia.
Table of Contents
- The substrate creates a sound foundation
- The membrane is the actual water barrier
- The tile finish carries the design
Why Porcelain Has Become the Shower Standard

Porcelain keeps earning its place in primary bath renovations because it solves several homeowner concerns at once. It handles persistent moisture well, offers a broad design vocabulary, and asks less maintenance than many natural materials. It can also create a refined, architectural look without requiring the room to function like a museum.
The material's defining technical advantage is its water absorption of 0.5 percent or less, a threshold that places porcelain in the impervious category under standard classification systems. That low absorption reduces moisture wicking through the tile body during repeated exposure to shower water and steam. It doesn't make the entire shower waterproof, but it gives the visible surface a dense, durable foundation. Tile Pro Calculator explains the distinction between tile absorption and the waterproofing layer behind it.
Design flexibility without stone-level upkeep
Porcelain can reproduce the visual language of marble, limestone, concrete, slate, and wood with remarkable control over color and pattern. Color-body and through-body products can make small chips less conspicuous because the material's color continues into the tile rather than stopping at a thin decorative surface. Glazed porcelain expands the palette further, especially for walls, niches, and accent zones.
That flexibility matters in a carefully planned bath. A homeowner might choose a calm marble-look wall tile, then pair it with a small matte mosaic underfoot and a contrasting niche detail. The finished room feels layered, but every surface can be selected for its specific job.
Design rule: Choose the tile by location first, then by appearance. A beautiful wall finish isn't automatically a responsible shower-pan finish.
Where porcelain fits in the assembly
Porcelain is the wear surface. It takes the water, cleaning, foot traffic, and visual attention, but it isn't the barrier protecting studs and framing. Grout joints, corners, seams, and penetrations still need a properly installed waterproofing system.
That's why a porcelain specification should include three decisions: the tile body, the slip-rated finish, and the membrane behind it. If you're planning a bathroom renovation with Jennifer Gilmer Kitchen & Bath, those choices belong in the same conversation as layout, lighting, niche placement, and cabinetry, not as a last-minute tile-store selection.
What Makes Porcelain Different from Other Tile
Porcelain is defined by performance rather than by a color, style, or showroom label. Under ANSI A137.1, porcelain has a water absorption rate of 0.5 percent or less. That threshold is the reason designers commonly favor it for shower walls and floors exposed to constant moisture. DG Floors identifies the ANSI absorption threshold for porcelain tile.
A useful comparison is a sponge. Porcelain behaves more like a dense, closed-cell sponge, with very little room for water to move through its body. Standard ceramic is closer to an open-cell sponge. It may still work well in selected bathroom applications, particularly on walls, but its body is generally more receptive to moisture.
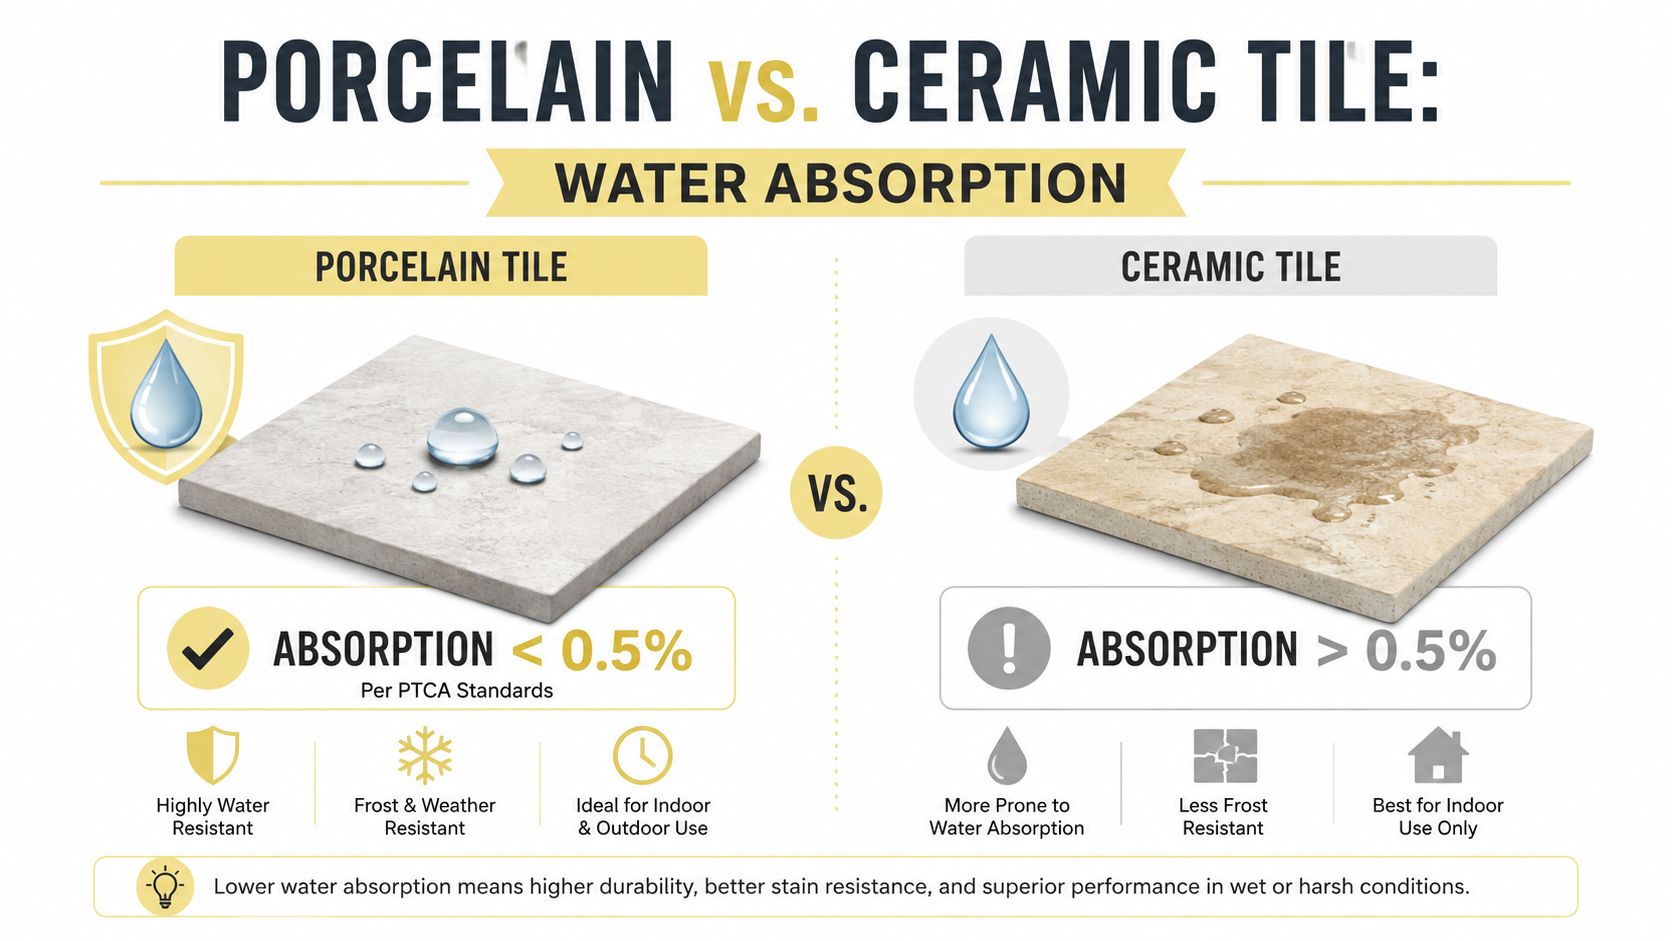
The density comes from finer clay blends and higher firing temperatures. Those manufacturing choices create a harder tile body, tighter color consistency, and a surface that generally withstands demanding residential use better than softer ceramic. The difference doesn't mean ceramic is a poor material. It means the tile should be matched to the exposure, location, and installation conditions. This wet-area classification guide places porcelain in the impervious category and distinguishes it from more absorbent tile bodies.
What low absorption does, and doesn't, do
Low absorption helps limit moisture migration through the tile itself. It can also reduce the conditions associated with moisture-related staining and deterioration, particularly when the rest of the assembly is correctly built. In an unheated bathroom, the dense body is also better suited to exposure where freeze-thaw conditions may matter.
It doesn't stop water at grout joints. It doesn't compensate for a poorly sloped pan. It doesn't seal a niche or protect a pipe penetration. Those responsibilities belong to the waterproofing system and the installer's workmanship.
The practical takeaway is simple: porcelain is a strong material for wet areas, but it isn't a complete wet-area strategy. Select it for the visible surface, then verify that the substrate, membrane, drainage, and finish are designed to work with it.
The Three Layers of a Shower Assembly
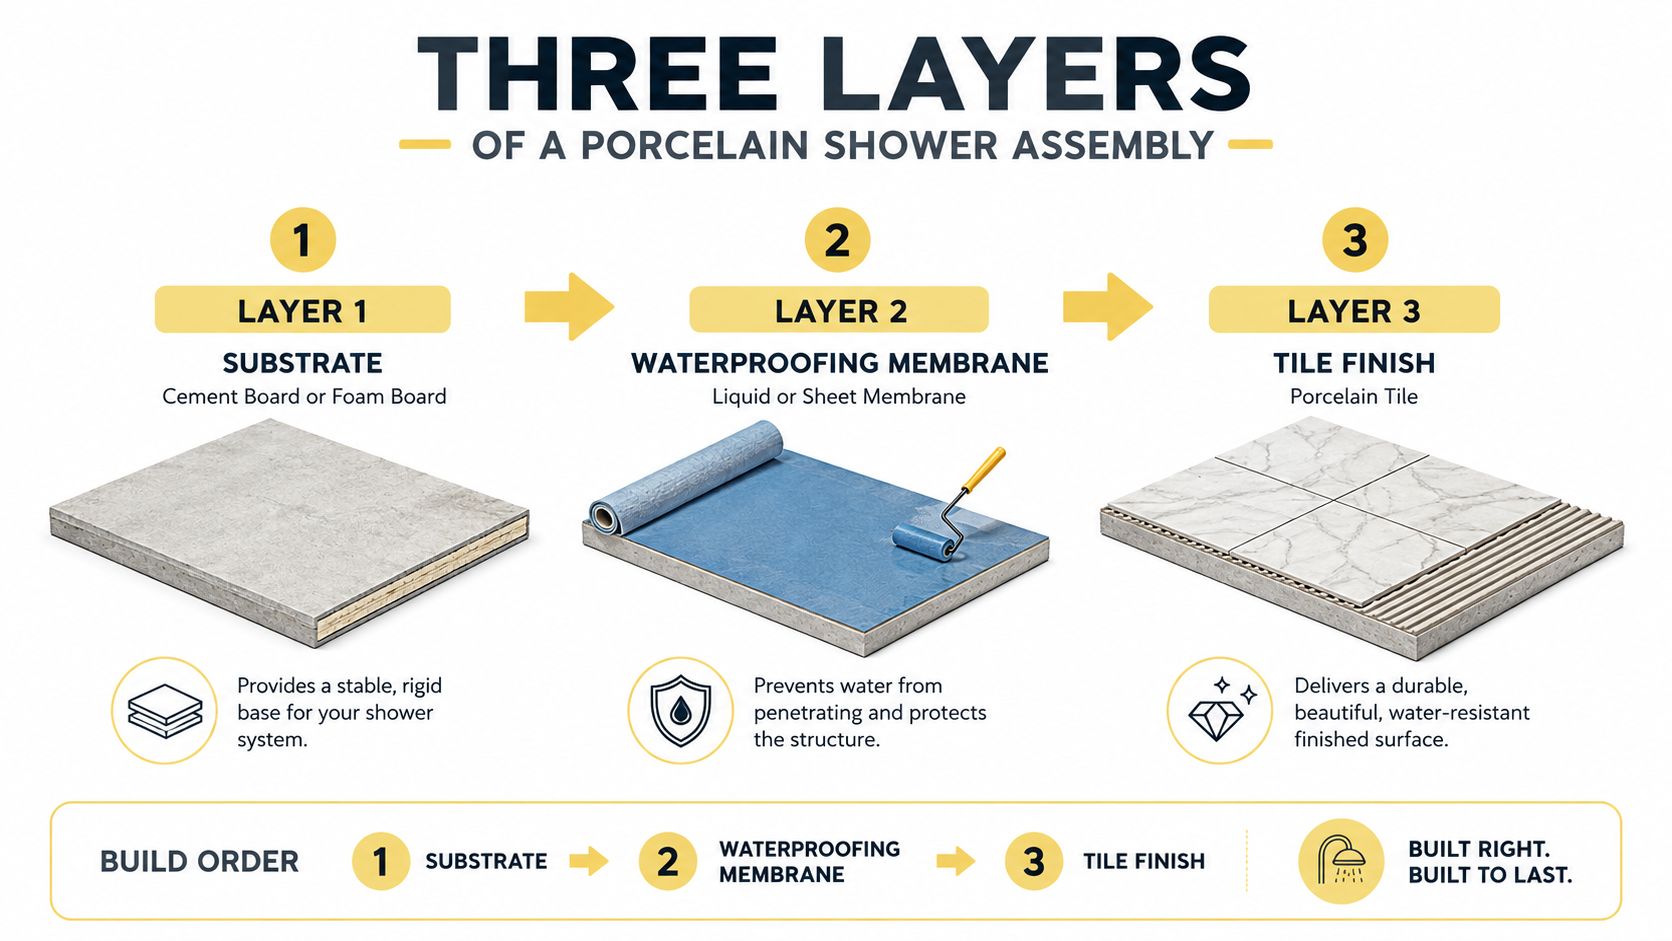
A porcelain shower performs well only when three layers do their separate jobs correctly. The substrate provides stability, the waterproofing layer protects the structure, and the tile finish creates the surface you see and touch.
The substrate creates a sound foundation
The substrate may be cement board or a foam panel such as Schluter Kerdi-Board, secured to rigid stud framing. Its purpose is to create a clean, stable plane for the waterproofing and tile installation. It shouldn't flex, crumble, or carry unresolved movement into the finish.
A shower wall can look perfectly straight from across the room while still containing small irregularities that create lippage, cracked grout, or uneven tile coverage. Skilled preparation protects the design intent before anyone sets the first piece of porcelain.
The membrane is the actual water barrier
The waterproofing layer may be a sheet membrane, a liquid-applied coating such as RedGard, or a foam panel with a bonded waterproof face. Schluter Kerdi systems and PVC pan liners are other familiar approaches, depending on the assembly and installer.
This is the layer many homeowners never see, yet it does the most important protective work. Water will eventually reach grout joints and movement joints. The membrane directs that moisture away from framing and toward the drain instead of allowing it to collect in the wall or floor structure.
The tile finish carries the design
Porcelain, grout, caulk, trim, and surface texture form the wear layer. They determine the shower's character, cleaning experience, and underfoot traction, but they don't replace the membrane.
Ask your contractor specific questions before work begins:
- Membrane: Which waterproofing product is being installed?
- Seams: How will corners, fastener points, and pipe penetrations be sealed?
- Curb and niche: How will these high-risk transitions be waterproofed?
- Drainage: How will the pan maintain slope toward the drain?
The most expensive tile in the room can't rescue a shower built without a reliable waterproofing plan.
Slip Resistance and the Numbers That Matter
A porcelain floor can be moisture-dense and still be unsafe under bare feet. Surface texture determines traction, especially when soap, water, and body oils are present. Polished and highly smooth finishes deserve particular scrutiny, even when their appearance is appealing.
For level interior surfaces expected to be walked on when wet, the critical baseline is a wet dynamic coefficient of friction, or DCOF, of at least 0.42. Tile Pro Calculator outlines the 0.42 wet DCOF benchmark and why tile absorption alone doesn't establish shower-floor safety.
Designers often look beyond that baseline for a shower pan. Shower-specific guidance commonly points toward 0.50 to 0.60 or higher, while some public-shower and comparable barefoot wet-area conditions distinguish 0.60 wet or higher. Treat those figures as use-case guidance, not as a substitute for the manufacturer's testing documentation.
DCOF and R-rating are not interchangeable
DCOF measures dynamic friction using a defined wet testing method. The R-rating system comes from German ramp testing and describes slip resistance under a different test approach. A tile's R-rating doesn't translate neatly into a DCOF value, so don't accept a single number without asking which method produced it.
| Rating System | Test Method | Minimum for Wet Shower Pan | Typical Spec for Residential Shower |
|---|---|---|---|
| DCOF | Wet dynamic friction testing, commonly referenced in American projects | At least 0.42 for the baseline wet interior threshold | Many designers target 0.50 to 0.60 or higher for barefoot shower zones |
| R-rating | Ramp testing under a separate European method | No direct DCOF conversion | Use the manufacturer's intended wet-area application and the applicable local guidance |
Ask for the product's wet DCOF data sheet and confirm the testing method, including ANSI A326.3 where that standard is cited by the manufacturer. If the sheet only describes the tile as “slip resistant,” keep looking.
For homeowners comparing additional treatment approaches, this resource on non slip coating for your bathroom tiles offers context on surface coatings. I still recommend selecting a tile manufactured and tested for the intended wet use rather than relying on a coating to correct an unsuitable finish.
Sizes and Formats for Shower Walls and Floors
Tile size changes more than the room's visual rhythm. It affects drainage, grout density, cutting, installation precision, and the ability of the surface to follow a sloped shower pan. The right format depends on whether the tile is underfoot or on the wall.
Small mosaics for the pan
Mosaics, often in compact formats such as 1x1 or 2x2 inches, remain my first choice for many shower floors. Their frequent grout joints break up the surface and provide additional texture underfoot. Small pieces also conform more easily to a sloped pan, reducing the risk of lippage and awkward cuts around a drain. Tile Pro Calculator discusses why shower-floor format must accommodate the required 1/4-inch-per-foot slope toward the drain.
The trade-off is more grout to clean. That's a worthwhile exchange when the shower needs reliable drainage and a forgiving surface, particularly in a curbless design or an aging-in-place plan.
Standard formats for adaptable layouts
Wall tiles from 4x4 through 12x24 offer a comfortable middle ground. They provide enough scale for a custom layout without demanding the extremely flat substrate and advanced handling that large panels require. Rectangular tiles can be stacked, offset, or installed vertically to influence how the room reads.
For homeowners comparing the broader palette of bathroom surfaces, Jennifer Gilmer Kitchen & Bath's guide to bathroom flooring options is a useful design reference.
Large panels for visual continuity
Large porcelain panels create a quieter, more continuous wall with fewer grout lines. They're well suited to modern baths, especially when a marble, concrete, or stone pattern needs room to read across the surface. They also reduce the number of joints where soap residue can collect.
Their demands are substantial. The substrate must be very flat, the setter must control lippage carefully, and penetrations for valves, shower heads, and niches require exact planning. I'm comfortable specifying large panels on walls, but I'm cautious about using oversized pieces on a sloped shower pan. Visual continuity should never outrank drainage or traction.
Grout and Waterproofing Choices That Age Well
A shower can fail visually before it fails structurally. Homeowners usually notice darkened grout, cracked corners, peeling caulk, or mildew around a niche long before they see evidence of a deeper waterproofing problem. Those surface details deserve the same planning attention as the porcelain itself.
Choose grout for the service conditions
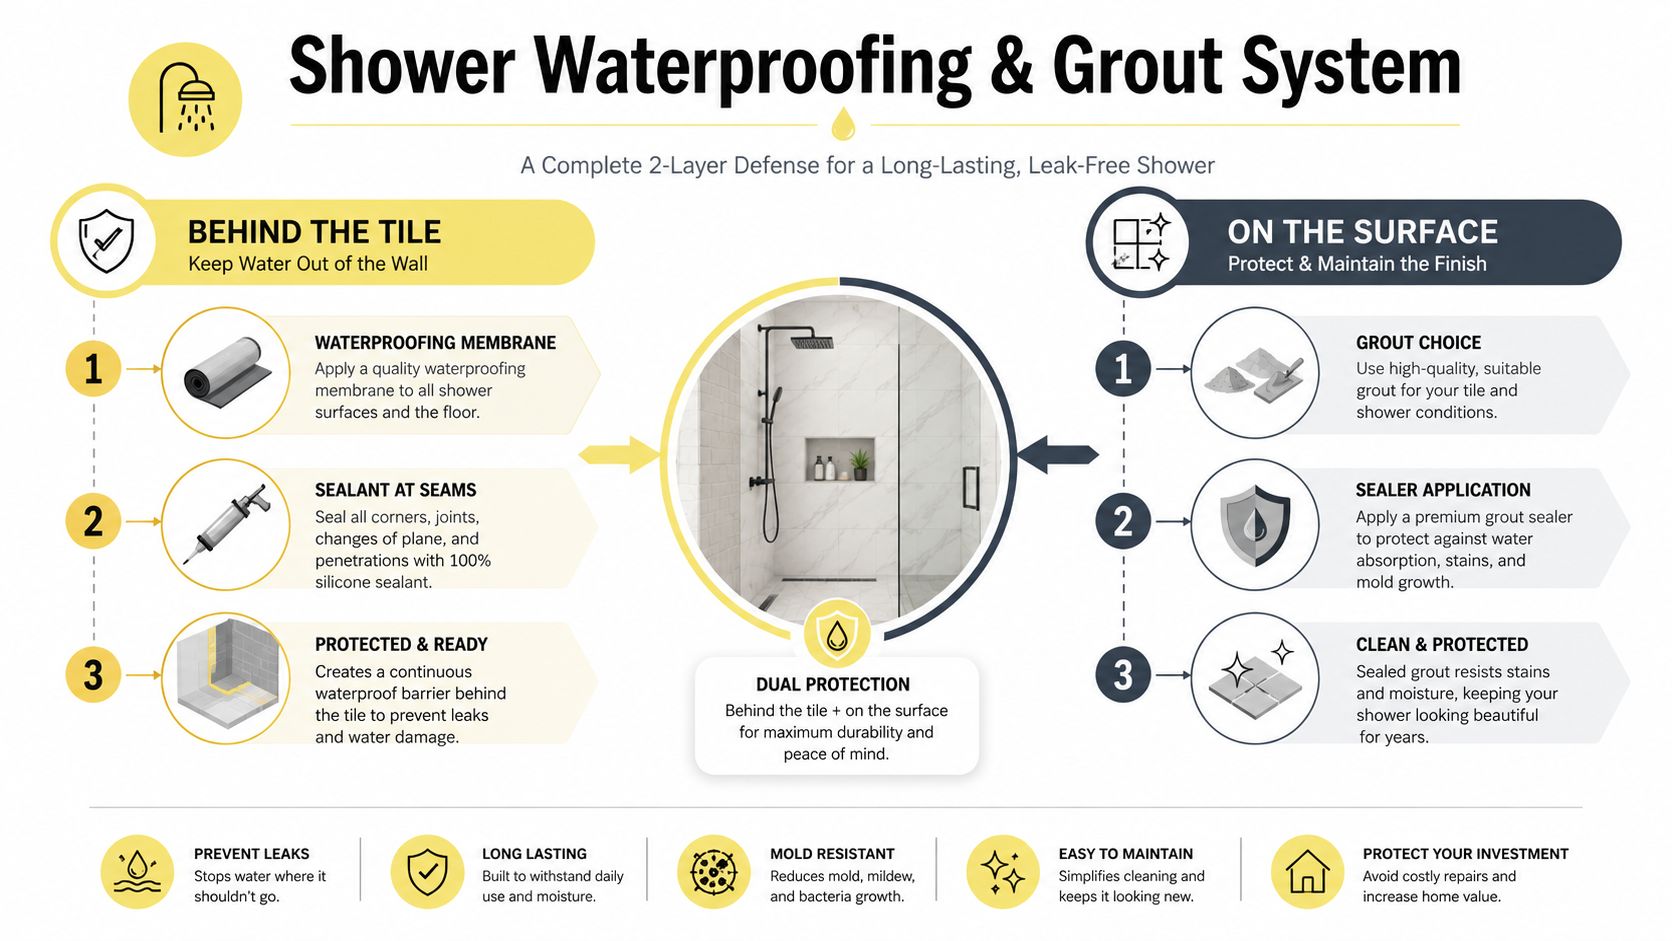
Cementitious grout remains common because it's familiar and comparatively accessible. In a shower, it should be sealed, but it can still absorb moisture, stain, and support mildew at the joint over time. Epoxy grout costs more and requires a careful installer, yet its nonporous and chemical-resistant surface makes it a strong choice for clients who want less staining and easier upkeep.
Grout width should follow the tile manufacturer's recommendation. Rectified porcelain often uses a narrower joint, commonly 1/8 inch, while pressed edges may call for 3/16 inch. Those dimensions are not universal rules. The tile's actual calibration, edge profile, and installation requirements control.
Treat corners as movement zones
Inside corners and the transitions where walls meet the ceiling need flexible sealant rather than rigid grout. Movement joints absorb small shifts that would otherwise show up as cracks. The same principle applies at changes of plane, around the curb, and at other transitions identified by the installation system.
Craftsmanship check: A clean grout line matters, but a properly detailed corner matters more.
Behind the tile, use a deliberate membrane system such as Schluter Kerdi, RedGard, or a PVC pan liner. Seam treatment at penetrations, corners, drains, curbs, and niches requires close attention because those locations interrupt the waterproofing plane. For broader context on moisture-conscious material choices, Eagle Restoration's building material guide provides a helpful reference.
A well-planned bathroom remodel should resolve these details before tile arrives. Jennifer Gilmer Kitchen & Bath's guide on how to plan a bathroom remodel is useful when coordinating layout, materials, lighting, and installation decisions as one project rather than a series of disconnected purchases.
Design Directions from Recent Client Projects
A representative Forest Hills primary bath illustrates how the best porcelain decisions come from the room's geometry and the client's daily habits. The homeowners wanted a walk-in shower that felt calm and modern, but they also wanted an assembly that would be easy to maintain and comfortable to use over time.
For the floor, the design team selected a warm 2×2 mosaic porcelain with a slip-rated finish that met a 0.60 DCOF target. The compact format was intentional. A curbless drain detail required the floor to follow a consistent slope, and the mosaic could conform to that plane more gracefully than a large slab.
The wall treatment took a different direction. Large-format 12x24 matte porcelain reduced grout lines and helped the shower's 36-square-foot interior read as a larger, calmer volume. A book-matched layout gave the marble-like pattern a sense of order without filling the room with competing visual breaks.
The niche became the focal point
The niche received a contrasting herringbone accent, a small but meaningful detail that anchored the eye and added craftsmanship at a practical storage zone. Carefully coordinated lighting brought out the variation in the wall tile while keeping the niche usable rather than purely decorative.
The material plan becomes a design plan. The floor needed traction and slope flexibility. The walls benefited from fewer joints and a quieter scale. The niche could carry a more intricate pattern because it wasn't exposed to the same underfoot demands.
Homeowners considering a similar combination can browse Jennifer Gilmer Kitchen & Bath's collection of bathroom tile design ideas for ways to balance field tile, accents, and layout.
Why the composition works
The project didn't rely on a single porcelain product to solve every problem. It used a slip-rated floor, a properly waterproofed assembly behind the finish, and a restrained grout pattern on the walls. The result feels polished because each choice supports the next one.
That approach suits the way Jennifer Gilmer Kitchen & Bath develops projects in the Washington DC area, Maryland, and Virginia. Material selections, lighting, storage, and installation coordination stay connected from concept through installation.
Caring for a Porcelain Shower Over Time
Porcelain itself is usually the easy part of shower care. The grout, silicone sealant, drain area, and waterproofing transitions need more attention because those joints and connections do the work that a solid tile face cannot.
Use a pH-neutral cleaner for regular maintenance. A squeegee after each shower removes water and soap residue before it dries along the grout lines and corners. This small routine protects the appearance of the finish without asking the tile to withstand aggressive cleaning chemicals.
Avoid acidic cleaners, bleach-heavy products, and abrasive pads. Acids can damage vulnerable grout and certain surface treatments, while harsh bleach use can create its own maintenance problems. Abrasive pads may dull or mark a matte finish, especially when used repeatedly.
Make the inspection practical
Set aside time for a visual inspection twice a year. Check the following areas:
- Silicone corners: Look for discoloration, peeling, gaps, or separation.
- Curb and threshold: Examine the sealant and transitions where water tends to sit.
- Changes of plane: Look for hairline cracks where walls meet walls, floors, or ceilings.
- Grout fields: Note persistent dark spots, crumbling joints, or cracks around fixtures.
- Drain area: Confirm that the drain and weep openings remain clear of hair and residue.
- Penetrations: Inspect around shower heads, valves, and other openings for failed sealant.
A small joint repair is far easier to manage than a concealed moisture problem. If caulk has pulled away at a corner, remove the failed material, allow the joint to dry, and have it resealed with a product appropriate for wet areas. Don't smear new caulk over a failing bead and expect a lasting repair.
Seasonally, refresh exposed penetrations and vulnerable caulk lines as needed. Follow the grout manufacturer's maintenance guidance if the installation uses cementitious grout, and keep a record of the tile, grout, sealant, and membrane products used in the renovation.
The durable-care principle is straightforward: porcelain provides the resilient face, but the joints and waterproofing details keep the shower performing. Choose the material carefully, inspect the connections routinely, and address small changes before they become construction problems.
Jennifer Gilmer Kitchen & Bath helps homeowners in Washington DC, Maryland, and Virginia plan porcelain shower assemblies with coordinated tile, layout, lighting, waterproofing details, and installation support from concept through completion. Visit Jennifer Gilmer Kitchen & Bath to begin a design consultation for a bathroom that balances safety, maintenance, and lasting style.