.avif)

You're standing in the middle of your kitchen with a tape measure, trying to answer what sounds like a simple question. How big should the island be? Then the complications appear. The refrigerator door needs room to open. Someone wants stools on one side. The dishwasher can't block the main path. Two people cook here most nights. Suddenly, island size isn't about one rectangle in the center of the room. It's about whether the whole kitchen will move well.
That's the point homeowners often miss when they search for standard island dimensions. There isn't one fixed size that works everywhere. A compact prep island can be perfectly right in one home, while a long seating island makes sense in another. The difference isn't taste alone. It's circulation, appliance placement, seating needs, and how many people use the room at once.
At Jennifer Gilmer Kitchen & Bath, that's how island planning is approached from the first sketch through installation. In homes across Washington DC, Maryland, and Virginia, the island is never treated as a standalone feature. It has to belong to the room. It has to support movement, daily rituals, and the cabinetry around it. Jennifer Gilmer, CKD, Nancy McCarren, AIA, LEED AP, and Marie-Josée Parisi all work from that same premise. Good proportions matter, but function comes first.
Table of Contents
- The five measurements that matter
- Where measurements are taken from
- Why these measurements control daily use
- Island Footprint Categories by Function
- How these categories feel in real life
- The category should follow the room
- The minimum isn't always the comfortable answer
- Where clearances usually fail
- A simple way to test viability
- Seating and appliance space need their own respect
- Prep first, then everything else
- Cooking changes the island's requirements
- Cleanup has a footprint too
- What makes seating feel comfortable
- Storage depth changes the equation
- Height affects more than looks
- A good design conversation sounds like this
- Quick room-fit logic
- How to read the tables
- Fast go-or-no-go checks
- Selection table for early layout conversations
Introduction to Standard Island Dimensions
A homeowner comes into a showroom with a clipping of a broad, furniture-like island and one clear wish: “I want this.” Then the floor plan comes out, and the conversation changes. If the room can't preserve proper circulation, the island that looked generous in a photograph may feel cramped in real life.
That's why standard island dimensions are better understood as ranges with consequences, not a single rule. One planning guide notes that there is no universal standard, and that current guidance still spans roughly 60 to 84 inches long and 30 to 42 inches deep, while many sources also describe common islands as 4 to 8 feet long and 2 to 4 feet deep. The more useful question is how size changes by function, from a compact prep surface around 24 by 48 inches to larger seating and storage formats such as 36 by 60 inches or 42 by 84 inches according to this kitchen island size overview.
That range explains why so many remodels stall at the island stage. People are often asking for a social center, extra drawers, a breakfast perch, and better prep space all in one piece. The room may support that. It may not.
What homeowners are usually trying to solve
The island question often stands in for several different problems at once:
- More prep space: The perimeter counters feel broken up or crowded.
- Better storage: Deep drawers are missing where they're needed most.
- Casual seating: The kitchen needs a place for coffee, homework, or a quick meal.
- Improved flow: The room feels busy, but not efficient.
A well-sized island doesn't just fit the room. It helps the room make sense.
In practice, this guide works best when you use it like a planning reference. Measure the room. Identify how you cook. Decide whether the island is primarily for prep, seating, storage, or a combination. Then test those goals against circulation before you choose stone, finish, or stool style.
A better way to think about the island
At Jennifer Gilmer Kitchen & Bath, an island is part of a circulation system. Its dimensions only make sense in relation to what surrounds it. That means cabinet runs, appliance doors, seated guests, and the daily movement between sink, refrigerator, and cooking area all shape the final size.
If you keep that framework in mind, the standard ranges become far less confusing. They stop feeling arbitrary and start becoming useful.
How Island Dimensions Are Measured and Defined
The easiest way to get lost in kitchen planning is to use one word, “size,” for several different measurements. Length, depth, height, overhang, and clearance all describe different things. If those terms aren't separated, two people can discuss the same island and mean entirely different dimensions.
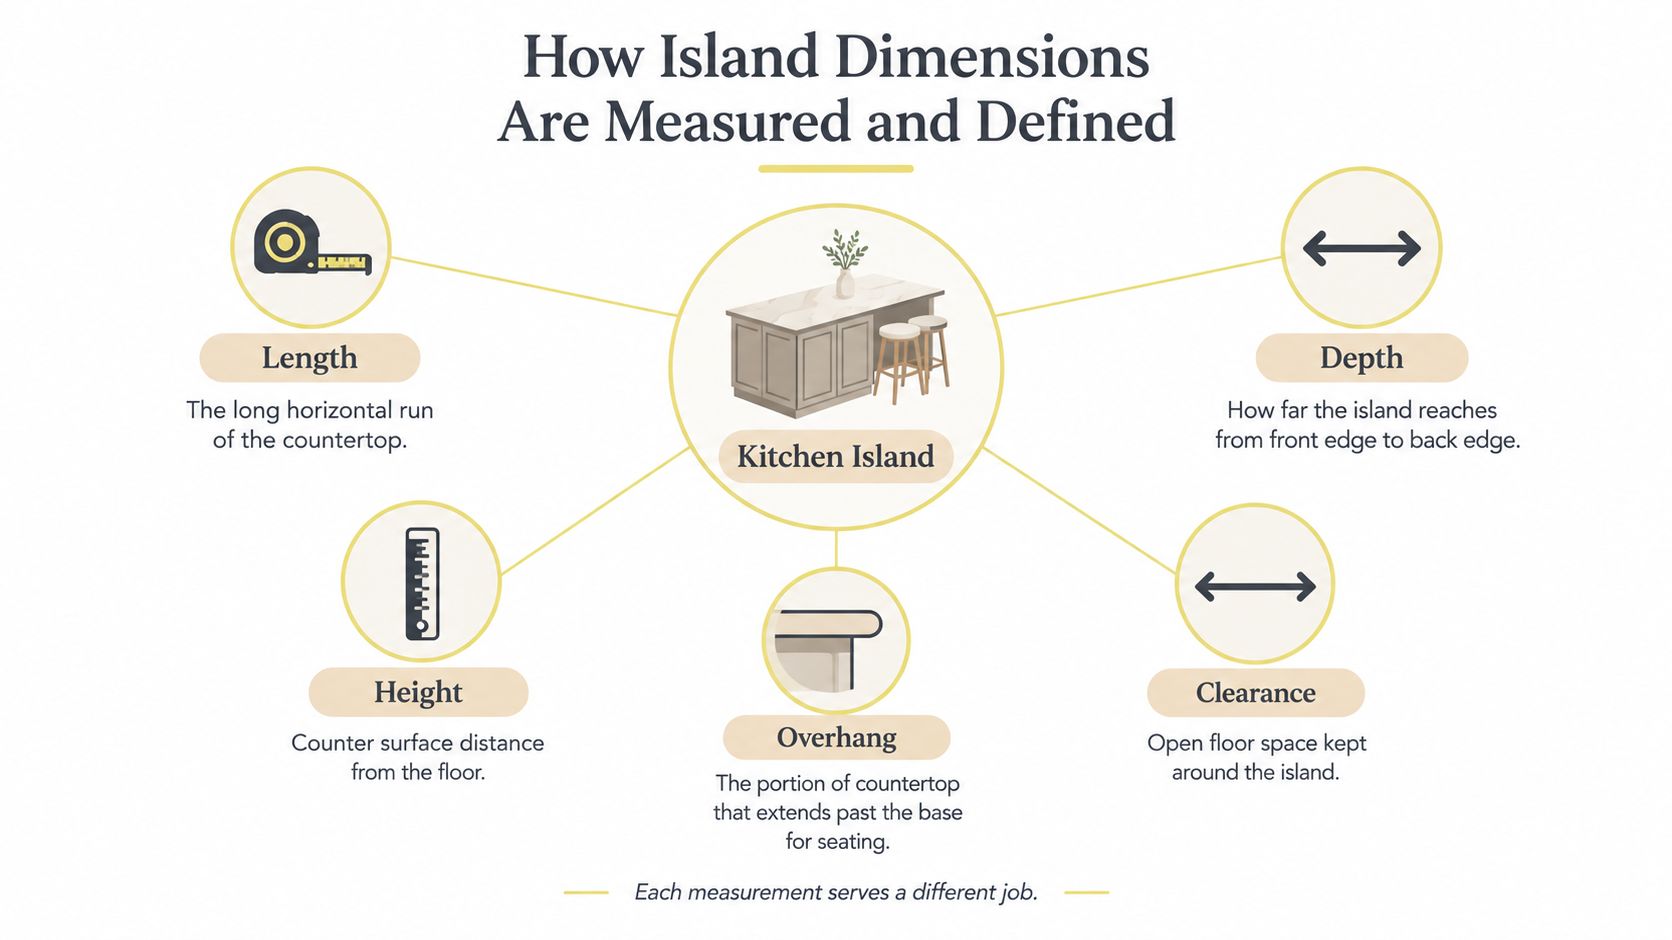
The five measurements that matter
Here's how designers read an island.
- Length: This is the long horizontal run of the island, end to end. It affects how much uninterrupted workspace you have and whether there's room for drawers, seating, or both.
- Depth: This is the front-to-back measurement. It helps determine whether the island can hold storage on one side, seating on the other, or just a simple prep surface.
- Height: This is measured from the finished floor to the countertop surface. In kitchen planning, 36 inches is the standard counter height used for islands that align with surrounding countertops, as reflected in Jennifer Gilmer Kitchen & Bath's own guidance on standard kitchen island height.
- Overhang: This is the part of the countertop that extends past the base cabinet. It's what creates room for knees and stools.
- Clearance: This is the open floor space around the island. It determines whether the island works comfortably once people, doors, and movement enter the picture.
Where measurements are taken from
Many planning mistakes begin. Island dimensions aren't measured from whatever edge happens to be easiest. They need to be measured consistently.
For the island itself, length and depth are taken across the countertop footprint or the intended cabinet module, depending on the stage of planning. For aisle planning, the measurement is taken between opposing surfaces that shape movement. That often means counter frontage to counter frontage, or appliance face to island edge when a refrigerator, oven, or dishwasher projects into the aisle.
Practical rule: If a door swings into the aisle, measure to the appliance face, not just the cabinet line behind it.
Why these measurements control daily use
A long island with shallow depth behaves differently from a shorter island with deeper storage. A standard-height island feels right for prep work, but seating comfort depends on more than height alone. The overhang, base depth, and stool style all affect whether someone can sit there for ten minutes or an hour.
When clients visit the Chevy Chase, Easton, or Ashburn showrooms, this vocabulary helps turn general preferences into clear decisions. “We want an island with seating” becomes a more precise conversation: seating for how many, on which side, with what kind of legroom, and with how much workspace left over.
That precision saves time. It also prevents the common problem of falling in love with a dimension before understanding what that dimension controls.
Standard Island Size Ranges by Category
A useful island isn't defined by whether it meets a mythical standard. It's defined by what it needs to do. The footprint for a prep-only island won't be the right footprint for an island that needs seating, drawers, and a generous serving surface.
One practical planning guide places the lower bound for a compact island at 48 inches by 24 inches, while noting that once seating, a sink, or a cooktop is added, the island typically expands to about 6 feet by 3 feet or larger to maintain function and circulation in this island layout guide. Another guide describes a practical minimum island footprint as 48 inches long by 24 inches deep, with a more usable residential sweet spot around 36 to 42 inches deep and 6 to 7 feet long, a range that can support drawers, prep space, and seating for about two to three stools in this kitchen island clearance guide.
Island Footprint Categories by Function
| Category | Typical Footprint | Best Use | Seating |
|---|---|---|---|
| Compact prep island | 48 x 24 inches | Extra work surface in a smaller kitchen | Usually none |
| Mid-size working island | 36 x 60 inches | Prep, drawers, and modest storage | Often limited or partial seating |
| Full multi-use island | 6 to 7 feet long and 36 to 42 inches deep | Prep, storage, and everyday gathering | About two to three stools |
| Larger seating-focused island | 72 x 36 inches or 42 x 84 inches | Social seating and broader counter presence | Works best when the room is generous |
How these categories feel in real life
A 48 by 24 inch island is often enough to create a useful landing zone in a kitchen that otherwise lacks uninterrupted counter space. It can hold a tray of groceries, support a baking task, or provide a focused prep station. What it usually can't do is carry the weight of too many expectations at once.
A 72 by 36 inch island behaves differently. It begins to support a more layered life. There's room for a broader prep area, better drawer organization, and a more natural place for a couple of stools. But that only works if the room around it stays open and easy.
The category should follow the room
The temptation is to start at the largest island the eye finds attractive. The wiser move is to start with the kitchen's actual role. In some homes, the island is the center of family life. In others, it's a quiet working surface that shouldn't dominate the room.
For readers comparing regional remodel ideas, some planning principles in kitchen remodeling for Houston homeowners echo the same lesson. Large islands succeed when the surrounding layout supports them, not because the dimensions look desirable on paper.
Clearance Requirements Around Kitchen Islands
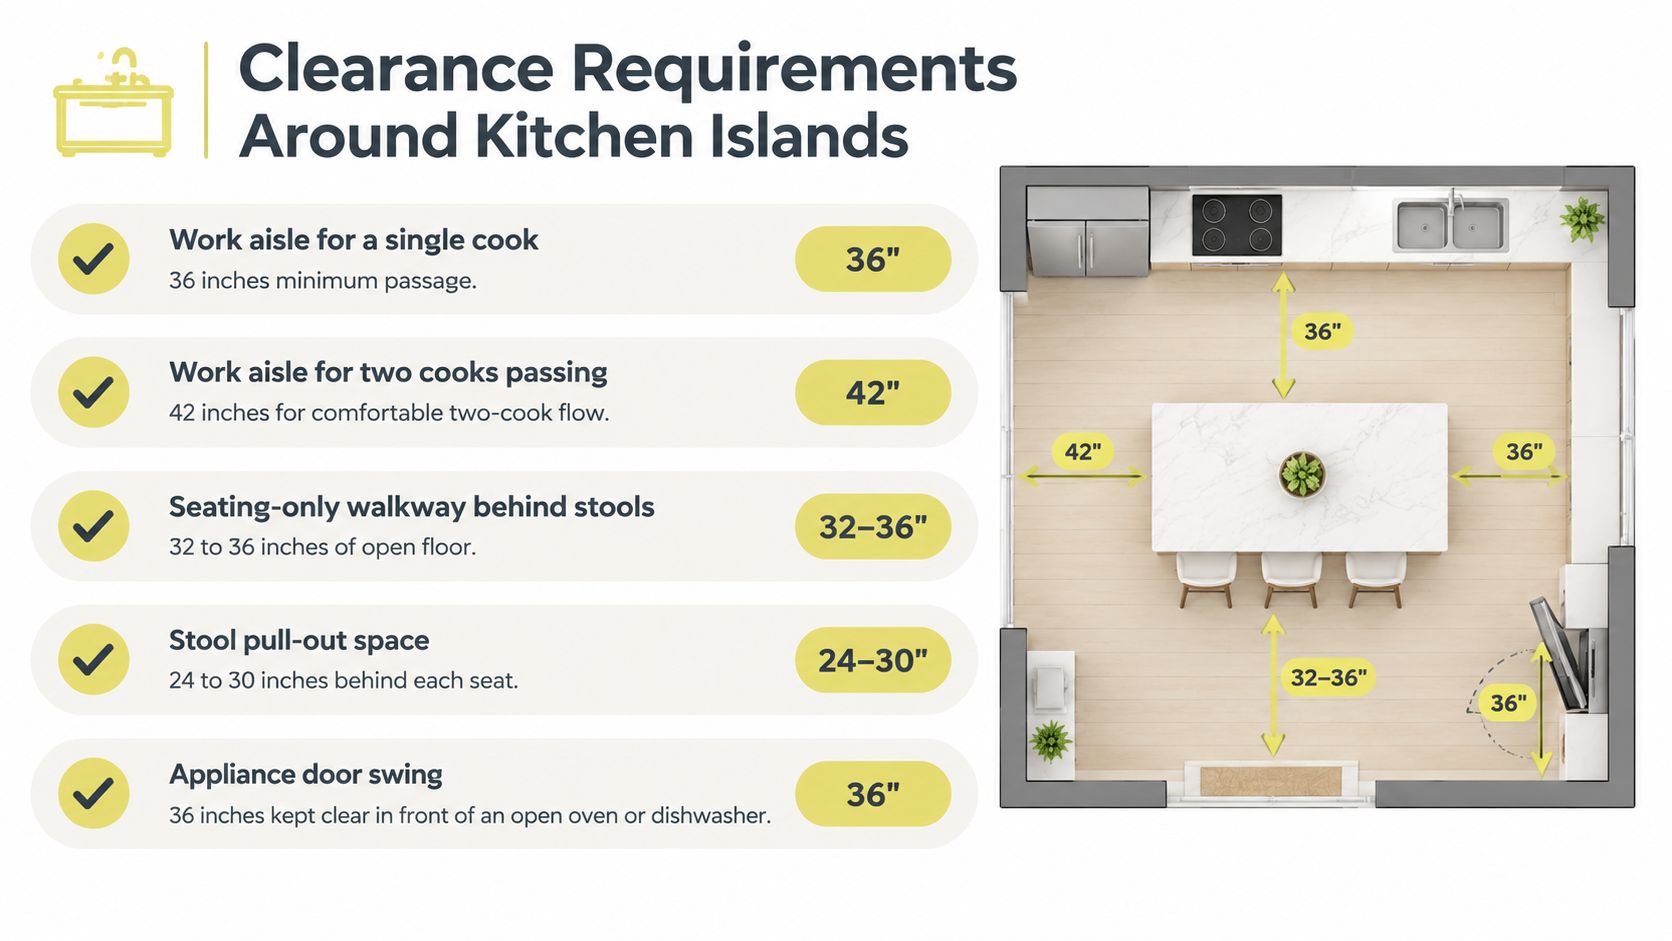
Most island mistakes aren't really size mistakes. They're clearance mistakes. An island can be beautifully proportioned on its own and still make the kitchen feel tight, awkward, or frustrating if the surrounding aisles are undersized.
Modern kitchen planning commonly treats 36 inches as the minimum walkway clearance around an island, 42 inches as the minimum work aisle for one cook, and 48 inches for two cooks. Some guides also specify 44 inches behind seating and 48 inches across from an appliance door to preserve circulation and safe use in this island clearance reference.
The minimum isn't always the comfortable answer
A 36-inch passage can work as a basic route around the island. It lets someone pass through. It does not always let someone pass comfortably while another person unloads groceries, opens a dishwasher, or stands at the counter.
NKBA guidance, which many designers use as a benchmark, recommends a minimum 42-inch work aisle for a single cook and 48 inches for multiple cooks, measured between opposing counter frontages, appliance faces, or tall cabinet faces. It also notes that 36 inches is the common minimum passage width around an island for circulation in the NKBA kitchen planning guidelines.
Where clearances usually fail
The pressure points are predictable.
- Dishwasher drop zone: Open the dishwasher and suddenly the aisle disappears.
- Refrigerator access: One person is choosing ingredients while another tries to pass behind.
- Seating overlap: Stools look fine tucked in, but once occupied they project into the main traffic path.
- Range or oven conflict: Heat, door swing, and foot traffic compete in one narrow zone.
If you need to choose between a larger island and better circulation, choose circulation.
A simple way to test viability
Take the island dimensions you like and test them against the room with painter's tape on the floor. Then act out the kitchen. Open the refrigerator. Stand where the dishwasher would be. Pull a stool back. Walk through while someone else pretends to cook.
This kind of rehearsal often answers the question faster than a rendering.
For a deeper explanation of aisle widths and door-swing conflicts, Jennifer Gilmer Kitchen & Bath has also published guidance on kitchen island clearances.
Seating and appliance space need their own respect
The most overlooked clearance isn't usually at the prep side. It's behind the seating side, especially in open kitchens where the island doubles as both breakfast perch and passage route. If traffic passes behind stools, the space has to feel usable when people are seated, not just when the chairs are tucked in.
That's why the circulation system matters more than the island footprint in isolation. In many remodels, the right answer is not “How large can the island be?” It's “How large can it be while the kitchen still works gracefully?”
Work Zones and Appliance Relationships That Shape Island Size
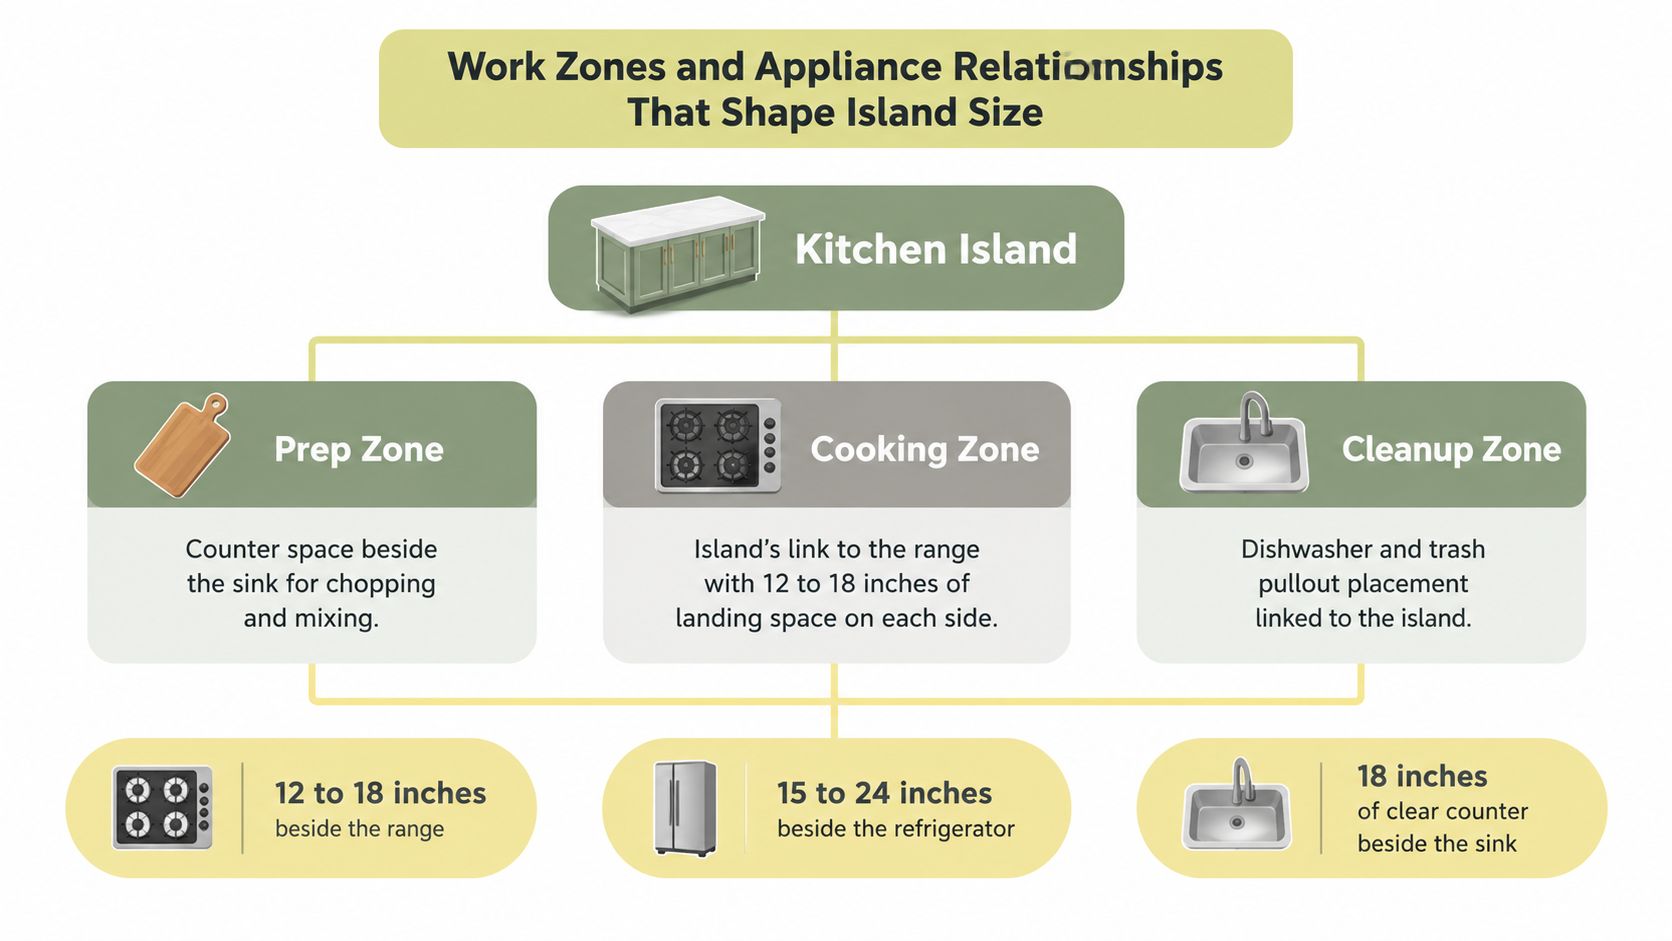
A kitchen island earns its place by improving movement between tasks. If it interrupts prep, cooking, or cleanup, it's oversized, misplaced, or carrying the wrong function.
Prep first, then everything else
In many kitchens, the island works best as the primary prep zone. That usually means keeping a broad section of countertop clear enough for chopping, mixing, plating, and setting down groceries. When a prep sink is included, the island often needs more depth and more disciplined organization so that the usable work surface doesn't shrink too much.
The refrigerator relationship matters here. If cold storage is across a comfortable route from the island, prep feels easy. If the refrigerator door opens into the same path where another person stands at the island, the kitchen starts to jam.
Cooking changes the island's requirements
An island with a cooktop becomes a different object entirely. It needs landing space, visual order, and close attention to ventilation and cleanup. It also changes how people gather around it. A social island can welcome guests on the far side. A cooking island asks those same guests to share space with heat, utensils, and active work.
Some homeowners love that energy. Others discover that they'd rather keep the island free for prep and serving, while the main cooking zone stays on the perimeter.
Cleanup has a footprint too
The cleanup zone often determines whether the island feels calm or cluttered. If the dishwasher, trash pullout, sink, and daily dish traffic all gather in one compressed stretch, the island can become a bottleneck. If those elements are arranged so one person can clear and rinse while another still uses the prep surface, the whole room feels better.
A helpful way to evaluate these relationships is to ask a few direct questions:
- Where do groceries land first? If the answer is the island, keep enough uninterrupted counter free for that task.
- Where does chopping happen most often? That surface should be near water and storage for knives, bowls, and cutting boards.
- Can someone unload the dishwasher without blocking prep? If not, the island may need to shift or simplify.
- Will guests gather at the island while someone cooks? If yes, separate the social edge from the busiest appliance path.
The island should shorten movements between tasks, not add an obstacle in the middle of them.
For readers exploring more layout-specific examples, Jennifer Gilmer Kitchen & Bath has a useful piece on custom design kitchen islands that looks at how islands support different kitchen plans.
Seating Overhangs Storage and Height Considerations
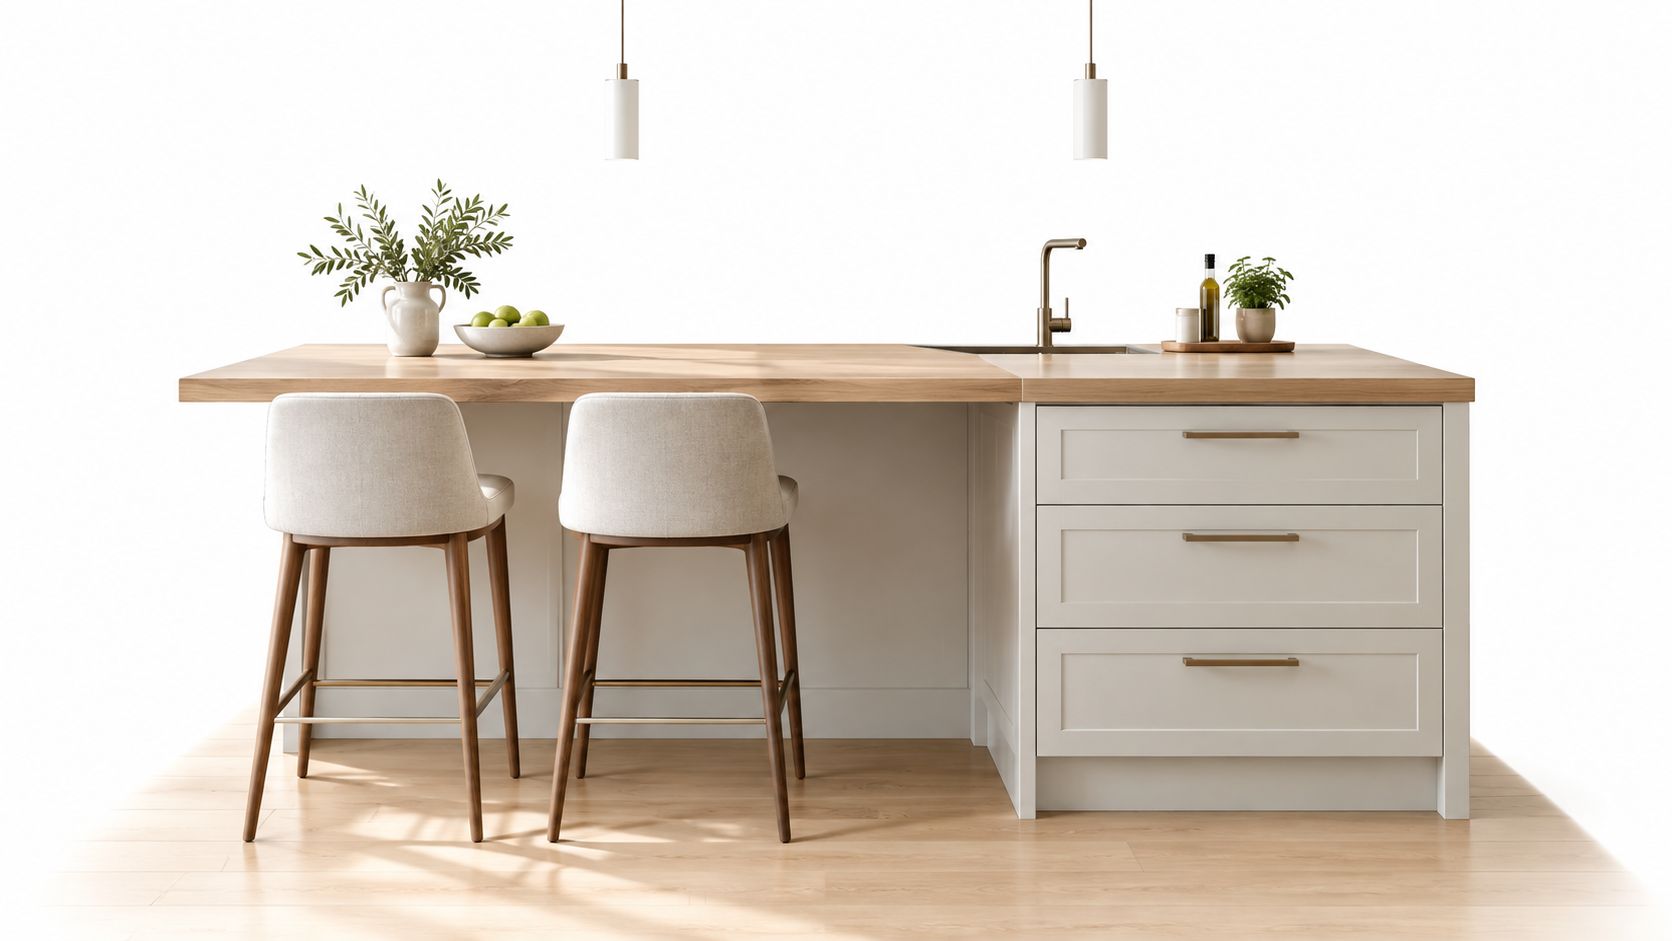
Once the footprint is roughly right, comfort takes over. Many islands that “fit” on paper still disappoint in daily life. Seating, overhang, drawer depth, and island height need to work together, not compete.
What makes seating feel comfortable
A seating edge has to do more than hold stools. It needs enough countertop extension for knees, enough width for each place setting, and enough room behind the diner so the rest of the kitchen can continue to function.
In practice, homeowners often find that a two-stool arrangement feels more relaxed than trying to squeeze in a third seat on a shorter island. The room around the island tends to decide that for you. If the cabinetry side also needs deep drawers, the island depth must support both storage and seated use without making the piece feel bulky.
Storage depth changes the equation
Deep drawers are one of the most valuable reasons to add an island. They can hold cookware, small appliances, serving pieces, or baking tools exactly where they're needed. But storage isn't neutral. The more the cabinet base becomes, the more carefully the seating side must be handled so the island doesn't become too deep for the room.
One widely cited design guide notes that a functional island is typically at least 24 by 36 inches, while more generous residential islands commonly land around 36 by 60 inches. It also notes that larger formats such as 42 by 84 inches are better reserved for rooms that can support them in this Reico planning article.
Height affects more than looks
Counter-height islands remain the most practical choice for prep because they align with surrounding work surfaces. Yet height also shapes the social feel of the island. A standard-height surface feels integrated and easy to use. Lower accessible work areas can be appropriate for households planning for long-term comfort, especially where seated use or wheelchair access matters.
Some accessibility-focused guidance also calls for 60 inches of turning space and lower work surfaces around 34 inches high with knee clearance when mobility needs are part of the brief in this accessibility and island planning discussion.
If you'd like a visual refresher on how seating and height work together, this short video is a useful companion:
A good design conversation sounds like this
When Jennifer Gilmer, CKD or Nancy McCarren, AIA, LEED AP refines an island with a client, the discussion usually moves beyond “How many stools?” It becomes more specific.
- How long will people sit here? Quick coffee seating is different from nightly meals.
- What needs to live inside the island? Pots and pans require a different drawer strategy than linens or serving ware.
- Who needs the surface to feel easy to use? Height and access should suit the household, not a showroom ideal.
Those are the details that turn a correctly sized island into one that supports daily life.
Quick Reference Tables for Room Fit and Layout Planning
A kitchen can have an island that looks perfectly sized on paper and still feel awkward once people start moving through it. That usually happens when the island is treated as a block of cabinetry instead of part of a circulation system. The room has to carry several things at once: prep routes, appliance door swings, stool pull-back, and the simple act of two people passing each other without turning sideways.
That is why quick-reference tables work best as fit checks, not shopping lists. Earlier size ranges are useful, but the better question here is how the island and the room behave together.
Quick room-fit logic
Start with the room shape, then test the traffic paths around the island. A narrow kitchen often improves with a smaller prep island because every added inch comes out of the walking and working space around it. In a more open plan, a longer island may fit comfortably, but only if it does not become the default hallway between the refrigerator, pantry, and adjacent rooms.
A good island works like a roundabout. It directs movement calmly instead of forcing everyone into the same lane.
| Layout Situation | Island Direction | Likely Best Starting Point | Watch For |
|---|---|---|---|
| Narrow galley-like room | Keep island compact | Prep-focused footprint around 48 x 24 inches | Tight aisles and appliance-door conflicts |
| L-shaped kitchen with open center | Moderate length | Working island around 36 x 60 inches | Congestion at the corner and dishwasher interference |
| Open-plan kitchen with broad circulation | Longer island possible | Lengths around 6 to 7 feet, with 36 to 42 inches depth | Too much seating, or an island that feels visually heavy |
| Large entertaining kitchen | Full multi-use island | Larger island around 42 x 84 inches | Oversizing the island until it controls the room |
How to read the tables
Use these dimensions the way a designer uses a sketch overlay. They help you test proportion before you commit to cabinet runs, appliance panels, and countertop slabs.
The same island length can perform very differently in two similar rooms. One plan may have a clean path from sink to refrigerator and clear space behind the seating side. Another may place that same island in the middle of a cleanup route, where every open dishwasher door interrupts movement. The measurement stays the same. The function changes.
That distinction matters in family kitchens and even more in homes with multiple cooks.
Fast go-or-no-go checks
These checks are useful during plan review because they turn abstract dimensions into lived space.
- Tape the island on the floor. The outline shows proportion faster than a dimension string on a drawing.
- Walk the appliance paths. Open the refrigerator, dishwasher, or oven area in your mind and picture someone passing behind.
- Test the stool zone. A seating edge needs room for a person to sit, push back, and let someone walk through without friction.
- Protect the work side first. If the island has to shrink to keep prep and cleanup paths comfortable, shrinking it usually improves the whole room.
A slightly shorter island often gives the kitchen a calmer rhythm.
Selection table for early layout conversations
| Primary Goal | Better Island Direction | Why |
|---|---|---|
| Extra prep space only | Smaller, simpler footprint | Preserves circulation and keeps the center of the room open |
| Prep plus storage | Mid-size island with practical cabinet depth | Adds useful drawers without forcing unnecessary seating |
| Social seating plus prep | Longer island with clear zoning | Gives stools a place to land without crowding the work area |
| Multi-cook kitchen | Island sized around distinct routes | Helps two people work without crossing into each other's lane |
| Accessible use | Simplified footprint with broader surrounding space | Turning and approach space around the island matter as much as the island size |
In Jennifer Gilmer Kitchen & Bath projects, this stage often settles the plan more than any single width or length recommendation. Homeowners usually start by asking how large the island can be. The more helpful question is how much room the island should leave behind for the kitchen to work well every day.
Cross References Related Concepts and Next Steps
By the time the island dimensions feel settled, the kitchen still isn't fully resolved. Several connected decisions need to be checked before cabinetry is finalized. The island sits at the center of those choices, but it doesn't answer them by itself.
What to verify next
A strong island plan should prompt a second round of questions.
- Storage strategy: Does the island need deep drawers, tray storage, bookcase ends, or support from nearby custom pantry cabinets?
- Lighting and electrical: Pendant placement, outlet access, and task lighting all affect how the island is used after dark.
- Ventilation: If a cooktop is going on the island, the ventilation strategy needs to be addressed early, not as a finishing detail.
- Accessibility: Households planning for long-term use may need lower work surfaces, easier approach zones, or broader turning space.
- Material scale: The island dimensions should also make sense with the selected countertop material and seam planning.
Why this stage matters
A measured concept becomes a buildable kitchen. Cabinet depth, stool placement, panel details, drawer configuration, appliance selection, and lighting all start interacting. An island that looked settled in plan can still change once storage priorities become clearer or once a family realizes they'd rather have a cleaner prep surface than one more seat.
For homeowners comparing broader planning ideas, discussions around kitchen efficiency for Chicago homes can be helpful because they connect layout decisions to the way people move through and use the room. The principle holds across regions. Efficiency isn't abstract. It's built into clear paths, useful surfaces, and sensible adjacencies.
How the process comes together
Jennifer Gilmer Kitchen & Bath handles projects from concept through installation, which matters on a subject like this. Island dimensions are never just drafting decisions. They affect cabinetry design, appliance integration, finish selections, electrical planning, and the final feel of the room. In a well-run process, those decisions are coordinated rather than patched together later.
If you want to continue the research side before a consultation, portfolio examples and The Kitchen Bible can help sharpen your preferences. But the most valuable next step is usually a measured plan review with your actual room conditions in front of you. That's when standard ranges stop being abstract and start becoming specific to your home.
If you're weighing standard island dimensions for a home in Washington DC, Maryland, or Virginia, Jennifer Gilmer Kitchen & Bath can help you test the footprint against circulation, cabinetry, seating, and appliance placement before the design is finalized. The firm works from concept through installation, with showroom support in Chevy Chase, Easton, and Ashburn. Visit Jennifer Gilmer Kitchen & Bath to explore the process and start shaping an island that fits the way your kitchen lives.